Where we learn technology

Year: 2019 (Page 1 of 2)

Setup Jenkins with Docker on Mac

Setup Jenkins with Docker on Mac

Environment

OS: macOS High Sierra 10.13

Download Docker for Mac

Create Docker ID

You need to go to https://www.docker.com/ to create you own docker id.

Download Jenkins CI with blue ocean plugin.

Follow the installation instructions to install the jenkinsci/blueocean Docker container. And do remember to launch the Docker.app after installation as launching the application is a necessary step to get the Docker daemon run.

Start the Jenkins CI container

$ docker run -u root --rm -d -p 8080:8080 -p 50000:50000 -v jenkins-data:/var/jenkins_home -v /var/run/docker.sock:/var/run/docker.sock jenkinsci/blueocean

Command options

--rm 
is to remove the docker container after it is shut down.

-d 
is to let jenkinsci container run in background and silent the output rather than print out in terminal console. Recommend not to add this option, because usually you want to check the output from terminal console, e.g. the initial password. 

-p 8080:8080 
is the to map the port number for host machine and docker container respectively.

-p 50000:50000 
is for the JNLP based Jenkins master-slave configurations. JNLP-based Jenkins agents communicate with the Jenkins master through TCP port 50000 by default.

-v jenkins-data:/var/jenkins_home 
is to map the /var/jenkins_home directory in the container to the Docker volume with the name jenkins-data, this option is to ask Jenkins to persist state for instance restarts. -v /var/run/docker.sock:/var/run/docker.sock, this option is to allow jenkins ci container to communicate with docker daemon.  jenkinsci/blueocean is the jenkinsci image with blueocean plugin, specifying this option will automatically pull any updates.  

Possibile errors

docker: Cannot connect to the Docker daemon at unix:///var/run/docker.sock. Is the docker daemon running?.

See 'docker run --help'.
This error is because the Docker daemon is not started yet. On MacOS, you need to manually start the Docker.app in order to let the docker daemon start.

Open the Jenkins landing page

Browse http://localhost:8080/ , you will see below page.
Screen Shot 2018-04-15 at 11.24.19
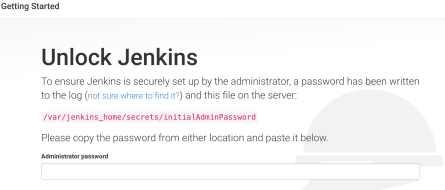
Find the password from console output and paste it above input box to continue.
If you suddenly lost your initial password from the console output. You can use below command to get it back. Also, actually this password is your default password for your Jenkins admin account.
$ docker exec cat /var/jenkins_home/secrets/initialAdminPassword

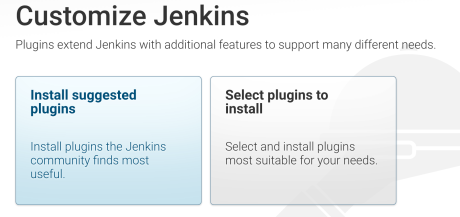
Initial customisation

You can ask the Jenkins to install the suggested plugins for you or choose the ones you need only. You can also install the plugins from “Manage Plugins” after you complete the Jenkins setup.
Screen Shot 2018-04-15 at 12.04.34

Create your first jenkins account

You can create your own jenkins account during the setup phase. Or you can also ignore this step but use the “admin” account with its default password, the one output in console, for login.
Screen Shot 2018-04-15 at 12.06.22

Proxy Setup

If your Jenkins server is behind a proxy, then you need to configure this proxy properly in order to install your Jenkins plugins. Navigate yourself to “Manage Jenkins” -> “Manager Plugins” -> “Advanced“.
Screen Shot 2018-04-17 at 09.24.46

Some useful commands

Check container IDs
docker ps -a
Check logs for a particular container
docker logs <container-id>

Cheers!!

Naveen AutomationLabs 

Take Screenshot of WebElement in Selenium || New Selenium 4 feature – Naveen AutomationLabs

Take Screenshot of WebElement in Selenium || New Selenium 4 feature

In this blog, I have explained how to take screenshot for a web element in Selenium 4 version. This is the new feature in Selenium 4, earlier we could only take screenshot only for web page, now you can take screenshot for elements and use them with your bug report.

Watch Full video here:

Source Code:

package WM;

import java.io.File;
import java.io.IOException;
import java.util.concurrent.TimeUnit;

import org.apache.commons.io.FileUtils;
import org.openqa.selenium.By;
import org.openqa.selenium.OutputType;
import org.openqa.selenium.WebDriver;
import org.openqa.selenium.WebElement;
import org.openqa.selenium.chrome.ChromeDriver;

import io.github.bonigarcia.wdm.WebDriverManager;

public class TakeElementScreenshot {

public static void main(String[] args) throws IOException {

WebDriverManager.chromedriver().setup();
WebDriver driver = new ChromeDriver();
driver.manage().timeouts().implicitlyWait(20, TimeUnit.SECONDS);

driver.get(“https://app.hubspot.com/login”);

WebElement email = driver.findElement(By.id(“username”));
WebElement password = driver.findElement(By.id(“password”));
WebElement loginButton = driver.findElement(By.id(“loginBtn”));
WebElement forgotPwd = driver.findElement(By.linkText(“Forgot my password”));

email.sendKeys(“naveen@gmail.com”);
password.sendKeys(“Test@123”);
takeElementScreenshot(email, “emailElement”);
takeElementScreenshot(password, “passwordElement”);
takeElementScreenshot(loginButton, “loginButtonElement”);
takeElementScreenshot(forgotPwd, “forgotPwdLink”);

driver.quit();

}

//take screenshot using getScreenshotAs() method.
public static void takeElementScreenshot(WebElement element, String fileName) {

File srcFile = element.getScreenshotAs(OutputType.FILE);
try {
FileUtils.copyFile(srcFile, new File(“./target/screenshots/” + fileName + “.png”));
} catch (IOException e) {
e.printStackTrace();
}

}

}

Executing Maven Project in windows from Command Prompt:


Executing Maven Project in windows from Command Prompt


Section-I:        

Pre-requisites:
Go to Menu Bar in Eclipse >> Window >> Preferences.     
Check if Maven is integrated with Eclipse or No.
[If you download Eclipse Neon Version, by default Maven will be integrated with Eclipse].

If Maven is integrated with Eclipse then we are good to create Maven Project.                           
If not installed go to Menu Bar >> Help >> Eclipse Market Place and Search by Maven and install required Maven Plugins shown below.


Section II:                                                                                                                                                                                    
 Steps to install Maven Jar Files and Setting Path in Environment Variables: https://maven.apache.org/download.cgi                                                                                                   
Download below highlighted Zip File.                                                                                                                                                      
Once download is completed, unzip it and keep it in any drive in your local system.                                
It is always good practice to keep it in C Drive.

Now we need to set path for Maven in Environment Variables:                                                         
Go to My Computer >> Right Click >> Properties >> Advanced System Settings.                               
 Now Go to Environment Variables and Set Pat as shown below.                                                               
[In my case i have kept Maven Jars in C Drive]                            


Now Add Bin Path of Maven in below Path 
highlighted                                                    
  
C:Program FilesMavenapache-maven-3.6.1bin
                                           
Once Path is set for Maven in Environment Variables.                                                                                              
Go to Command Prompt and type command as shown below to make sure that Maven is installed or not.


If Maven is installed then we will see as highlighted above and now we are good to execute Maven Project. 

Section III:                                                                                                                                                                                           

 Now Executing Maven Project from Command Prompt.                             
                                                                   
To Execute Maven Project from Command Prompt, In pom.xml 
Maven Surefire Pluginmust be added.

<build>
<plugins>
                                    <plugin>
                                                      <groupId>org.apache.maven.plugins</groupId>
                                                      <artifactId>mavensurefireplugin</artifactId>
                                                      <version>2.18.1</version>
                                                      <configuration>
                                                                        <suiteXmlFiles>
                                                                                          <suiteXmlFile>testng_sanity.xml</suiteXmlFile>                                                                                                        </suiteXmlFiles>
                                                      </configuration>
                                    </plugin>
                  </plugins>
</build>

Now Go to Command Promp
Go to Project Folder as shown below

Now Use below commands to execute Maven Project from 
Command Prompt                          
1. mvn clean install : It will execute all test cases as well as it will generate a build. Build will be generated under target folder.                                                                                                                                                                   
2. mvn clean test : It will execute only test cases and it won’t generate build.


This blog is written by Pavan. He is an expert in Selenium Automation and currently working in Infosys as Automation QA Engineer. Also, he is helping QA community with his knowledge along with Naveen AutomationLabs!! 

Cheers!
Naveen AutomationLabs

Payment Details

Naveen AutomationLabs Online Courses:

 
Payment Options:
Here I’m sharing the bank account details. Please send me the screenshot of the receipt once you make the payment without fail. 
 
Please send the details at : naveenanimation20@gmail.com
Subject Line: Online Course Payment Receipt – Your Full Name

Please find below bank details: You can make the transaction directly to the given account or make it via Western Union Or Xoom.
 
Please find the bank details:
 
Full Name: NAVEEN KHUNTETA
 
Contact No.: 9902233400
 
Payee name: NAVEEN KHUNTETA
 
Name of the Bank: ICICI bank
 
Address of the Bank: Bhandarkar Road, Pune
 
 Bank Account Number: 624001553272
 
 IFSC Code(11 Digit Code): ICIC0006240  
 
PayPal Payment: 
Check out with PayPal

For Candidates in India:

  • You can also make the payment via Tez (Google Pay) OR PhonePe:
  • UPI to this number: +91-9902233400
  • UPI: naveenanimation20@okicici
  • OR Google Pay IDnaveenanimation20@gmail.com


For Candidates in India:

Please scan this QR code to make the payment via PhonePe, GPay / PayTM/ Amazon Pay/ UPI.

Push Code to Git Repositories using Command Prompt

Steps to Push Code to Git Repositories using Command Prompt

Pre-requisites:      

1. Download Git from below Link:

https://git-scm.com/download/win/ [Git must be installed in Local System].

2. Once Git is installed >> SSH Key should be Added in Git.

Login to Github >> Go to Settings >> User should be able to see SSH and GPG Keys on Left Side Panel as per below Screenshot.                  

Click on SSH and GPG Keys >> User should be able to see as shown below in same page.

Now Click on New SSH Key and Add SSH Key.

Below are the Steps to Generate SSH Key using Git bash:          

Step1: Launch git bash.

Step2: Type ssh-keygen -t rsa -> Enter -> Enter -> Enter -> Key will be generated.


Admin@Admin-PC MINGW64 ~
$ ssh-keygen -t rsa

Generating public/private rsa key pair.
Enter file in which to save the key (/c/Users/Admin/.ssh/id_rsa):
/c/Users/Admin/.ssh/id_rsa already exists.
Overwrite (y/n)? y
Enter passphrase (empty for no passphrase):
Enter same passphrase again:
Your identification has been saved in /c/Users/Admin/.ssh/id_rsa.
Your public key has been saved in /c/Users/Admin/.ssh/id_rsa.pub.
The key fingerprint is:
SHA256:RWDx9MsZekrqrGMqKoL7tWVvjq51BSlUnzknk78RAzU Admin@Admin-PC

Now Go to Path as shown above which is highlighted.              

[Path will be changed from System to System].

Open the File which is of Publisher type and user should be able to see SSH Key which needs to be added in Git. 

[Make sure key is starting with ssh-rsa].

Once SSH key is added, you are good to add your code to created repository in Git.

Note: We can add as many as ssh keys, if we need to give permission for someone who can contribute to our repositories.

Below are the commands to Push Code from Command Prompt:

Step 1:  Open Command Prompt.

Step 2:  Go to Folder/Workspace where your project/files stored.

In my case my project is stored in D: Drive and User should be in Project Folder.


Step 3: git init >> Command to initialise project with repository.

Step 4: git status >> To check status.

Since my project is already associated with created repository, it is showing as Reinitialized existing Git Repository.  If it is not initialized, still you can proceed and you can initialize later on.

Then I am checking status of files >> All files are highlighted in Red color because they are not ready to be committed.

Step 5: git add . Or git add Filename >> Commands to add all files or To add particular File.

Step 6: git status >> To check status. 

Now all files are highlighted in Green color because all files are ready to be Committed.

Step 7: git commit –m “Comment Message”

Step 8: git status

Now my code is ready to be pushed to Repository.

If Project is not initialised with GIT Repository  – Follow below command to initialise project with GIT Repository before pushing code to Repository. [It is a One Time Activity].

If Project is already initialzed you can ignore Step-9.

Step 9: git remote add  origin “Path of Git Repository”

Now Project will be initialised with GIT Repository and we are good to push our code.


Step 10: git push origin master [Master >> Branch Name].

If it asks for credentials >> Enter Valid Username and Password.

Code is Pushed to initialised GIT Repository.


Other git commands:

git clone “repository path“ – To download or clone complete repository from git.


git pull origin master – Once repository is cloned from git to local and we udpate any code for same repository in git. To get same code to be udpated in Local and in Eclipse we can use this command.


This blog is written by Pavan. He is an expert in Selenium Automation and currently working in Infosys as Automation QA Engineer.


Cheers!

Naveen AutomationLabs

How to control Chromedriver using curl

How to control Chromedriver using curl

Here is how to use Chromedriver without libraries like selenium-webdriver. This can be useful for debugging.
The following example visits a web page and reads the a headline’s text contents.

1. download chromedriver.exe on windows/mac, go to the same directory and run this command:

On Mac: ./chromedriver &
On Windows: chromedriver.exe

2. Create a session:
Java Code:
WebDriver driver = new ChromeDriver();

Curl Command:
curl -XPOST http://localhost:9515/session -d ‘{“desiredCapabilities”:{“browserName”:”chrome”}}’

3. launch a URL:
Java Code:
driver.get(“https://www.google.com”);

Curl Command:
curl http://localhost:9515/session/142a7f9bb57b8fda48636c8709df9591/url -d ‘{“url”:”https://www.google.com”}’

4. find an element:
Java Code:
WebElement element = driver.findElement(By.name(“q”));

Curl Command:
curl http://localhost:9515/session/142a7f9bb57b8fda48636c8709df9591/element -d ‘{“using”:”name”, “value”:”q”}’

5. enter text in element:
Java Code:
element.sendKeys(“Naveen AutomationLabs”);

Curl Command:
curl http://localhost:9515/session/142a7f9bb57b8fda48636c8709df9591/element/0.45843488917986774-1/value -d ‘{“value”:[“Naveen Automation Labs”]}’

6. Quit Browser/close the session:
Java Code:
driver.quit();

Curl Command:
curl -X DELETE http://localhost:9515/session/142a7f9bb57b8fda48636c8709df9591


Cheers!!
Naveen AutomationLabs

Usage of Cucumber Options which we use in TestRunner File


Usage of Cucumber Options which we use in TestRunner File


TestRunner File is used to build a Communication between Feature Files and StepDefinition Files. 


features: We use Cucumber features option to define path of feature file(s). 

glue: We use Cucumber glue option to define path of step definition file(s). 

format: We use Cucumber format option to generate output or test results in different types of formats. 
Eg: HTML Report, JUnit or TestNG Report, Cucumber Report and So. 

monochrome: We use Cucumber monochrome option to print console output in a very readable format. 
monochrome must be set to true in order to achieve it. 

strict: We use Cucumber strict option to check if any step if not defined in step definition file. 
If any step is not defined in step definition file then it will stop an execution of program. 

dryRun: We use Cucumber dryRun option to check whether all the steps from feature files has got methods and implemented or no in Step Definition File. 
Before execution of program dryRun must be set to true and we need to make sure that all steps are implemented in Step Definition File. 
Once we are sure that all steps are implemented then dryRun must be set to False and we should continue with Test Execution.

tags: We use Cucumber tags option when we have more number of scenarios in a single feature file which represents different purpose [Smoke, Sanity, Regression etc] in such cases we can make use tags option.
Eg: tags={ ” @ Smoke ” } >> It will pick only and only those scenarios which are tagged with Smoke in feature files.


This blog is contributed by Pavan KrishnanReddy Working as Testing Executive at Infosys Limited  
Cheers!
Naveen AutomationLabs

How to solve Maven issue – Could not resolve archetype org.apache.maven.archetypes from any of the configured repositories.

How to solve Maven issue – Could not resolve archetype org.apache.maven.archetypes from any of the configured repositories.


  • Problem: – 


Solution
Steps to follow:
  1. Right click on project
  2. click on properties
  3. java build path
  4. select source
  5. add, apply then OK


6. Open window preferences
7. open Maven
8. deselect all dialog box


9. Open window : preferences, open Maven Archetype, click on ‘Add Remote catalog’ and add Catalog file: http://repo1.maven.org/maven2/archetype-catalog.xml
Description: Maven Catalog.


10. check library, right click on project

click on properties, go to java build path
click libraries
add external jars
add, apply ok. 

Error Resolved!! YEY!

This is Nazia. I have recently completed my post-graduation. Later I joined Naveen Automation Labs which is one of the best online training programs and improved my automation skills a lot. I face some difficulties while configuring Maven, so I tried some of the possible ways to solve them, hope this will help you as well.
Cheers!
Nazia

-Naveen AutomationLabs

Role of a Tester in Scrum – Agile Process

Role of a tester in Release and Sprint Planning:

Understand user stories and acceptance criteria
User stories get clarified from the respective stakeholders where there is insufficient information
High level test strategy has to be decided for whole release
All the risk that might occurs at the time of release needs to be noted or documented
Number of testing types need to be decided and discussed
Estimate time for each user story test case creation and execution
Break user stories into different testing tasks
Decide each story test coverage
Acceptance criteria for user stories needs to be defined

Understand and plan for user stories automation and support various levels of testing


Customer satisfaction through delivery of high-quality software which is earlier and continuous is highest priority
Engagement is early during the project from sprint planning but the QA activities are same
Business people, developers, and testers must work together throughout the project
Discuss and understand each user story with stakeholders and then decide on acceptance criteria for the same
Welcome changing requirements. Tester needs to be adaptable to any changes
Define activities for themselves to estimate time, updating test cases as and when changes appear, complete testing within the sprint time etc.
Story level estimation needs to be done and time needs to be assigned for each story
Test Cases needs to be developed as per the story acceptance criteria and needs to be change whenever there is a change in story
Deliver high quality software iteratively from a couple of weeks to a couple of months
QA needs to track the progress of testing on a daily basis with continuous feedback


Cheers!
Naveen Khunteta
Naveen AutomationLabs 

« Older posts