Where we learn technology

Day: 16 April 2020

How to write your first Selenium WebDriver Code

How to write your first Selenium WebDriver code


1. Introduction 

 
In this article, we will have a quick look at the download and installation of java, eclipse and practical introduction to working with our first selenium script.


2. Set up java and Eclipse

 
Eclipse IDE requires java, so we will be installing Java SE JDK1.8
 
Here are the steps to install JDK :
 
Step 1: Download JDK from here and choose the JDK according to your OS (Windows/Mac based on 32 bit and 64-bit version). 
 
Sign up for oracle account and login with the same, you will be able to download the JDK and install in your system by clicking it and accepting the consent till you get the finish/close button.
 
Step 2: To check if java is installed, open a command window or terminal and type java -version, and output will be similar to


Otherwise, we’ll get an error as :
 
‘java’ is not recognised as an internal or external commands
 
The above error may vary depending on the OS and the java version installed
 
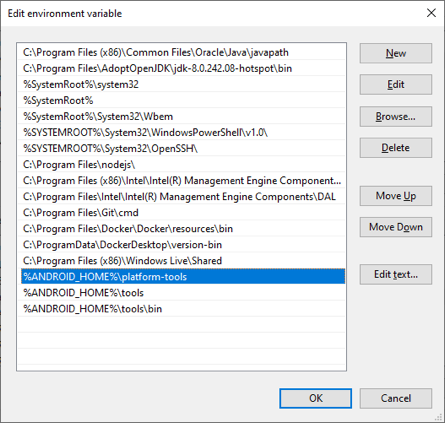
Step 3: For windows, we need to define the java Environment path to locate the executables like javacjava, etc
  • Open search and type advanced system setting


  • In the shown options, select the View advanced system settings link
  • Under the Advanced tab, click Environment Variables
 
 
·       In the System variables section, click New 


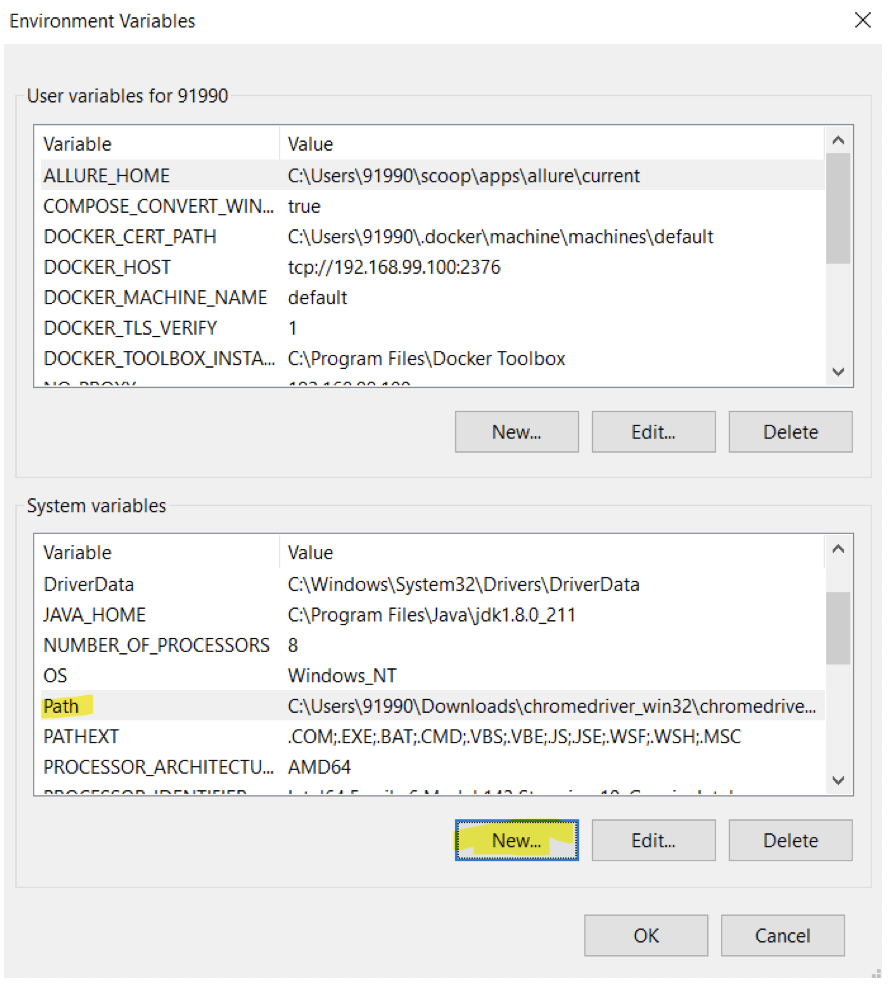
·        Set JAVA_HOME as the Variable name and the path to the JDK installation and click OK
 
 
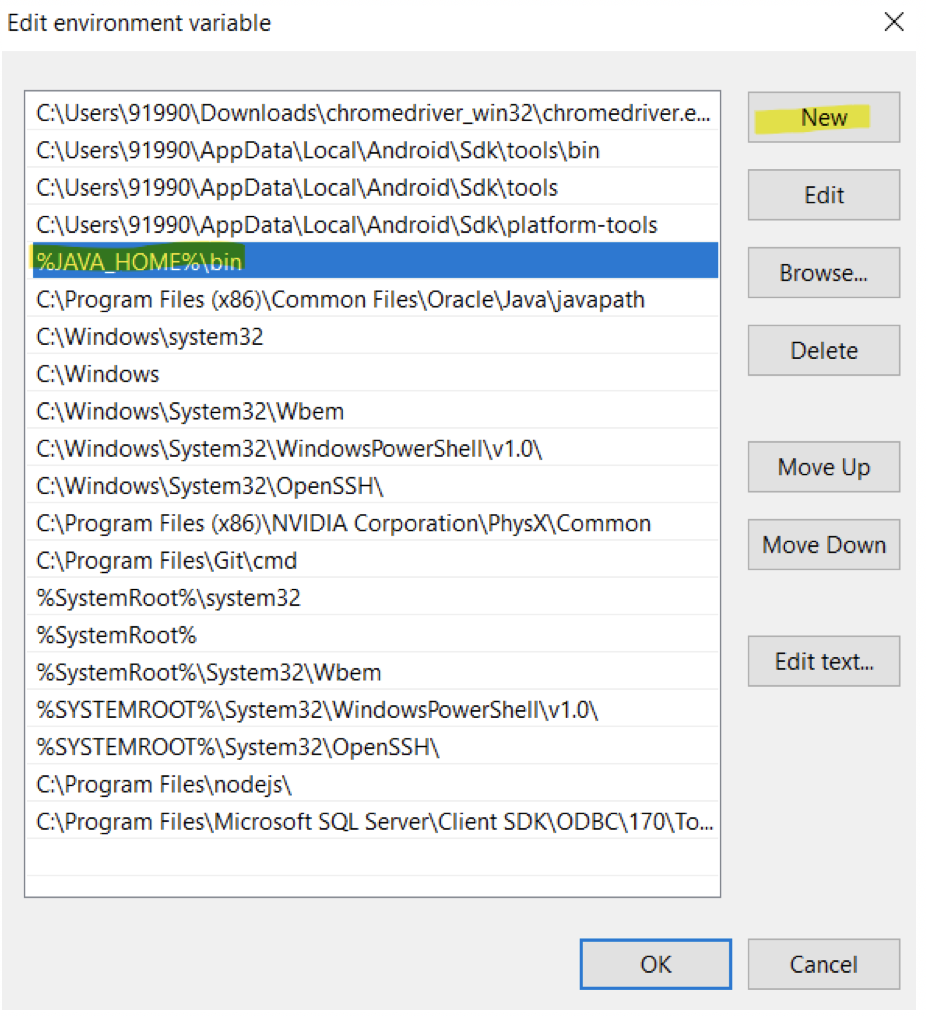
  • Click OK and click Apply to apply the changes
 

In Mac OSX 10.5 or above, Apple recommends  to set the $JAVA_HOME variable to (/usr/libexec/java_home
 
1) open the terminal and run the command Open ~/.bash_profile, if file exists it will open the bash file 
otherwise, we will get the error message as:


The file /Users/userName  .bash_profile does not exist.
 
2) The next step is to create the bash file, simply run command $ vim  ~/.bash_profile  and add 
export JAVA_HOME=$(/usr/libexec/java_home) save and close the file.


3) Now, run the source ~/.bash_profile to apply the changes. 
 
4) To check the value of JAVA_HOME  run the command echo $JAVA_HOME and the output should be similar like 
 
/Library/Java/JavaVirtualMachines/jdk1.8.0_241.jdk/Contents/Home
 
Step 4Download the latest version of Eclipse IDE from here and choose the version according to OS
 
you should be able to download .exe file for Windows and .dmg for Mac after successful completion of the installation, you are all set to launch the IDE.
 
Step 5: Lastly, we need to download Selenium Java Client Driver  to run our first selenium script 
 
Selenium Java Client Driver from here and choose the latest version and Save it your preferred location in your machine (say C:\documents) 
 
Configure Eclipse IDE with WebDriver :
  • Create a new Java Project in Eclipse:


  • Give a Project Name : Test Automation
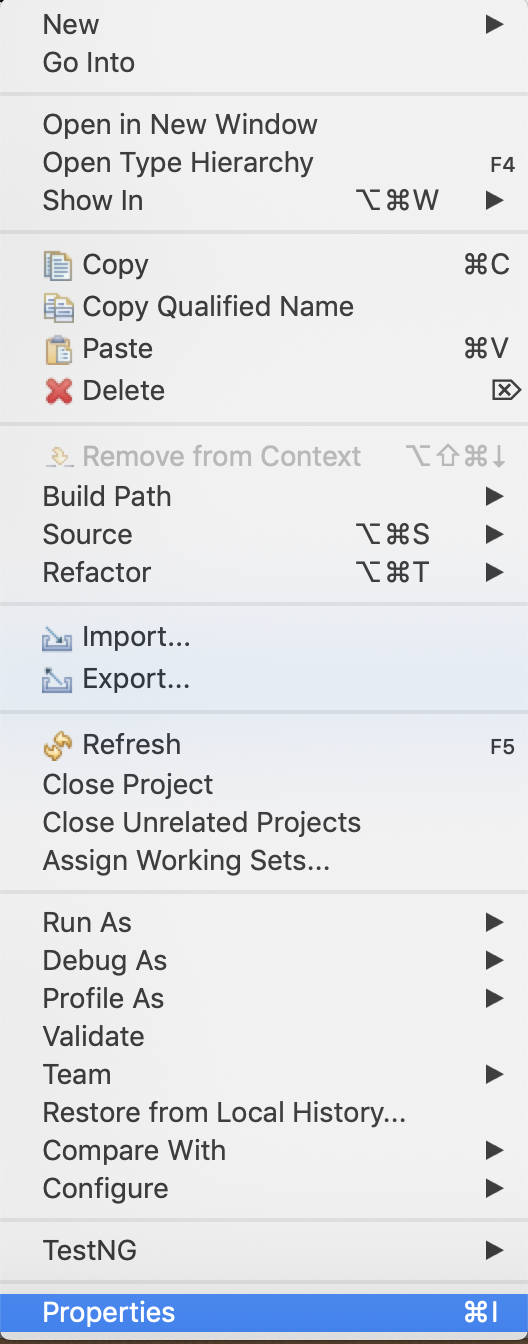
  • Right-click on the project and click on Properties>Java Build Path>Click on configure build path>Click on Library Tab>Add External JARs and Select the Selenium WebDriver JARs from the location, where you have saved the Selenium JARs in your System.   


 and click on apply and press OK
 
Now, let’s first download the latest chrome Driver from here according to your OS and save the driver in some directory and to check the compatibility with browser and driver click here
 
3. Selenium Integration :
 
In this section, we will start with a simple selenium script  such as open a browser, navigating to URL and verify the title of the page 
Now, create a java package under your project, and create a class  and provide a  class name as SeleniumConfig 
 
In order to launch the Chrome browser, we have to do two steps
1. Set a system property “webdriver.chrome.driver” to the path of your ChromeDriver file
2. Instantiate a ChromeDriver class.
 
 
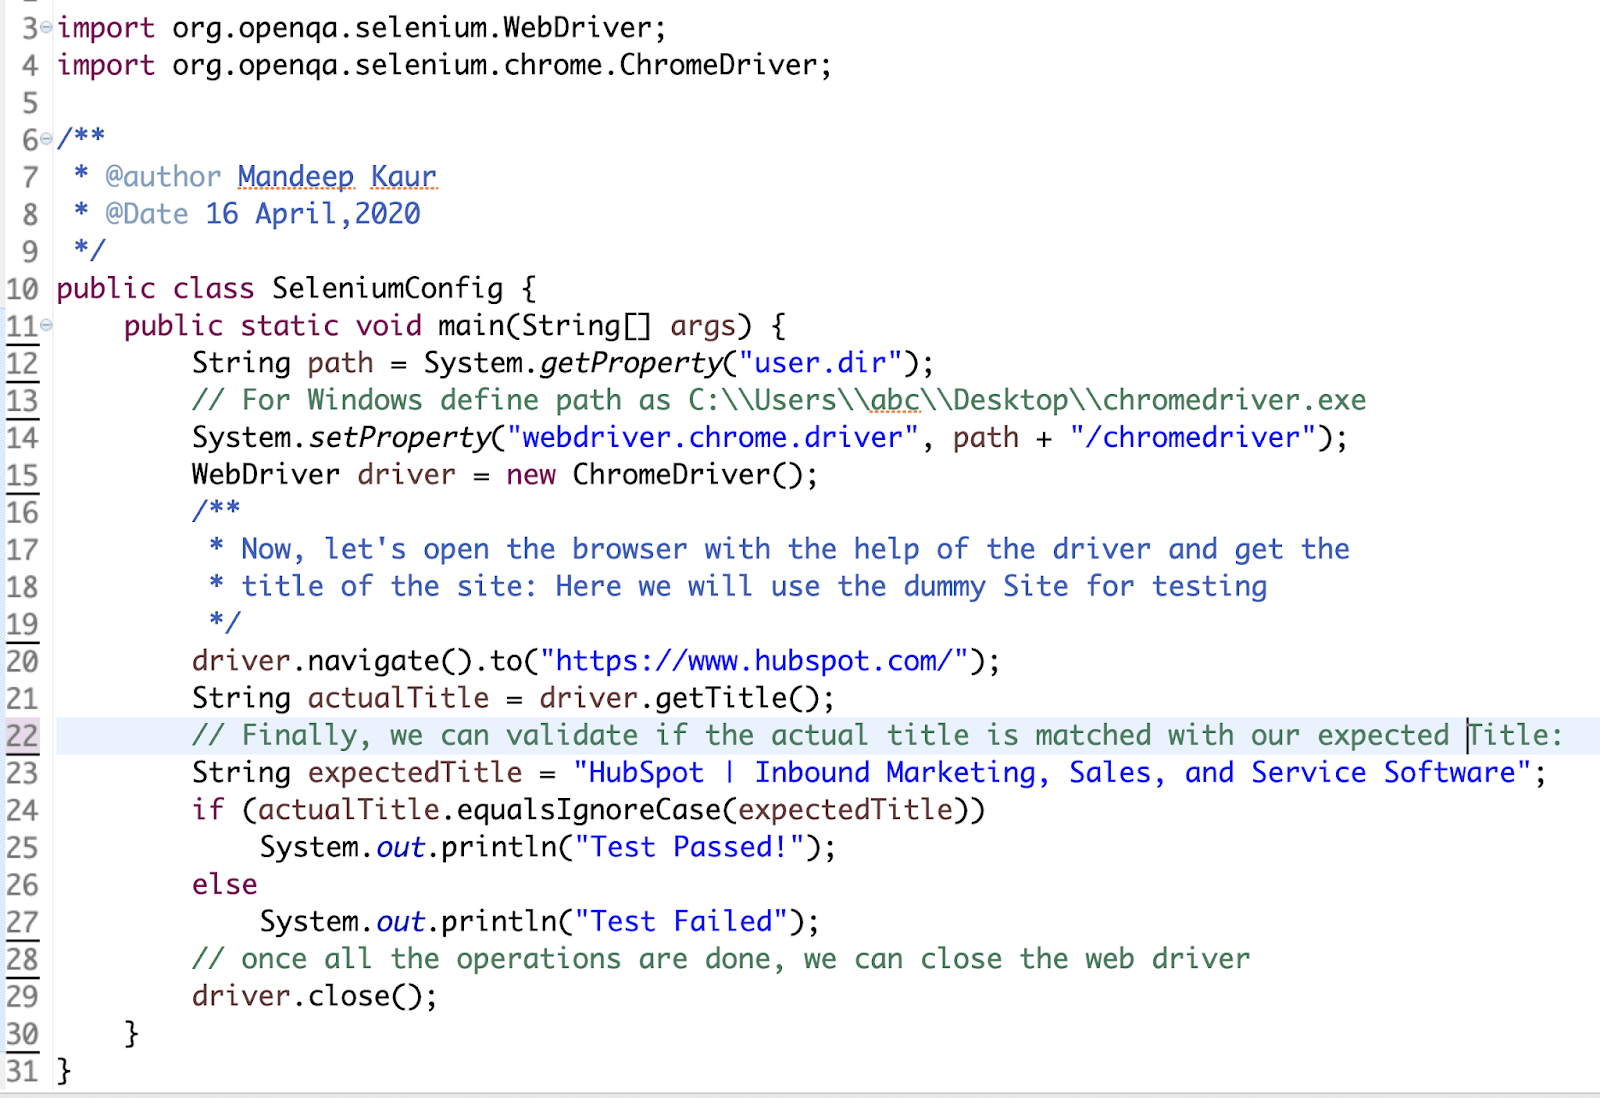
Below is the code snippet for your reference :
 
package com.example.testAutomation;
 
import org.openqa.selenium.WebDriver;
import org.openqa.selenium.chrome.ChromeDriver;
 
/**
 * @author Mandeep Kaur
 * @Date 16 April,2020
 */
public class SeleniumConfig {
public static void main(String[] args) {
 
String path = System.getProperty("user.dir");
 
// For Windows define path as C:\Users\abc\Desktop\chromedriver.exe
 
System.setProperty("webdriver.chrome.driver", path + "/chromedriver");
WebDriver driver = new ChromeDriver();
 
/**
* Now, let's open the browser with the help of the driver and get the
* title of the site: Here we will use the dummy Site for testing
*/
 
driver.navigate().to("https://www.hubspot.com/");
String actualTitle = driver.getTitle();
 
// Finally, we can validate if the actual title is matched with our
// expected
// Title:
 
String expectedTitle = "HubSpot | Inbound Marketing, Sales, and Service Software";
if (actualTitle.equalsIgnoreCase(expectedTitle))
System.out.println("Test Passed!");
else
System.out.println("Test Failed");
 
// once all the operations are done, we can close the web driver
 
driver.close();
}
 
}
 
That’s it!! You have written your first Selenium Program 🙂
 
Cheers!
Naveen AutomationLabs

Blog Contributors:Author:  Mandeep Kaur

Mandeep, having 5+ years of Testing experience in automation using Selenium (Java). Expertise in API and Performance testing using JMeter. https://www.linkedin.com/in/mandeep-kaur-486ba9106

Reviewer: Naveen Khunteta https://www.linkedin.com/in/naveenkhunteta

How to Download and Install Appium Desktop on Win and Mac

How to Download and Install Appium Desktop on Win and Mac


Appium Desktop is an application for Windows, Macintosh and linux OS. Appium Desktop is a UI based app with a lot of connectivity and configuration options. It will allows the user to view some advanced options in UI like Inspector for identifying elements, Relaxed security, exporting appium logs and so on..
·       Using a graphical interface for the Appium Server. You can set options, start/stop the server, see logs, etc… Appium Desktop comes with Node runtime files, so no need to separately download and install Node.
·       One of the powerful and main feature on Appium desktop is INSPECTOR. Inspector is the object spy in Appium (like QTP you can spy an element by clicking). Inspector tool will identify the elements along with ID, XPATH and all applicable attributes.
http://appium.io/ is the official website for Appium desktop. One can easily download the latest desktop build of Appium form Downloads sections. Based on preferred the OS we can easily download the build. Hence it is an open source we can download and use it free of cost.

For Windows:

If you are using Windows based OS, then you have to download the .exe file. (ex: Appium-windows-1.15.1.exe). Once downloaded you can install the software by double clicking on the exe file.


On double click on exe file, the below installation screen will popup


Select the 1st radio button if you want appium to be avaialbe for all user who logs in this computer. Else click on 2nd option.  On clicking on “Install” button, installation will begin


Click on “Finish” button to launch the Appium desktop and also to complete the installation process and to quit the installation wizard.


For Mac:

If you are using Mac OS, then you have to download .dmg file so that you can simply move the file under Application to get started. (ex: Appium-mac-1.15.1.dmg). Once downloaded you just need to extract the file and move the build to Applications.
Just click and drag the appium logo to Applications.


Appium also available as an AppImage for Linux. App image is like an executable file for windows. Here in linux no need to install the build, just we need to open the appImage so that your Appium server UI will be prompted.
The good thing in Appium desktop is no UI change for any operation system. UI is built to be stable across platform.

Now we are ready with our Appium desktop to launch and starting the server.


Launching Appium Desktop after Installation for the first time:


Appium desktop UI is very simple and easy to access. Below image represents the home page of Appium Desktop.

In Simple Mode, one can start the Appium server by providing the “Host” and “Port” values. By default Appium REST http interface listener will use the Host 0.0.0.0 and Port “4723”. If any other programs like Jenkins/tomcat are running on a default local server/port then we can change the Port in Appium.

Clicking on “Start Server” button will initiate a local host server with the given port #. You can start seeing logs in Appium desktop like below.

You can also verify the status in any browser by entering the command/URL http://localhost:4723/wd/hub/sessions. Which will give you the current status (same like selenium grid)


By any chance if your firewall is blocking Appium or if you get the below screen, select any or both the checkboxes and click on “Allow access” button. So that Appium can initiate a local host.


How to connect to an Emulator or a real Device with Appium:

Connecting a real device with Appium is very simple. Appium Desired Capabilities will take care of all the connectivity protocols. But before trying to connect we need to make sure all prerequisites are available in the computer. It’s all about configuration and SDK’s
If you want to connect an Android device on a Windows/Mac based OS, then you have to download and install the Android Studio/ Android SDK. Without Android SDK Appium cannot initiate a connectivity to any android based devices. The reason behind this is, Appium will connect to android device in developer debugging mode. Hence to enable the debugging mode “SHELL” commands are inevitable, Commands like ADB, Shell are available only on Android SDK. So to make a connectivity to a real android device “Android SDK” is must.
You can download Android SDK on its official website https://developer.android.com/studio. Based on the OS you can download and set the preferences. Once Android studio is installed it is also necessary to install the android SDK based on the device Android version. Ex. My real device is running Android version 9, then I need to install the SDK for Android 9. This can be achieved by AVD in android studio.
“Please use the below steps for creating an Android Emulator”

Step 1: Open android studio

In the home page, you can find “AVD Manager” icon on the top left corner


Step 2: Click on “AVD Manager” icon to get the below screen


Step 3: Create a Virtual Device (Emulator) by clicking the button “ + Create Virtual Device..” then you will be navigated to the below screen


Select the option “Phone” and you can select any device model based on your real device screen size (if needed) and click on “Next”
The below screen will list out all the applicable Android version for the selected device. Then you can click on download as per the android version you need.

Here I have selected “Android Pie” and click on Download.


Accept the license Agreement and click on Next button


Now the selected Android OS will start to download


Click on finish once download is completed.


So we are done with downloading SDK and successfully created Android Emulator.


Click on “Next” button to create an Emulator

Provide any name to the Emulator and click on “Finish”.

On the next time when you click on “AVD Manager” you will get the below screen where you can see the list of AVD’s created


Click on “Launch this AVD” button (Play button) under Actions section to start the Emulator.

Emulator is launched successfully 😊


2.     Android Environmental variables


Once Android SDK is downloaded successfully we can start using ADB and Shell executables from Android SDK. But the problem is windows OS don’t know from where it need to take the executable files. Imaging its like searching a small tool on a big warehouse. So to make the search easier we need to instruct the OS from where we need to utilize the commands, here comes the Environment variables. We need to inform Windows OS to take the executable files from this location and execute my command. So how to configure this ? let’s see
There are many ways to navigate to “Environment Variables” screen, A common way is to click on start menu and type “My Computer” or “My PC”,  then right click on that and select the “properties” option form the menu. Select “Advanced System Settings” to get system properties screen


 Click on “Environment Variables” and Select “New” button under “User Variables” section

Now, it’s time to create “Android_Home” path. Android_Home is nothing but the parent folder where  we have our SDK and Platform tools available. By default the Android_Home path should be
“C:Userscurrent userAppDataLocalAndroidSdk”
Enter the “Variable Name” as “Android_Home” and “Variable value” with the directory value and click on “OK” button to add the record.

Now “%android_home%” command refers to the directory where our SDK files are located.
It’s time to add “Platform-tools” and “tools” link to our Sytem variables, under “Path” record. For that click on “Path” record and select “Edit” button under System Variables


As I already mentioned, “%android_home%” refers to our SDK directory, now it’s time to add below 3 directories
%ANDROID_HOME%platform-tools
%ANDROID_HOME%tools
%ANDROID_HOME%toolsbin
Just copy and paste it one by one under “Path” record. Like below,

Now we are done with setting up Environment variables for Android. Click on OK button and close all the open windows.
Now open “Command Prompt” and simply type “ADB” and Enter

If you get the text as mentioned in the image, then you successfully configured the Android SDK variable path in our OS. Now we are good to go with Appium to connect to any real device/ Emulators.

That’s it!! You are ready to automate 🙂

Cheers!
Naveen AutomationLabs

Blog Contributors:
Author:  Ragavendran
Ragav, having 10.5 years of Testing experience on which 7 years of rich experience in automation using UFT, Selenium (Java/Python). Expertise in Web and Mobile automation testing using Appium.

Reviewer: Naveen