Selenium WebDriver Architecture Overview & WebDriver APIs
1. Overview
This article describes about Selenium WebDriver Architecture and to know about how selenium works internally.
2. The Basics
- Selenium WebDriver is a browser automation framework that allows you to execute your tests against different browser.
- WebDriver interacts and controls the actual browser in either locally or remotely.
- We can use WebDriver to automate and validate Web-Applications.
3. How selenium WebDriver Works Internally
Let’s take a look at the below architecture:

The above picture depicts, there are four components of Selenium Architecture:
1. Selenium Client Library
2. JSON Wire Protocol over HTTP
3. Browser Drivers
4. Browsers
We will try to understand each of these four components briefly:
1. Selenium Client Library
Selenium supports multiple libraries such as Java, Ruby, Python, etc.
It means that we can write our code with any of these scripting/programming languages.
Selenium Client Library sends the request in the form of API to the Browser Driver with the help of JSON Wire Protocol over HTTP (hypertext Transfer Protocol).
2. JSON Wire Protocol over HTTP
- JSON stands for JavaScript Object Notation. It is a lightweight data-interchange format which transfers the data between a server and a client on the web.
- JSON Wire Protocol is a REST API that transfers the data between HTTP server .Every Browser Driver uses a HTTP server to receive HTTP requests.
3. Browser Driver
- Browser Drivers are used to communicate with browsers.
- Each browser has its specific Browser WebDriver.
- When a browser driver is received any command then that command will be executed on the respective browser and the response will go back in the form of HTTP response.
Following are the operations performed when we run our automation script using specific Browser driver:
1. For each Selenium command, a HTTP () request is created and sent to the browser driver.
2. The browser driver uses a HTTP server for getting the HTTP requests.
3. HTTP Server sends all the steps to perform a function which are executed on the browser.
4. The HTTP server sends the status back to the automation script.
3. Browsers
Selenium supports multiple browsers such as Firefox, Chrome, IE, Safari etc.
Now let’s proceed to see the real implementation of the same:

Note: Because there are many Browsers in the market today, Selenium community has created WebDriver as an interface.
This interface defines some set of methods whose implementation will be provided by implementing classes such as ChromeDriver, FirefoxDriver, SafariDriver etc.
WebDriver’s main feature is to control and provide instructions to the Browser. So, you can choose any driver based on your browser. In above case we have chosen ChromeDriver.
Below code for your reference:
package com.example.testAutomation;import org.openqa.selenium.WebDriver;import org.openqa.selenium.chrome.ChromeDriver;
/**
* @author Mandeep Kaur
* @Date 17 April,2020
*/public class SeleniumConfig {
public static void main(String[] args) {String path = System.getProperty(“user.dir”);
System.setProperty(“webdriver.chrome.driver”, path + “/chromedriver”);
WebDriver driver = new ChromeDriver();
driver.get(“https://www.hubspot.com/”);}
}
4. Now, let’s see what will happen internally when you execute the above script:
1. Upon executing the above code, Selenium client library (java) will convert the automation script to Rest API and communicates with the Chrome Driver over JSON Wire Protocol.
2. Once API interacts with Browser Driver, then the Browser Driver will pass that request to the browser over HTTP and then the commands in your selenium script will be executed on the browser.
3. Based on the Rest Methods Type: Get/Post/Delete, response will be generated on the browser end and it will be sent over HTTP to the browser driver and from the Browser Driver over JSON Wire Protocol sends it to the UI Console.
Let’s try understanding this with an example:
Below are the API’s gets evoked when we write any operation using selenium .
For example, when we write driver.get(“url”) below highlighted API will be executed Internally.

(Image Reference: https://github.com/SeleniumHQ/selenium/wiki/JsonWireProtocol)
Let’s move on to the practical implementation to see how exactly it works:
1. Download the selenium Standalone server from here and place it to a directory and keep your chrome/gecko driver in the same directory.
2. Open command Terminal/command Prompt and navigate to the above directory and run the command java -jar selenium-server-
standalone-3.141.59.jar and we will get our selenium server up and running as can be seen below

Next, we will open our browser and enter the URL as http://localhost:4444/ :
You will be landing to this page

Click on console, you will be navigated to below page

Click on create Session and you will be prompted with a pop up to select the browser you want to run the automation script and click OK

And we see our session got created and chrome browser will be launched automatically and same can be confirmed from the Terminal:

Move the cursor to Capabilities and you will see our code WebDriver driver = new ChromeDriver(); has been converted into API in JSON-Payload internally
Now, let’s open the postman (It’s a tool to validate the request and Response)
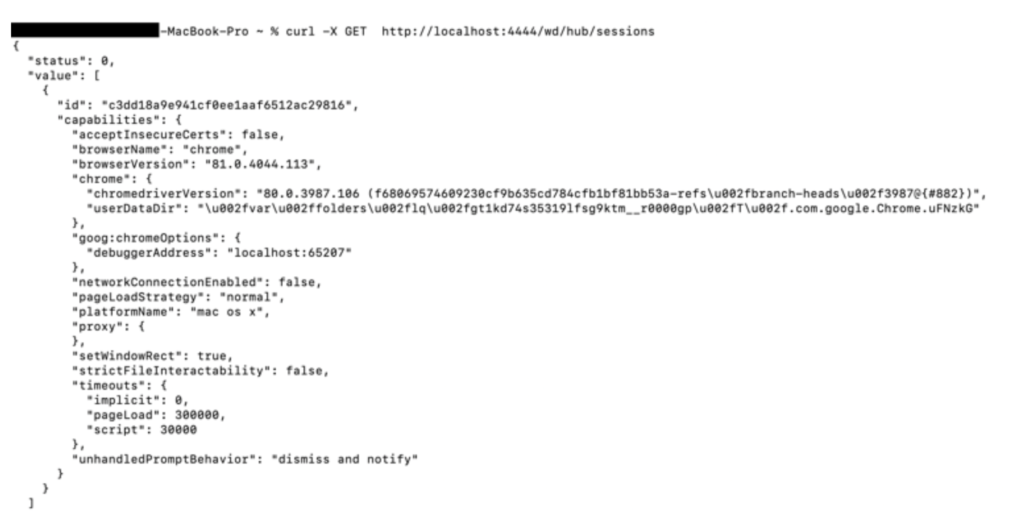
Request: To get the current session running, we will evoke sessions API from JSONWireDocumentation with end-point: /sessions
And here we got our current “session id”:

This also can be done by running the command curl -X GET http://localhost:4444/wd/hub/sessions

Let’s evoke “/sessionId/url” API to see how we can retrieve the URL when we pass driver.get(“url” ) in our code:
Here method Type will be post and we have to pass the body with URL we want to get, in this case will take https://www.hubspot.com/
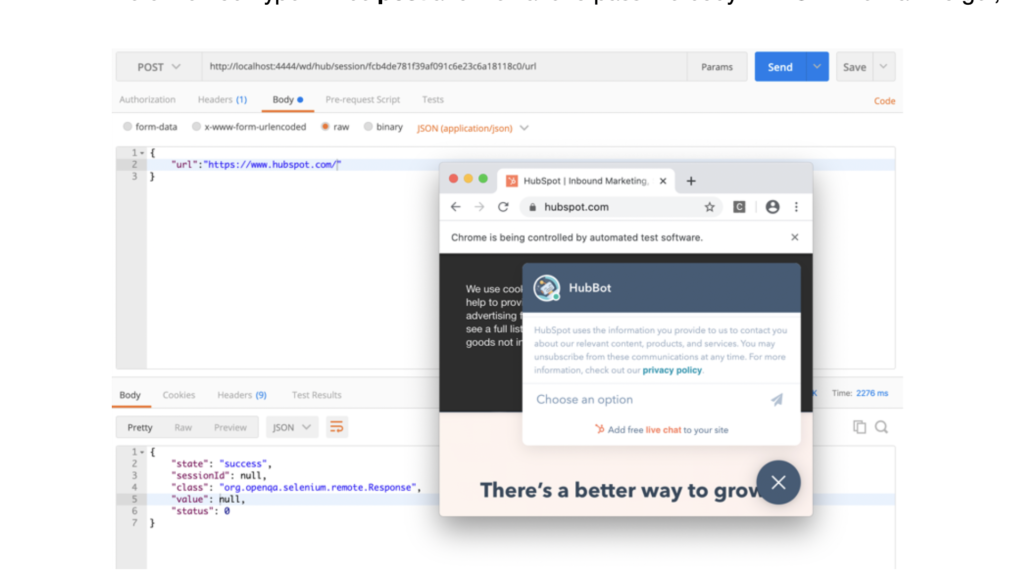
And yes, we got our URL in launched Chrome and same operation through Terminal can be achieved like below

5. Conclusion
In this article, we have learnt the complete internal architecture of Selenium WebDriver.
That’s it 🙂 You have learnt about Selenium WebDriver Architecture and WebDriver Rest APIs.
Cheers!
Naveen AutomationLabs

Blog Contributors:
Author: Mandeep Kaur
Mandeep, having 5+ years of Testing experience in automation using Selenium (Java). Expertise in API and Performance testing using JMeter.
Reviewer: Naveen
 – Basics To Advanced (Coming Soon)")
GOOD CONTENT.
Good job👍👍
Informative 🙂