How to write your first Selenium WebDriver code
1. Introduction
In this article, we will have a quick look at the download and installation of java, eclipse and practical introduction to working with our first selenium script.
2. Set up java and Eclipse
Eclipse IDE requires java, so we will be installing Java SE JDK1.8
Here are the steps to install JDK :
Step 1: Download JDK from here and choose the JDK according to your OS (Windows/Mac based on 32 bit and 64-bit version).
Sign up for oracle account and login with the same, you will be able to download the JDK and install in your system by clicking it and accepting the consent till you get the finish/close button.
Step 2: To check if java is installed, open a command window or terminal and type java -version, and output will be similar to
Otherwise, we’ll get an error as :
‘java’ is not recognised as an internal or external commands
The above error may vary depending on the OS and the java version installed
Step 3: For windows, we need to define the java Environment path to locate the executables like javac, java, etc
- Open search and type advanced system setting
- In the shown options, select the View advanced system settings link
- Under the Advanced tab, click Environment Variables
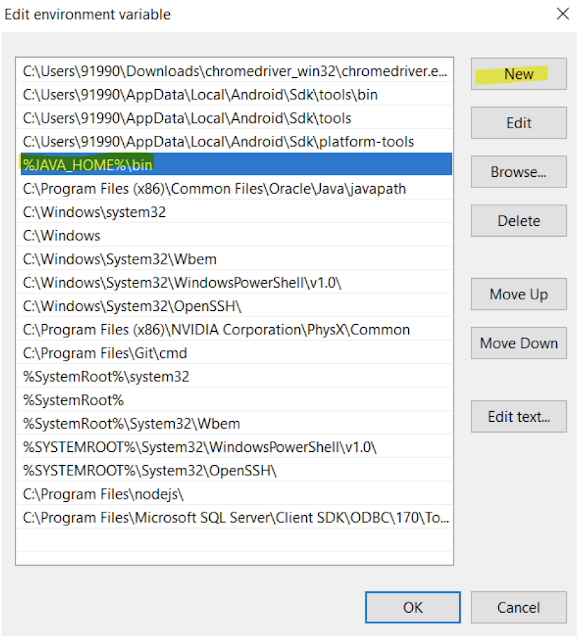
· In the System variables section, click New
· Set JAVA_HOME as the Variable name and the path to the JDK installation and click OK
- Click OK and click Apply to apply the changes
In Mac OSX 10.5 or above, Apple recommends to set the $JAVA_HOME variable to (/usr/libexec/java_home)
1) open the terminal and run the command Open ~/.bash_profile, if file exists it will open the bash file
otherwise, we will get the error message as:

The file /Users/userName .bash_profile does not exist.
2) The next step is to create the bash file, simply run command $ vim ~/.bash_profile and add
export JAVA_HOME=$(/usr/libexec/java_home) save and close the file.
3) Now, run the source ~/.bash_profile to apply the changes.
4) To check the value of JAVA_HOME run the command echo $JAVA_HOME and the output should be similar like
/Library/Java/JavaVirtualMachines/jdk1.8.0_241.jdk/Contents/Home
Step 4: Download the latest version of Eclipse IDE from here and choose the version according to OS
you should be able to download .exe file for Windows and .dmg for Mac after successful completion of the installation, you are all set to launch the IDE.
Step 5: Lastly, we need to download Selenium Java Client Driver to run our first selenium script
Selenium Java Client Driver from here and choose the latest version and Save it your preferred location in your machine (say C:\documents)
Configure Eclipse IDE with WebDriver :
- Create a new Java Project in Eclipse:
- Give a Project Name : Test Automation
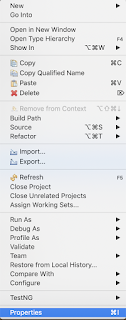
- Right-click on the project and click on Properties>Java Build Path>Click on configure build path>Click on Library Tab>Add External JARs and Select the Selenium WebDriver JARs from the location, where you have saved the Selenium JARs in your System.
and click on apply and press OK
Now, let’s first download the latest chrome Driver from here according to your OS and save the driver in some directory and to check the compatibility with browser and driver click here
3. Selenium Integration :
In this section, we will start with a simple selenium script such as open a browser, navigating to URL and verify the title of the page
Now, create a java package under your project, and create a class and provide a class name as SeleniumConfig
In order to launch the Chrome browser, we have to do two steps
1. Set a system property “webdriver.chrome.driver” to the path of your ChromeDriver file
2. Instantiate a ChromeDriver class.
Below is the code snippet for your reference :
package com.example.testAutomation;

import org.openqa.selenium.WebDriver;
import org.openqa.selenium.chrome.ChromeDriver;

/**
 * @author Mandeep Kaur
 * @Date 16 April,2020
 */
public class SeleniumConfig {
public static void main(String[] args) {

 String path = System.getProperty("user.dir");

 // For Windows define path as C:\Users\abc\Desktop\chromedriver.exe

 System.setProperty("webdriver.chrome.driver", path + "/chromedriver");
 WebDriver driver = new ChromeDriver();

 /**
 * Now, let's open the browser with the help of the driver and get the
 * title of the site: Here we will use the dummy Site for testing
 */

driver.navigate().to("https://www.hubspot.com/");
 String actualTitle = driver.getTitle();

 // Finally, we can validate if the actual title is matched with our
 // expected
 // Title:

 String expectedTitle = "HubSpot | Inbound Marketing, Sales, and Service Software";
if (actualTitle.equalsIgnoreCase(expectedTitle))
 System.out.println("Test Passed!");
 else
 System.out.println("Test Failed");

 // once all the operations are done, we can close the web driver

driver.close();
 }

}
That’s it!! You have written your first Selenium Program 🙂
Cheers!
Naveen AutomationLabs
Blog Contributors:Author: Mandeep Kaur
Mandeep, having 5+ years of Testing experience in automation using Selenium (Java). Expertise in API and Performance testing using JMeter. https://www.linkedin.com/in/mandeep-kaur-486ba9106Reviewer: Naveen Khunteta https://www.linkedin.com/in/naveenkhunteta


Leave a Reply