Where we learn technology

Tag: git

Steps to Configure Maven Project with Jenkins

Jenkins is an Open Source Continuous integration tool that is written in Java which is often used in Devops.

It is mainly used by Developers and Testers, whenever Developers/Testers does any changes in Source Code then Jenkins will automatically pull the code and continuously build and test code that has been added.           

Step 1: Installing Jenkins War File.

Follow below steps to install Jenkins War File. 

Go to any browser and search by Jenkins Download as shown below and click on  below highlighted link.

After clicking on above highlighted link, you will be navigated to below page.      

Click on “Permalink to the latest” – Latest and Stable version of Jenkins War File will be installed into your local system.

Now you are good to execute your Jenkins War File from Command Prompt.

Step 2: Executing Jenkins War File from Command Prompt.

Create a separate folder in your local system and place Jenkins War file once it is downloaded. Note: We must run Jenkins.war file through Command Line Prompt.

Step 3: Use below command to Run Jenkins.war file

Note:  By default, Jenkins will always run in localhost:8080. Make sure nothing else is running on port 8080. If localhost:8080 is already occupied then you won’t be able to execute Jenkins.war file.                    In such case you can execute your Jenkins.war file in other port using below command.

Once Jenkins is successfully launched, user should be able to see below message in
Command Prompt.

“Jenkins is Fully Up and Running”.

Step 4: Now, go to browser and open localhost:8084 where you have run your Jenkins.               
In my case, I have run Jenkins in port 8084.                                                                            

When launching it for first time, you have to set username and password and install default plug-ins that suggests etc and then you will be landed on to Jenkins Dashboard Page. 

Step 5: Configure your system for Java and Maven in Jenkins as shown below                

Go to Manage Jenkins >> Global Tool Configuration.

Step 6: Install Required Plug-ins >> Go to Manage Jenkins >> Manage Plug-ins and install from Available Section.

Step 7: Create Job >> New Item >> Enter Item Name >> Select Maven Project and Click on OK. After installing all Maven Plug-ins user should be able to see Maven Project Option.

Step 8:                                                                                                                                           A. Go to General >> Enter Description of your Project.

B. Go to Maven Info Plug-in Configuration >> Select None.

C. Go to Source Code Management. [You have to select any one option from it].       

Select None, if you are not using any Source Code Management tool for maintaining Code.

Select Git and provide Repository URL and Branch Name, if you are maintaining code in Git.

D. Go to Build Triggers.                                                                                                      

You can select as shown below, if you are not scheduling jobs using CRON Command and such. [In this case you have to build a job manually].

If you have to schedule jobs automatically, select Build Periodically and use CRON Command. 

If we have to build a job automatically when in any commit happens to Git then we
can select Poll SCM and use CRON Command.                                                                 

[As soon as code commit happens to Git, it will trigger a build].

E. From Build Environment, Select None

F. From Pre Steps, Select None.

G. From Build, Enter Path for your Root POM.xml and command to be executed as shown below.                                                                                                                  
Note: When in giving Maven Command to Run Test Cases in Jenkins, ignore mvn and just give commands as below.                                                                                
clean install Or test Or test -PSmoke etc.

H. From Post Steps, you can select any option as per your requirement.

I. If you want to be notified, when in any job is getting failed then you can select Build Settings and configure it.

Note: To do this we need to do other extra configuration [You can ignore for it now].

J. Post Build Actions can be used to Generate Results. [To achieve it, we need to install required plug-ins like TestNG Plug-in, HTML Report Plug-in for Generating Extent Report]

Below Configurations needs to be done for generating Extent Reports in Project Folder.

Step 9: Apply and Save, now click on Build now to trigger your Job.

Conclusion: In this blog, we have seen how to create a Job for Maven Project, Configuring Job and Executing a Job in Jenkins.


Cheers!!

Naveen AutomationLabs

Blog Contributors:

Author:  Pavan K

Pavan, having good knowledge in Selenium Web UI and API Automation frameworks. Also, he is helping QA community with his knowledge along with Naveen AutomationLabs!!

LinkedIn

Reviewer: Naveen Khunteta 

https://www.linkedin.com/in/naveenkhunteta

.gitingore file for Java projects

Different IDE will create extra files which we really don’t want to push to Git Repo at remote side. So using the .gitignore file in the root folder of your Git repository will ignore files and patterns you have mentioned. 

I have created the git ignore list of famous Java editors like Eclipse, IntelliJ, NetBeans and Visual Studio Code.

##############################
## Java
##############################
.mtj.tmp/
*.class
*.jar
*.war
*.ear
*.nar
hs_err_pid*
##############################
## Maven
##############################
target/
pom.xml.tag
pom.xml.releaseBackup
pom.xml.versionsBackup
pom.xml.next
pom.xml.bak
release.properties
dependency-reduced-pom.xml
buildNumber.properties
.mvn/timing.properties
.mvn/wrapper/maven-wrapper.jar
##############################
## Gradle
##############################
bin/
build/
.gradle
.gradletasknamecache
gradle-app.setting
!gradle-wrapper.jar
##############################
## IntelliJ
##############################
out/
.idea/
.idea_modules/
*.iml
*.ipr
*.iws
##############################
## Eclipse
##############################
.settings/
bin/
tmp/
.metadata
.classpath
.project
*.tmp
*.bak
*.swp
*~.nib
local.properties
.loadpath
.factorypath
##############################
## NetBeans
##############################
nbproject/private/
build/
nbbuild/
dist/
nbdist/
nbactions.xml
nb-configuration.xml
##############################
## Visual Studio Code
##############################
.vscode/
##############################
## OS X
##############################
.DS_Store

Please comment below, if you want to have more git ignore files extensions. You can also share with other projects based out of JavaScript, NodeJS, Python, .Net etc…

References:

dedunu.info

Cheers!!

Naveen AutomationLabs

Push Code to Git Repositories using Command Prompt

Steps to Push Code to Git Repositories using Command Prompt

Pre-requisites:      

1. Download Git from below Link:

https://git-scm.com/download/win/ [Git must be installed in Local System].

2. Once Git is installed >> SSH Key should be Added in Git.

Login to Github >> Go to Settings >> User should be able to see SSH and GPG Keys on Left Side Panel as per below Screenshot.                  

Click on SSH and GPG Keys >> User should be able to see as shown below in same page.

Now Click on New SSH Key and Add SSH Key.

Below are the Steps to Generate SSH Key using Git bash:          

Step1: Launch git bash.

Step2: Type ssh-keygen -t rsa -> Enter -> Enter -> Enter -> Key will be generated.


Admin@Admin-PC MINGW64 ~
$ ssh-keygen -t rsa

Generating public/private rsa key pair.
Enter file in which to save the key (/c/Users/Admin/.ssh/id_rsa):
/c/Users/Admin/.ssh/id_rsa already exists.
Overwrite (y/n)? y
Enter passphrase (empty for no passphrase):
Enter same passphrase again:
Your identification has been saved in /c/Users/Admin/.ssh/id_rsa.
Your public key has been saved in /c/Users/Admin/.ssh/id_rsa.pub.
The key fingerprint is:
SHA256:RWDx9MsZekrqrGMqKoL7tWVvjq51BSlUnzknk78RAzU Admin@Admin-PC

Now Go to Path as shown above which is highlighted.              

[Path will be changed from System to System].

Open the File which is of Publisher type and user should be able to see SSH Key which needs to be added in Git. 

[Make sure key is starting with ssh-rsa].

Once SSH key is added, you are good to add your code to created repository in Git.

Note: We can add as many as ssh keys, if we need to give permission for someone who can contribute to our repositories.

Below are the commands to Push Code from Command Prompt:

Step 1:  Open Command Prompt.

Step 2:  Go to Folder/Workspace where your project/files stored.

In my case my project is stored in D: Drive and User should be in Project Folder.


Step 3: git init >> Command to initialise project with repository.

Step 4: git status >> To check status.
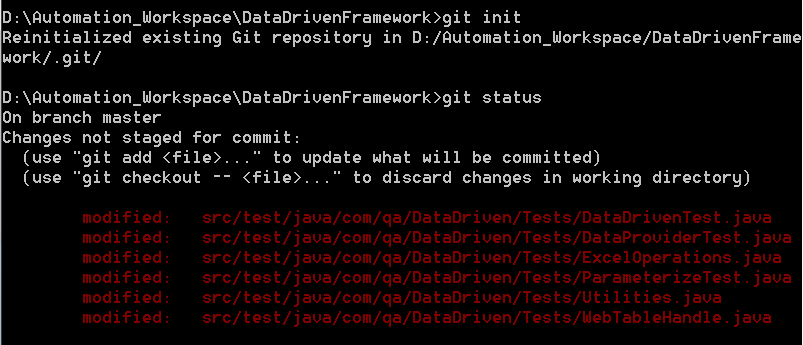
Since my project is already associated with created repository, it is showing as Reinitialized existing Git Repository.  If it is not initialized, still you can proceed and you can initialize later on.

Then I am checking status of files >> All files are highlighted in Red color because they are not ready to be committed.

Step 5: git add . Or git add Filename >> Commands to add all files or To add particular File.

Step 6: git status >> To check status. 
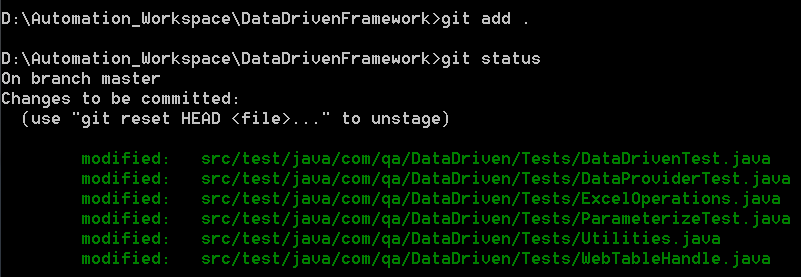
Now all files are highlighted in Green color because all files are ready to be Committed.

Step 7: git commit –m “Comment Message”

Step 8: git status

Now my code is ready to be pushed to Repository.

If Project is not initialised with GIT Repository  – Follow below command to initialise project with GIT Repository before pushing code to Repository. [It is a One Time Activity].

If Project is already initialzed you can ignore Step-9.

Step 9: git remote add  origin “Path of Git Repository”
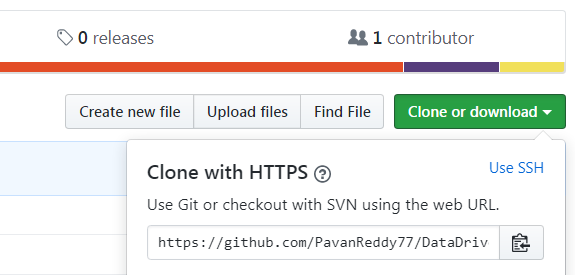
Now Project will be initialised with GIT Repository and we are good to push our code.


Step 10: git push origin master [Master >> Branch Name].

If it asks for credentials >> Enter Valid Username and Password.
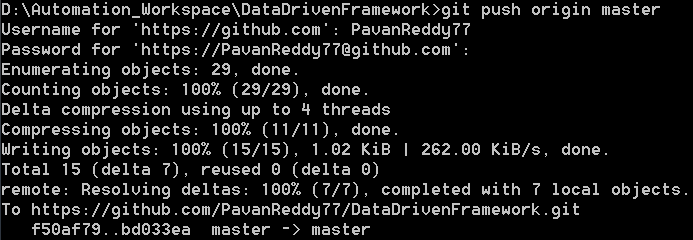
Code is Pushed to initialised GIT Repository.


Other git commands:

git clone “repository path“ – To download or clone complete repository from git.


git pull origin master – Once repository is cloned from git to local and we udpate any code for same repository in git. To get same code to be udpated in Local and in Eclipse we can use this command.


This blog is written by Pavan. He is an expert in Selenium Automation and currently working in Infosys as Automation QA Engineer.


Cheers!

Naveen AutomationLabs