TestNG.xml file is a configuration file that helps organizing our tests. It allows testers to create and handle multiple test classes, define test suites and tests. Also, we can achieve parallel testing and parameterize test cases through Testng.xml which we will see later sections. Let’s see how to create tesng.xml file.
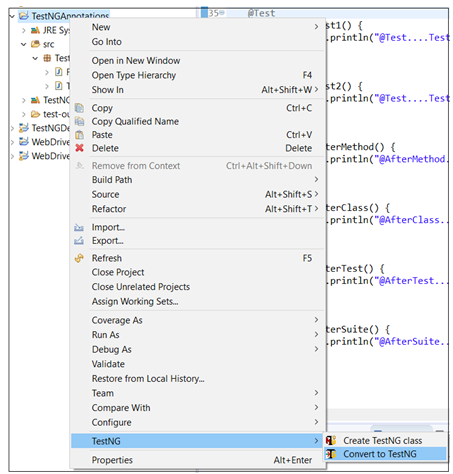
Go to project folder, right click on it, select TestNG option listed and click on Convert to TestNG as shown in the below screenshot.
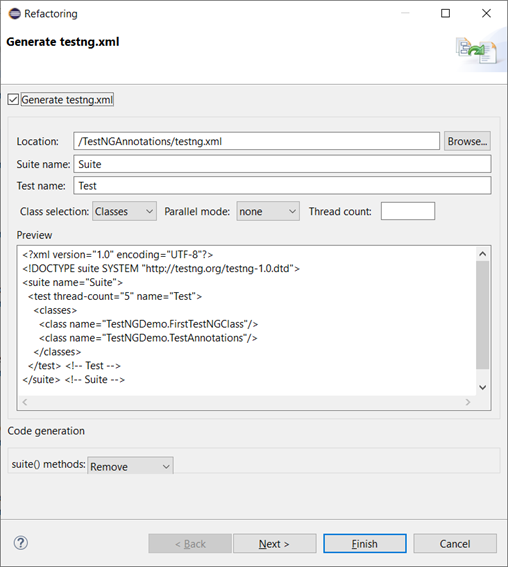
On clicking “Convert to TestNG” option, you will see the below dialog box as shown in the below screenshot. Click on Finish button to finish .
Here is the sample of testng.xml file
Example 1:
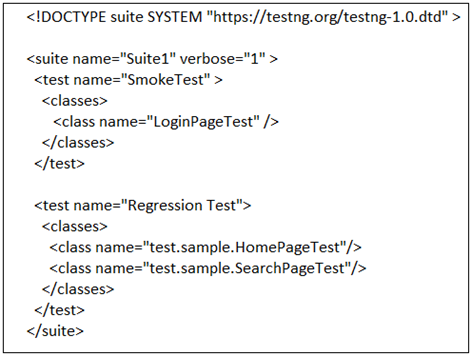
Let us understand the different components of testng.xml file.
Suite: A Suite is represented by one XML file. It can contain one or more tests and is defined by the <suite> tag. Example:

verbose: It is used to log the execution details in the console. The value should be 1-10. As you increase the value of verbose attribute, you will get more detailed log in the console window.
Test: A Test is represented by <test> and can contain one or more TestNG classes.Example:

Class : TestNG class is a Java class that contains at least one TestNG annotation. It is represented by the <class> tag and can contain one or more test methods.Example :

Test Method: A Test method is a Java method annotated by @Test methods in the source file. Example:

Example 2
We can specify package names instead of class names: In this example, TestNG will look at all the classes in the package “test.sample” and will run only classes that have TestNG annotations.

How to Run Testng.xml in the Eclipse IDE
Select the testng. xml file in the package explorer, right-click on it, move to Run As option and then select TestNG suite option.
How to create multiple classes, packages and execute TestNG suite
- Launch the Eclipse IDE, create a Java project, create two packages under src folder. Say Basic Features and TestUtility.
- Create three classes in Basic Features package say LoginPageTest.java, HomePageTest.java and SearchPageTest.java
- Create one class in TestUtility package, say BaseTest.java
- Write the below codes in the classes
- Create Testng.xml and execute it.
Refer below folder structure in the Package Explorer

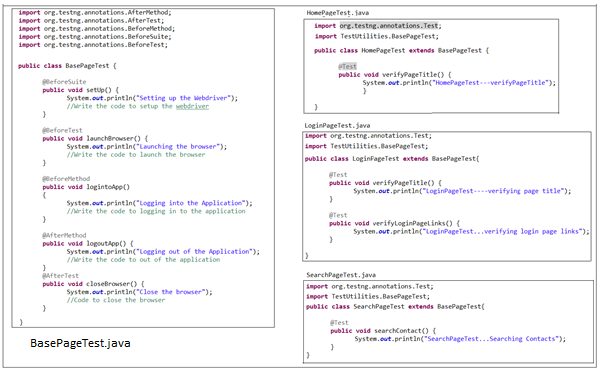
Now, write the below codes in the respective class files as shown below
Next, create testng.xml file as shown below
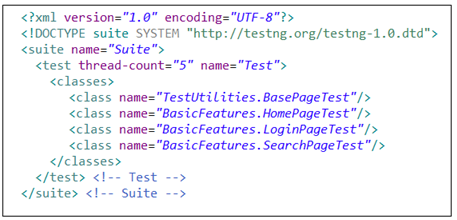
Now, execute the testng.xml file and you will see the below output
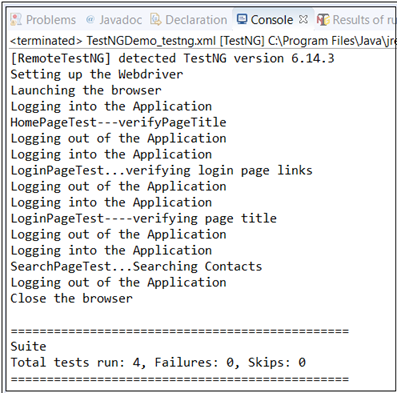
Let’s have a look at the execution order in the above project.
First, all pre-test Conditions are executed . In the above example, it is defined in BasePageTest.java and is executed in the below mentioned order
- @BeforeSuite: It is executed before executing any of the @Test annotated methods and any @Before annotated methods. It is executed only once.
- @BeforeTest: It is executed before all the classes included in the test included in <test> tag. In the above case it is <test thread-count=“5” name=“Test”>. Thread count is used in parallel testing, it can be excluded.
- @BeforeMethod: It is executed before every @Test annotated method in all the classes that have extended BasePageTest class.
Next, @Test annotated method where the business requirement resides are executed. That is after pre-test annotated methods,
- @Test: @Test annotated methods are executed as per the classes organized in Testng.xml. In the above case, it will execute first all @Test annotated methods in SearchPageTest.java, then from LoginPageTest.java and finally HomePageTest.java. And within the class, it is executed in alphabetical order.
Then, all post-test conditions are executed
- @AfterMethod: It is executed after every @Test annotated method. In our example there are four @Test annotated methods so it is executed after each @Test methods.
- @AfterTest: It is executed after all @Test annotated method from all classes have been executed
It is not necessary to use all the annotations, So based on testing needs these annotations, classes and tests should be defined.
View the test execution results in the Results of running suite tab
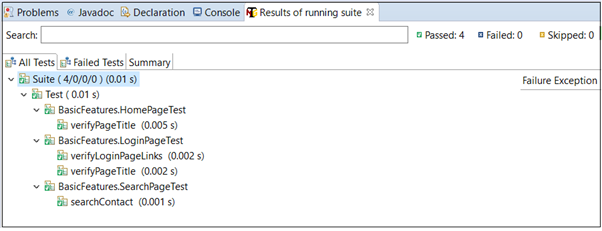
We can create multiple testng.xml files for different test phases and create test suite as per the testing needs. Example: RegressionSuite.xml, SmokeTestSuite.xml etc.
In the next section, we will see how to create Maven project and integrate TestNG with Selenium Webdriver code.

Leave a Reply