Let’s understand how the TestNG project can be executed. Since it doesn’t contain Java main method, it can’t be run as Java Application. We can run in the below two ways.
1. Through Eclipse IDE
2. Through Command line.
How to run TestNG project from Eclipse IDE
We can use one of the below mentioned methods.
- Run as TestNG Test
- Create Testng.xml and execute it
Run as TestNG Test:
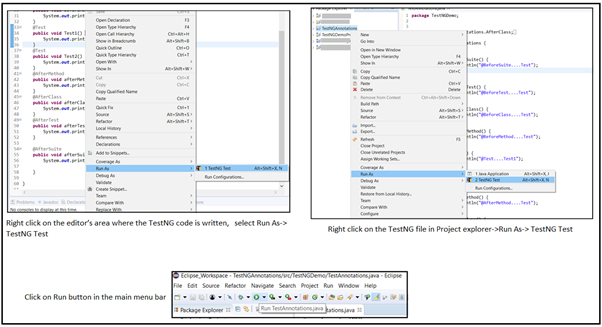
- From the editor’s area: Right click on the editor’s area where the TestNG code is written, select Run As-> TestNG Test.
- From the Package Explorer: This method can be used to run single or multiple classes.
Go to Package Explorer in the Eclipse IDE ->select single/ multiple classes/ test package, right click on it -> Choose Run As->TestNG Test
3. From the Menu bar, Click on Run button .
Refer below screenshot for the above-mentioned methods.
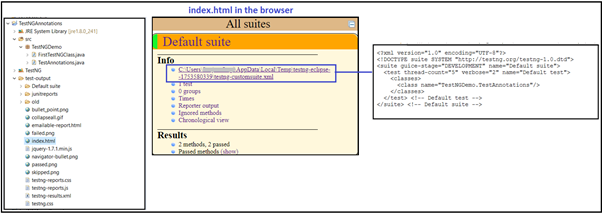
When TestNG file/files are run in the above-mentioned ways, TestNG creates a default Testng.xml file and executes the test. This default testng.xml can be located in two places.
- In the index.html file
- Under test-Ouput folder
1. TestNG will generate a default report that can be viewed in index.html file present under test-Output folder. Right click on the Project in the Package explorer and Refresh after TestNG project is executed. Copy the path of the index.html file and open it in the browser. [Note: We will go through index.html file in detail in the further section]
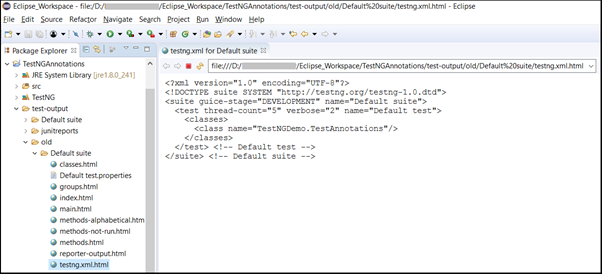
2. Right click on the Project in the Package explorer and click on Refresh after TestNG project is executed. Go to test-Output folder under Project directory. Expand it, then go to old-Default suite. You will see textng.xm.html file. Open it and check the code.
How to run TestNG project through command line.
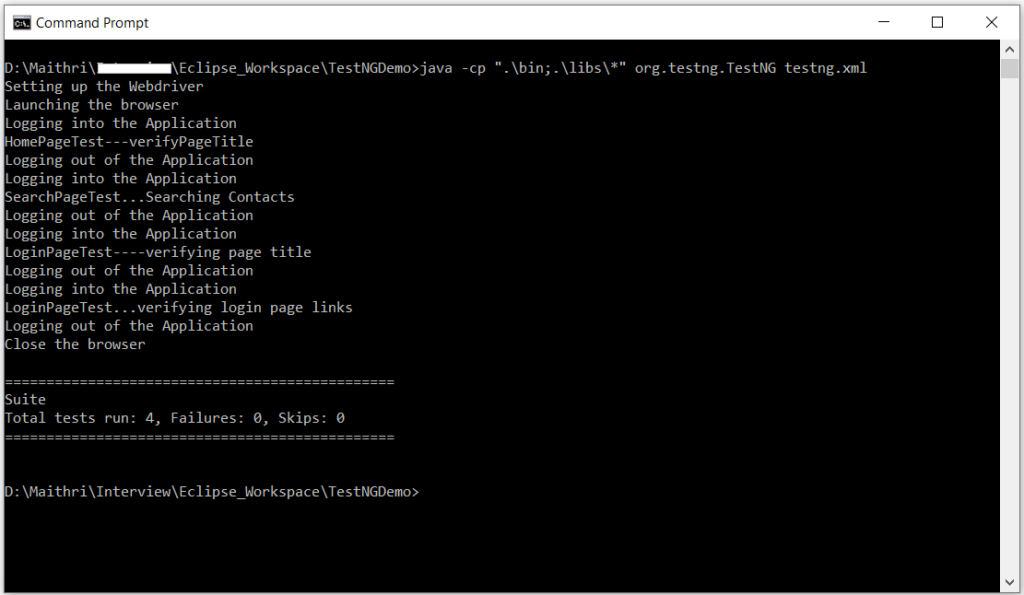
In order to run Testng.xml file through command line, we need testng.jar and jcommander.jar files. These jar files can be searched and downloaded from https://mvnrepository.com/.
Once it is downloaded, place it in “libs” folder under your Eclipse project directory. Before we run it, we need to compile our project. The compiled code can be found in “bin” folder under the project directory. We can execute the TestNG project in two ways. Either you set the class path first for lib and bin folder and then execute or combine both the commands in one step. Both the ways are shown below. So go to command prompt,
Step 1. set classpath=[Project Folder]\bin;[Project Folder]\libs\*
Step 2. java org.testng.TestNG testng.xml
Or
Step 1. java -cp “.\bin;.\libs\*” org.testng.TestNG testng.xml
For example: Navigate to project folder and type the below command

or navigate to project folder and the type the below command

We can execute multiple testng.xml files just by appending it.
Example:

Please refer below screenshot for command line execution
In the next section, we will see how to create Testng.xml and execute it through Eclipse IDE .
 – Basics To Advanced (Coming Soon)")
Leave a Reply