
~Source: Google
Introduction:
In this Article, We are going to learn about creating UI Test automation framework with Cucumber BDD Approach.
What is BDD ?
- Behaviour-driven development is an Agile software development process that fosters collaboration between developers, software testers, and the non-technical, business side in a software development process.
- It asserts how an application should behave from the end user’s perspective.
Why Cypress ?
- Front end testing tool built for the modern web applications.
- Because of its Architectural design, Cypress delivers fast, consistent and reliable test execution compared to other Automation tools
- Cypress takes snapshots as your tests run. We can hover over each command in the Command Log to see exactly what happened at each step.
- Cypress automatically waits for commands and assertions before moving on.
- Ability to test edge test cases by Mocking the server response.
Cypress Project Setup with Cucumber:
- Download Node js from https://nodejs.org/en/download/ as per your operating system, as the cypress is built on the node js.
- Create a folder and import the folder in any editor atom, sublime or visual studio code and open the terminal.
- Setup a new npm package : npm init, this will create package.json in your project.
- Open the terminal and enter npm install cypress cypress-cucumber-preprocessor, this will install cypress and cucumber in your project.
- Dependencies should get added in package.json file.
- Execute a command npx cypress open and you will be displayed with these folders in editor’s Left Pane.
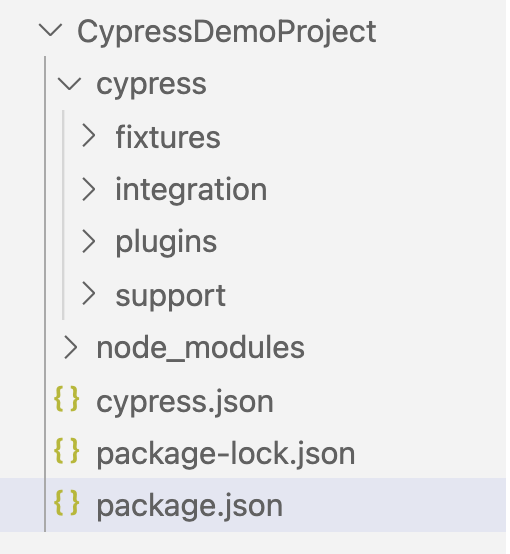
To enable the cucumber preprocessor plugin:
Open cypress/plugins/index.js and this snippet
const cucumber = require('cypress-cucumber-preprocessor').default

module.exports = (on, config) => {
  on('file:preprocessor', cucumber())
}
Add support for feature files to your Cypress configuration
cypress.json{
  "testFiles": "**/*.feature"
}
Add this section to your package.json:
"cypress-cucumber-preprocessor": {
"nonGlobalStepDefinitions": true
}
To bind our step definitions to our features files.
Cucumber Feature File:
A feature file can contain a scenario or can contain many scenarios in a single feature file but it usually contains a list of scenarios in English format using some BDD keywords and the language is called “Gherkin“.
Steps:
- Create a folder under the Integration folder as CucumberTests
- Create a file login.feature and click login.feature and type Feature and the syntax for the same will get poped up automatically:

Provide Feature name, Feature Description and Type Scenario and give Scenario name.
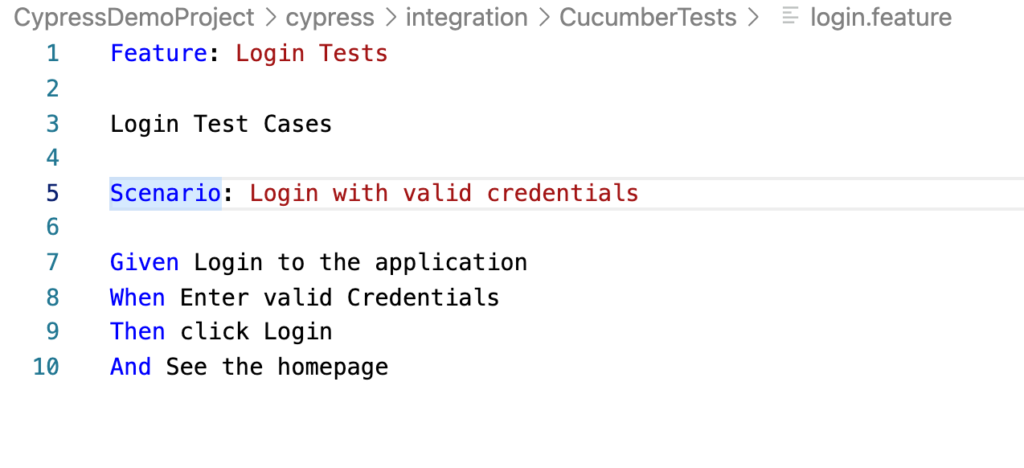
Let’s try to understand the Feature File:
After the Scenario, we need to write certain statements with Keywords Given, When, Then, And also But.
- Given: It describes the pre-requisite for the test to be executed.
- When: It defines the trigger point for any test scenario execution.
- Then: It holds the expected result for the test to be executed.
- And: It provides the logical AND condition between any two statements
- But: It signifies logical OR condition between any two statements.
Now, We have to create the step definition for the test written in the feature file:
Since we have feature file with us, now we have to create step definition file for the same :
- Create a folder login, remember folder name should be the same as the name of feature file.
- login.feature is the feature file name and folder should have name as login
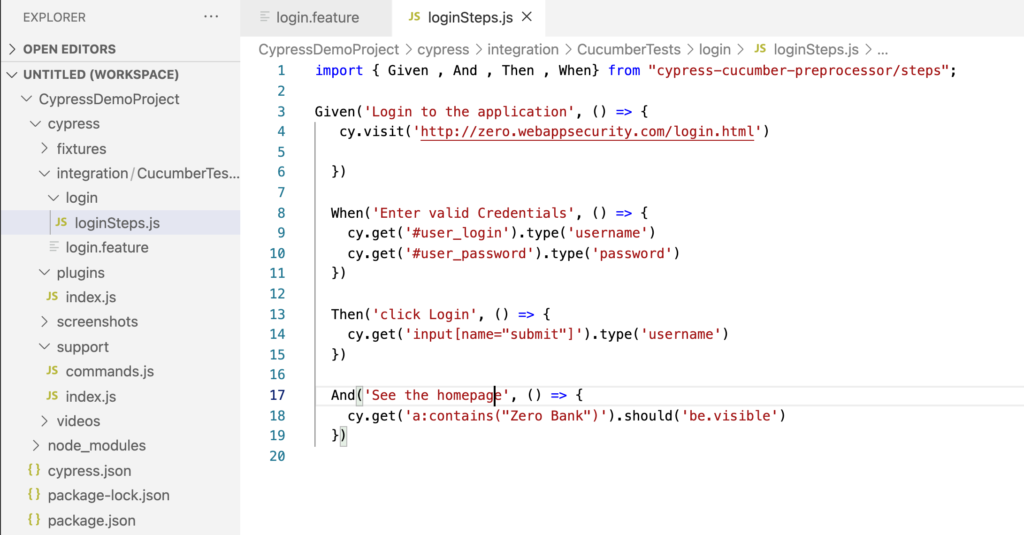
- Under the login folder, create a loginSteps.js file and start Mapping the test steps with feature file test cases.
and folder in left pane and step definition would look like below:
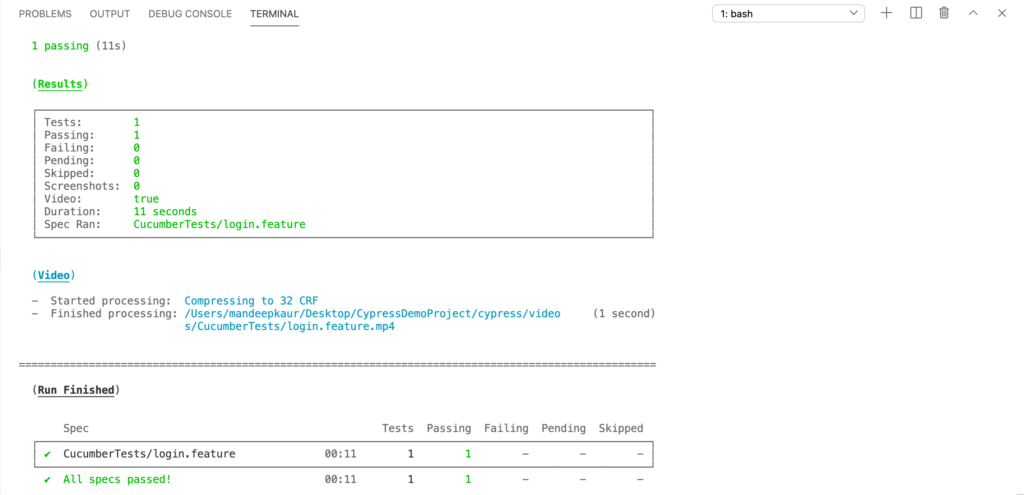
Hit the command npx cypress run and output on console will be displayed as below:
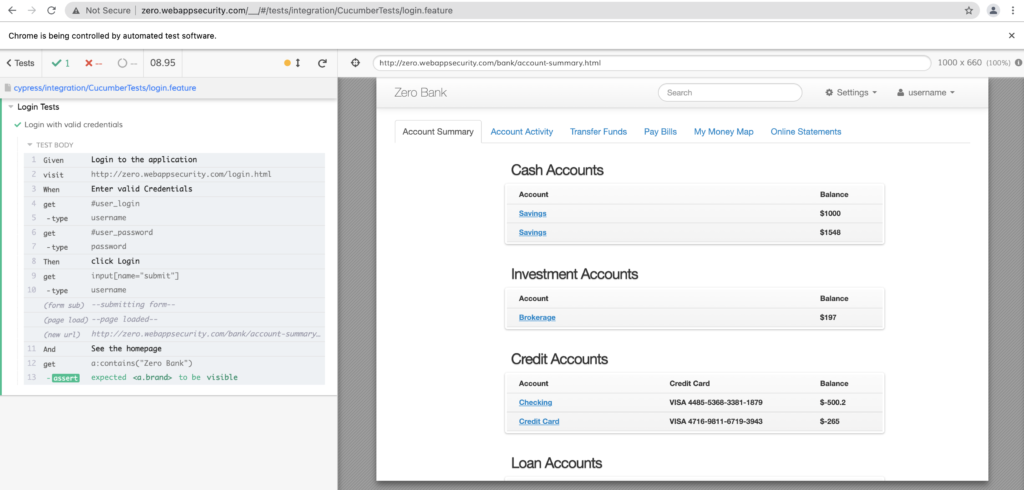
and to run in Test runner enter the command npx cypress open in the terminal and then run feature file and will be displayed as below:
Step Definitions with Dynamic Parameters:
Say, when you have to pass username and password as dynamic values below is the code snippets to be followed
Feature: Login Tests

Login Test Cases

Scenario: Login with valid credentials

Given Login to the application
When I type username as "username"
And I type password as "password"
Then click Login
And See the homepage
import { Given , And , Then , When} from "cypress-cucumber-preprocessor/steps";
Given('Login to the application', () => {
cy.visit('http://zero.webappsecurity.com/login.html')
})
When('I type username as {string}',username=> {
cy.get('#user_login').type(username)
})
And('I type password as {string}',password=> {
cy.get('#user_password').type(password)
})
Then('click Login', () => {
cy.get('input[name="submit"]').click()
})
And('See the homepage', () => {
cy.get('a:contains("Zero Bank")').should('be.visible')
})
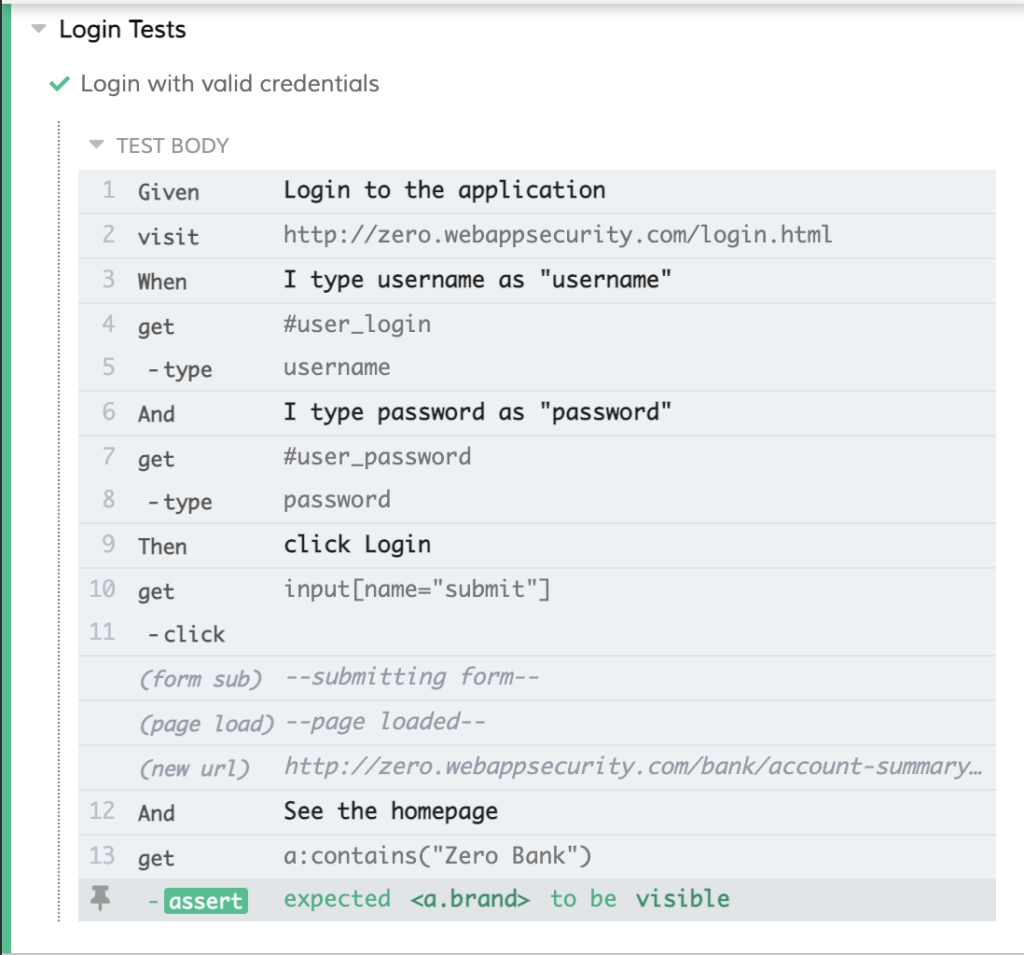
and In the Test Runner, it will be shown as with proper Given, When, Then and And statements:
Concept of Grouping and Filtering of Test Cases/ Smart Tagging:
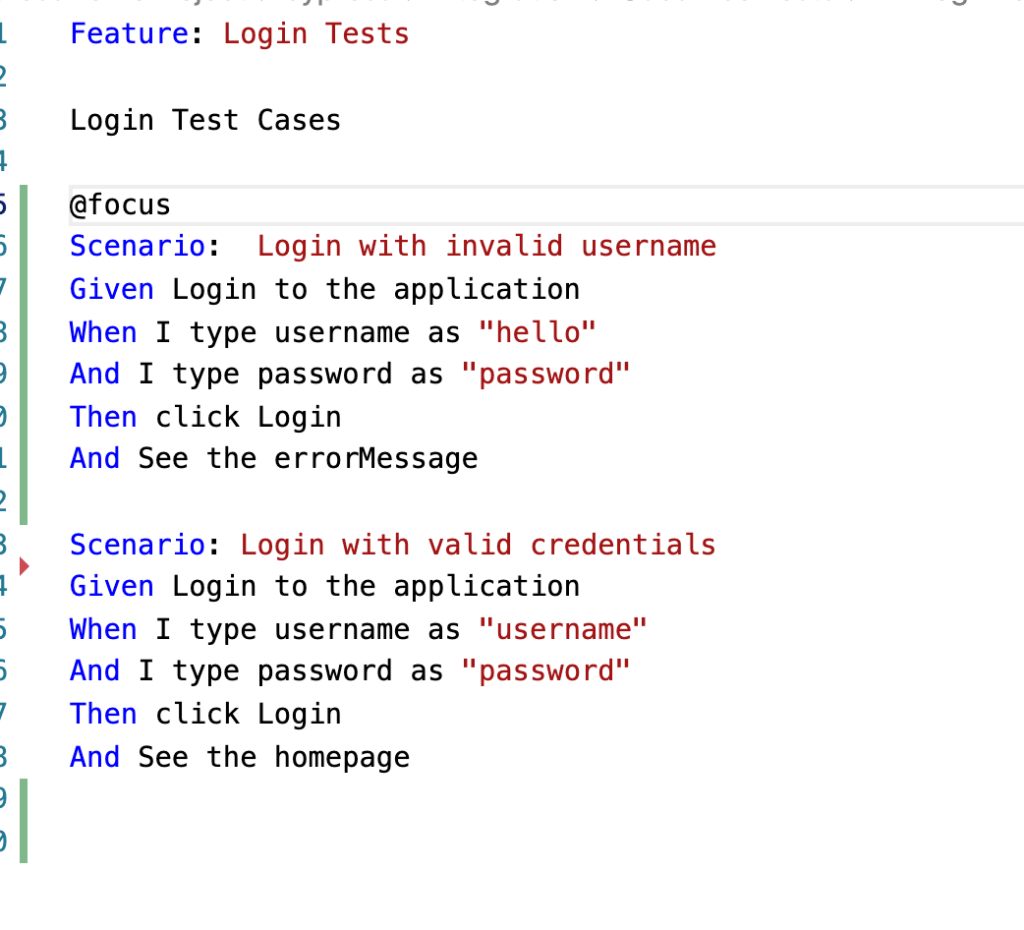
when you have multiple scenarios and wanted to check few test cases to run, just put @focus on the specific scenarios you want to run:

Also, you can tag your test cases with @smoke and @Regression test cases and run the particular scenarios from your command line with the below command :
./node_modules/.bin/cypress-tags run -e TAGS=’not @Smoke and (@Regression or @Sanity)’
Hooks Support in cypress and cucumber:
- The cypress-cucumber-preprocessor supports both Mocha’s before/beforeEach/after/afterEach hooks and Cucumber’s Before and After hooks.
- Cucumber Before hooks run after all Mocha before and beforeEach hooks have completed and the Cucumber After hooks run before all the Mocha afterEach and after hooks.
- As we are using Mocha test framework with cucumber and cypress, it’s always good to go with Mocha hooks.
Let’s begin to Explore Data Driven Testing with cucumber:
Feature File:
Feature: Login Tests

Login Test Cases

Scenario: Login with multiple credentials
Given Login to the application
When I type the credentials
| uname | pword |
| username | password |
| hello | world |
Then click Login
To pass multiple test data set, you define the test set in tabular form like done above:
import { Given , And , Then , When} from "cypress-cucumber-preprocessor/steps";

Given('Login to the application', () => {
   cy.visit('http://zero.webappsecurity.com/login.html')
  })

  When('I type the credentials',function(dataTable) {
    cy.get('#user_login').type(dataTable.rawTable[1][0])
    cy.get('#user_password').type(dataTable.rawTable[1][1])
    cy.get('#user_login').type(dataTable.rawTable[2][0])
    cy.get('#user_password').type(dataTable.rawTable[2][1])
  })

  Then('click Login', () => {
    cy.get('input[name="submit"]').click()
  })
Let’s try to understand the code:
To fetch the test data, just write dataTable in function and as I have defined 2D array, fetch first username as dataTable.rawTable[1][0] that means raw one and 0 coloumn and it will fetch username as “username”.
Generating HTML Cucumber Reports:
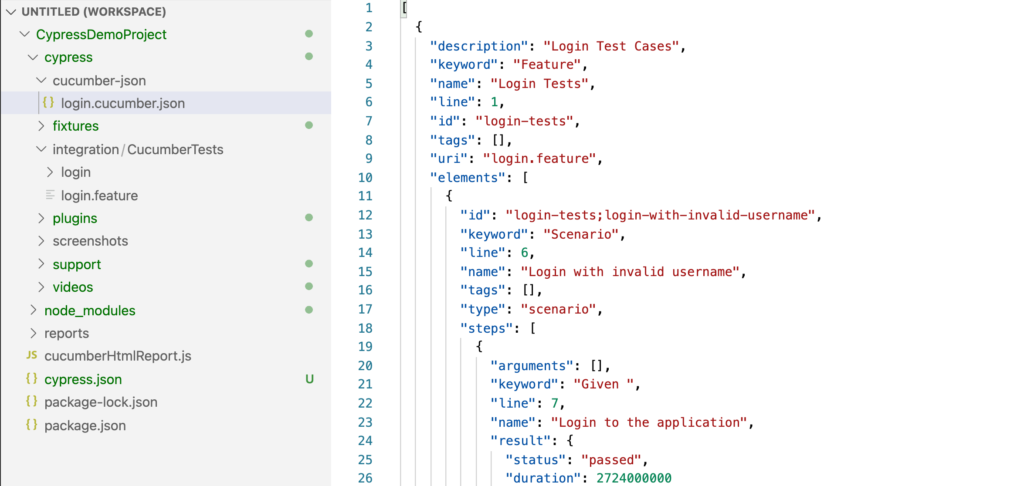
Add below code snippet in package.json
 "cypress-cucumber-preprocessor": {
    "cucumberJson": {
      "generate": true,
      "outputFolder": "cypress/cucumber-json",
      "filePrefix": "",
      "fileSuffix": ".cucumber"
    }
  }
cucumber.json file:
And to create HTML report : Install this plugin with the following command:
- npm install multiple-cucumber-html-reporter –save-dev
- Add cucumberHTMLReport.js file under your parent project and paste the below code:
const report = require('multiple-cucumber-html-reporter');

report.generate({
	jsonDir: './path-to-your-json-output/',
	reportPath: './path-where-the-report-needs-to-be/',
	metadata:{
        browser: {
            name: 'chrome',
            version: '60'
        },
        device: 'Local test machine',
        platform: {
            name: 'ubuntu',
            version: '16.04'
        }
    },
    customData: {
        title: 'Run info',
        data: [
            {label: 'Project', value: 'Custom project'},
            {label: 'Release', value: '1.2.3'},
            {label: 'Cycle', value: 'B11221.34321'},
            {label: 'Execution Start Time', value: 'Nov 19th 2017, 02:31 PM EST'},
            {label: 'Execution End Time', value: 'Nov 19th 2017, 02:56 PM EST'}
        ]
    }
});
Configure jsonDir and reportPath as or the way you want :
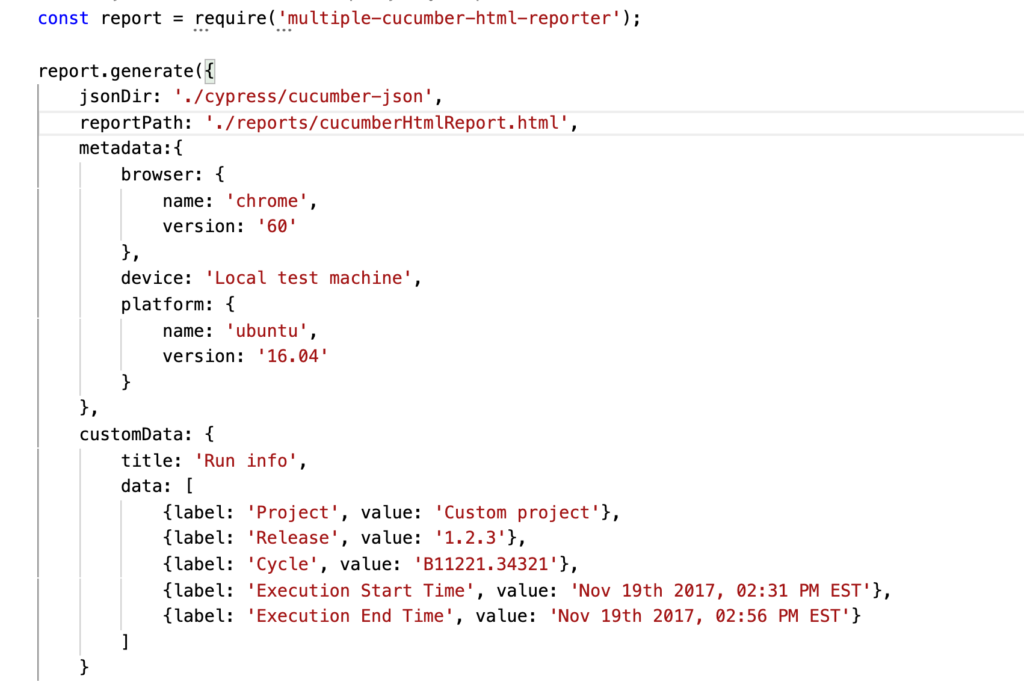
Now, we need to execute this js file to get the HTML Report , just hit the command as node cucumberHTMLReport.js

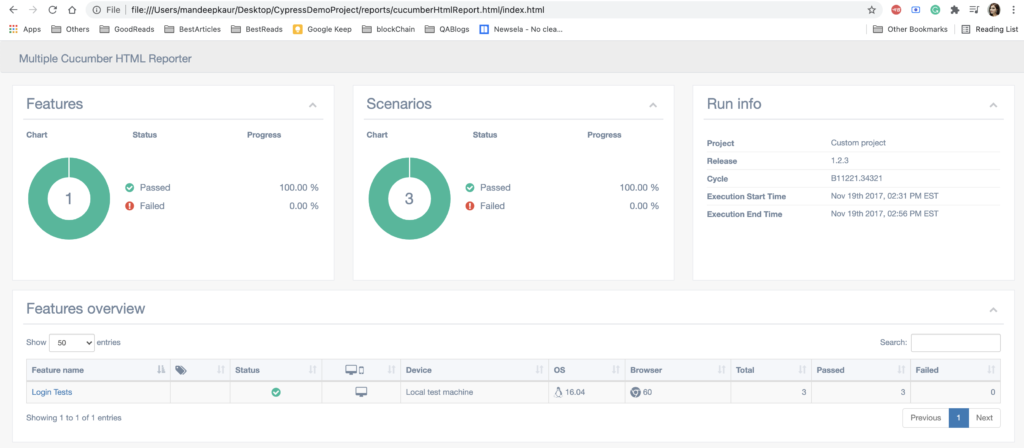
Open this file in browser to get full-fledge HTML report:
For the code reference, please clone the project from:
https://github.com/MandeepKaur2020/CypressFrameworkBDD.git
References:
- https://www.npmjs.com/package/cypress-cucumber-preprocessor
- https://github.com/TheBrainFamily/cypress-cucumber-preprocessor
Conclusion:
Blog Contributors:
Author: Mandeep Kaur
Mandeep, having 5+ years of Testing experience in automation using Selenium (Java) and Cypress. Expertise in API using Rest Assured, HTTP Client and Performance testing using JMeter.https://www.linkedin.com/in/mandeepkaur93/
Reviewer: Naveen Khunteta
https://www.linkedin.com/in/naveenkhunteta


Thanks For Sharing the topics in much details and an easy way
Very Useful .
Thanks so much.
Gr8 work, with the help of this article I am able to confirm the Cypress with Cucumber .!!
How to get the details like on which browser the test was executed. Currently it is hard coded in .js file.
Ιt’s actually a great and helpful piece of info. I’m glaԁ
that yoս simply shared this useful info with us.
Please stay սs up to date like thiѕ. Thanks for
shaгing.
Hi Naveen/Mandeep,
I am using cypress with cucumber BDD. For report. I am using multiple cucumber HTML reports.
Query: How can I add dynamic values of browser version and OS name in the report. Thanks in advance.
Нeya i’m for the first time here. I came across
this board and I find It reaⅼly useful & it helped me out a lot.
I hope to give something back and heⅼp others like you helped me.