~ Image Source:google/.sashido.io/
Introduction
In this article, we are going to learn about the HTTP Post Method in detail and various ways to create a post payload, in addition to that, we will also learn how to validate Post Response using RestAssured.
Writing post Method
Let’s start writing our first positive scenario :
- Given Accept the given content in JSON format
- with content type as JSON
- and Body
- when I performed the Post Request
- Then status Code should be 200 OK
- And The response should have name as given in JSON body
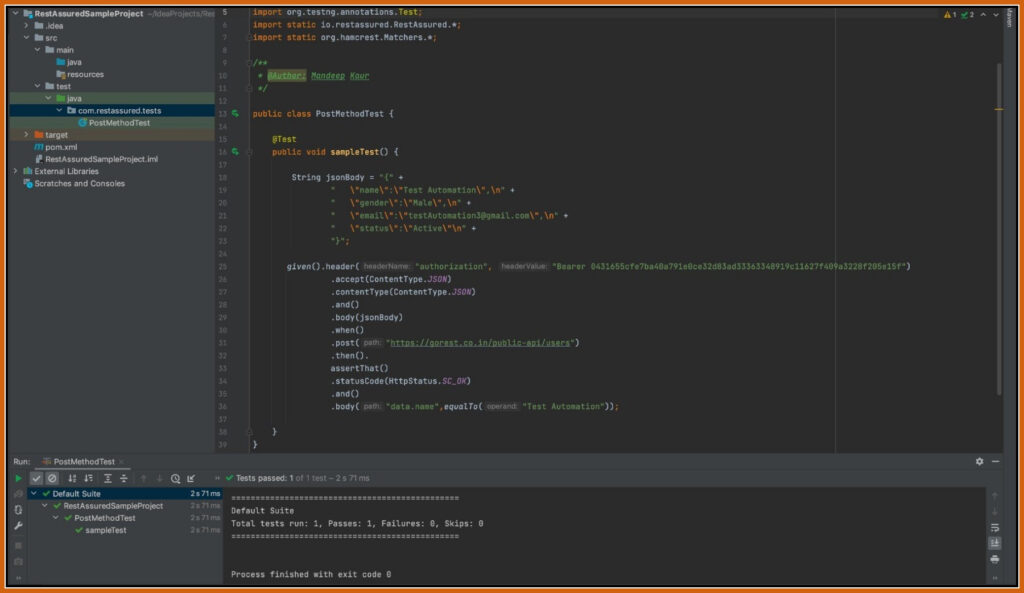
- As depicted in the screenshot, Primarily, to hit the JSON HTTP post request we need to have JSON Body and passing the JSON body as a string in Body function would suffice our need.
- This means, once we have the body, we can simply pass our endpoint here in the .post function and once it is successful, we need to assert whether we get the expected output or not.
- Below is the code for same:
Note: Content type can be XML if you are using XML, else it would be JSON
package com.restassured.tests;
import io.restassured.http.*;
import org.apache.http.HttpStatus;
import org.testng.annotations.Test;
import static io.restassured.RestAssured.*;
import static org.hamcrest.Matchers.*;
/**
* @Author: Mandeep Kaur
*/
public class PostMethodTest {
@Test
public void sampleTest() {
// Json Body to pass in the request
String jsonBody = "{" +
" \"name\":\"Test Automation\",\n" +
" \"gender\":\"Male\",\n" +
" \"email\":\"testAutomation3@gmail.com\",\n" +
" \"status\":\"Active\"\n" +
"}";
given().header("authorization", "Bearer 0431655cfe7ba40a791e0ce32d83ad33363348919c11627f409a3228f205e15f")
.accept(ContentType.JSON)
.contentType(ContentType.JSON)
.and()
.body(jsonBody)
.when()
.post("https://gorest.co.in/public-api/users") //hit the post end point
.then().
assertThat()
.statusCode(HttpStatus.SC_OK)
.and()
.body("data.name", equalTo("Test Automation")); // Match the output actual to expected
}
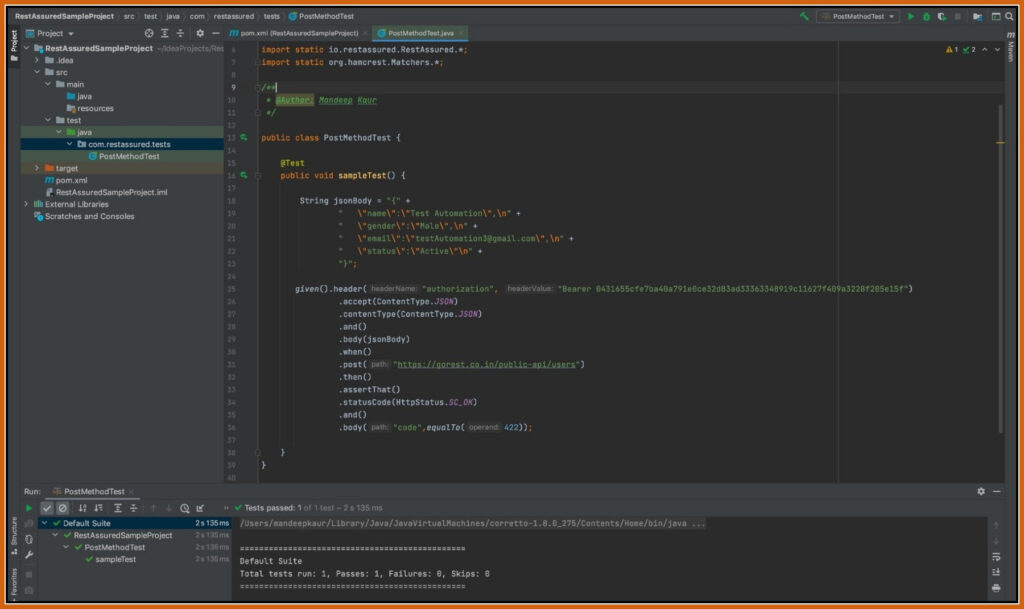
}Another scenario is the negative case:
Would be if we send the same request, then it should return the response code as “422” and message as email has already been taken because to create user every time unique email should be passed:
JSON Object
Now, the other way of creating the payload/ request is through JSON Object:
A JSONObject is an unordered collection of key and value pairs, resembling Java’s native Map implementations.
- Keys are unique Strings that cannot be null
- Values can be anything from a Boolean, Number, String, JSONArray or even a JSONObject.NULL object
- A JSONObject can be represented by a String enclosed within curly braces with keys and values separated by a colon, and pairs separated by a comma
- It has several constructors with which to construct a JSONObject
Instead of sending the hardcode JSON body, we can send customize data along with post request.
For this scenario, what we need to do is :
Add this maven dependency in your project

After that manipulate below JSON request to JSON Object:
{
"name":"Test Automation",
"gender":"Male",
"email":"testAutomation6@gmail.com",
"status":"Active"
}
And here’s the below code for the same :
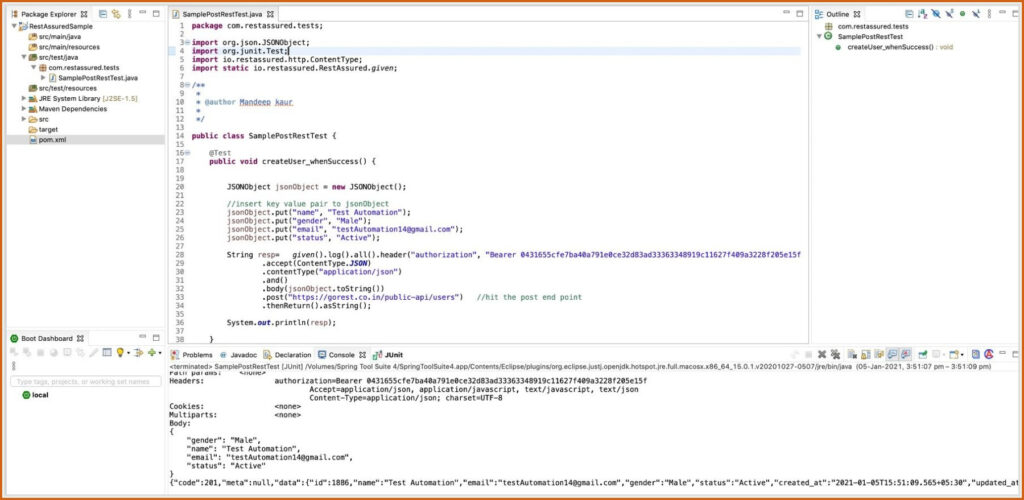
Post Request by JSONObject
package com.restassured.tests;

import org.json.JSONObject;
import org.junit.Test;
import io.restassured.http.ContentType;
import static io.restassured.RestAssured.given;

/**
 *
 * @author Mandeep kaur
 *
 */

public class SamplePostRestTest {

	@Test
	public void createUser_whenSuccess() {


		JSONObject jsonObject = new JSONObject();

		//insert key value pair to jsonObject
		jsonObject.put("name", "Test Automation");
		jsonObject.put("gender", "Male");
		jsonObject.put("email", "testAutomation14@gmail.com");
		jsonObject.put("status", "Active");

		String resp=  given().log().all().header("authorization", "Bearer 0431655cfe7ba40a791e0ce32d83ad33363348919c11627f409a3228f205e15f23")
				.accept(ContentType.JSON)
				.contentType("application/json")
				.and()
				.body(jsonObject.toString())
				.post("https://gorest.co.in/public-api/users")   //hit the post end point
				.thenReturn().asString();

		System.out.println(resp);

	}
}
As can be seen, We can use JSONObject and insert the values in the attribute just like hashMap in java and later on, can pass the JSON object in String. After that, validations can be performed accordingly:
And From hashMap also we can create JSON Object like below:
Map<String, String> map = new HashMap<>();
map.put("name", "Test Automation");
map.put("gender", "Male");
map.put("email", "testAutomation14@gmail.com");
map.put("status", "Active");
JSONObject jo = new JSONObject(map);
and this jo object reference can simply be passed in the request.
Since this nature of post request is quite simple, so for the complex request, you need to modify the request as per given specification.
Let’s take a small example:
[
    "Employee",
    {
        "city": "chicago",
        "name": "john",
        "age": "36"
    }
]
Now here it is having array and then a JSON object :
To build this request we need to have this below structure:
JSONArray jsonArray = new JSONArray();
jsonArray.put("Employee");

JSONObject jo = new JSONObject();
jo.put("name", "john");
jo.put("age", "22");
jo.put("city", "chicago");

jsonArray.put(jo);
To illustrate the example above, we first need to create the JSON object and insert values in it, once done then we need to pass this object in JSON Array which again comes from org.json package(below-detailed description of JSONArray), JSON array has its own element as “Employee” which can also be inserted using put() method and finally we can insert this JSONArray into request body like below
A JSONArray is an ordered collection of values, resembling Java’s native Vector implementation.
- Values can be anything from a Number, String, Boolean, JSONArray, JSONObject or even a JSONObject.NULL object
- It’s represented by a String wrapped within Square Brackets and consists of a collection of values separated by commas
- Like JSONObject, it has a constructor that accepts a source string and parses it to construct a JSONArray
package com.restassured.tests;

import org.json.JSONArray;
import org.json.JSONObject;
import org.junit.Test;
import io.restassured.http.ContentType;
import static io.restassured.RestAssured.given;

/**
 *
 * @author Mandeep kaur
 *
 */

public class SamplePostRestTest {

	@Test
	public void createUser_whenSuccess() {


		JSONArray jsonArray = new JSONArray();
		jsonArray.put("Employee");

		JSONObject jo = new JSONObject();
		jo.put("name", "john");
		jo.put("age", "22");
		jo.put("city", "chicago");

		jsonArray.put(jo);

		 given().log().all().header("authorization", "Bearer 0431655cfe7ba40a791e0ce32d83ad33363348919c11627f409a3228f205e15f23")
				.accept(ContentType.JSON)
				.contentType("application/json")
				.and()
				.body(jsonArray.toString())
				.post("https://gorest.co.in/public-api/users")   //hit the post end point
				.thenReturn().asString();

             }
	}
If there will be any issues with JSON Object, We will get below exception:

The JSONException is the standard exception thrown by this package whenever any error is encountered. This is used across all classes from this package. The exception is usually followed by a message that states what exactly went wrong.
Object Mapping:
Lastly, the other method where payloads can be really complexed, we can go for Object Mapping:
We need to follow below steps :
- Create a Mapping class also called POJO class (Plain Old Java Objects) and this process is called serialization as we are going to convert the object to the body.
- Create an object of Mapping class
- Initialise the values available in the mapping class
- Send the object along with post request
Let’s analyse the below code
{
“name”:”Test Automation”,
“gender”:”Male”,
“email”:”testAutomation6@gmail.com”,
“status”:”Active”
}
To Create the mapping class, I would say go to JSONToJavaObject, paste the JSON request and get the Mapping class. As done below:
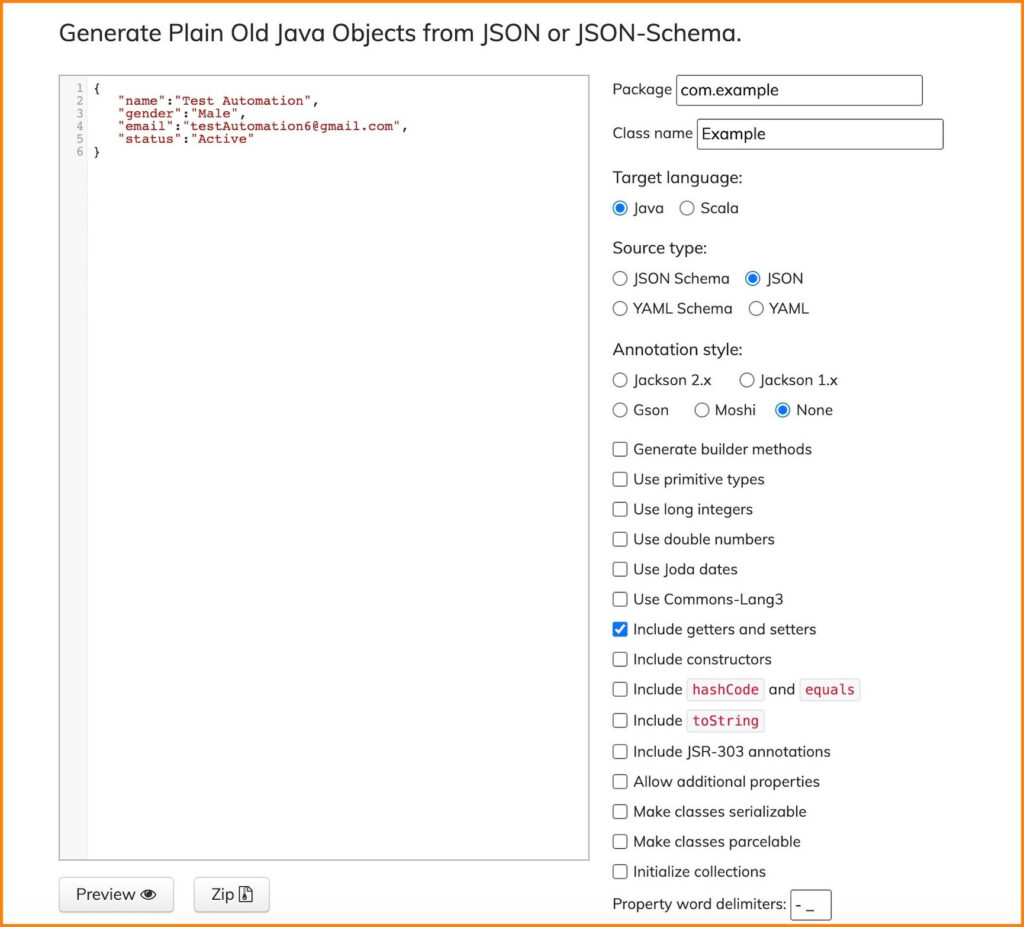
JsonToPOJO
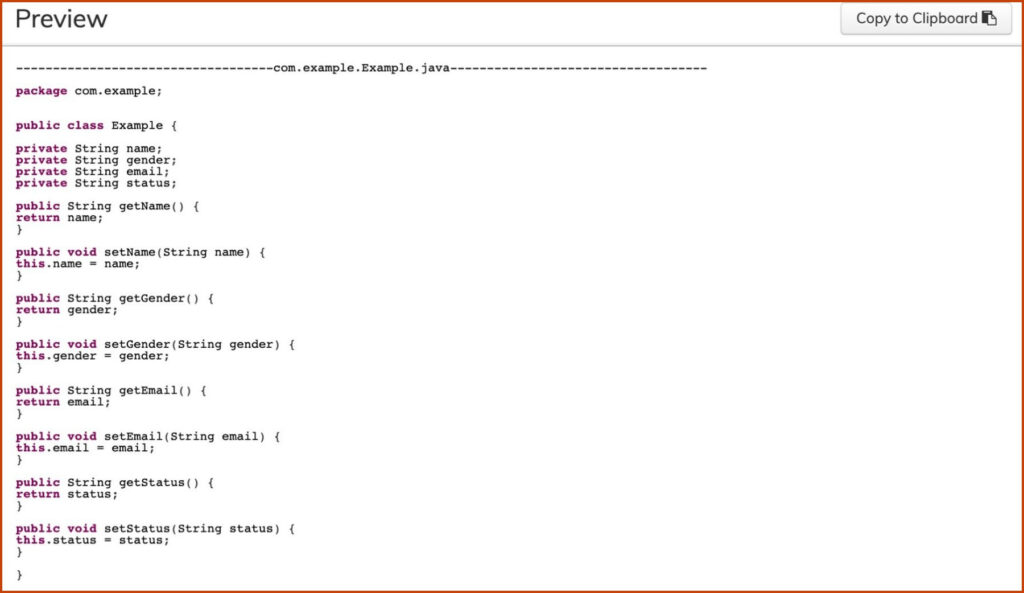
Mapping class
And our createUser Mapping class will look like this:
package com.restassured.vo;

public class createUserDO  {

    private String name;
    private String gender;
    private String email;
    private String status;


    public String getName() {
        return name;
    }

    public void setName(String name) {
        this.name = name;
    }

    public String getGender() {
        return gender;
    }

    public void setGender(String gender) {
        this.gender = gender;
    }

    public String getEmail() {
        return email;
    }

    public void setEmail(String email) {
        this.email = email;
    }

    public String getStatus() {
        return status;
    }

    public void setStatus(String status) {
        this.status = status;
    }


}
Now, the second step is to create an object of Mapping class:
- createUserDO cu = new createUserDO();
- Initialised the values via setters i.e setName(“Test Automation”) available in the mapping class.
- and finally, we sent the object in the post call
package com.restassured.tests;


import org.junit.Test;

import com.restassured.vo.createUserDO;

import io.restassured.http.ContentType;
import static io.restassured.RestAssured.given;

/**
 *
 * @author Mandeep kaur
 *
 */

public class SamplePostRestTest {

	@Test
	public void createUser_whenSuccess() {
	createUserDO cu = new createUserDO();
        cu.setName("Test Automation");
        cu.setGender("Female");
        cu.setEmail("testAutomation25@gmail.com");
        cu.setStatus("Active");

		String resp =  given().log().all().header("authorization", "Bearer 0431655cfe7ba40a791e0ce32d83ad33363348919c11627f409a3228f205e15f")
				.accept(ContentType.JSON)
				.contentType("application/json")
				.and()
				.body(cu)
				.post("https://gorest.co.in/public-api/users")   //hit the post end point
				.thenReturn().asString();

		System.out.println(resp);

             }
	}
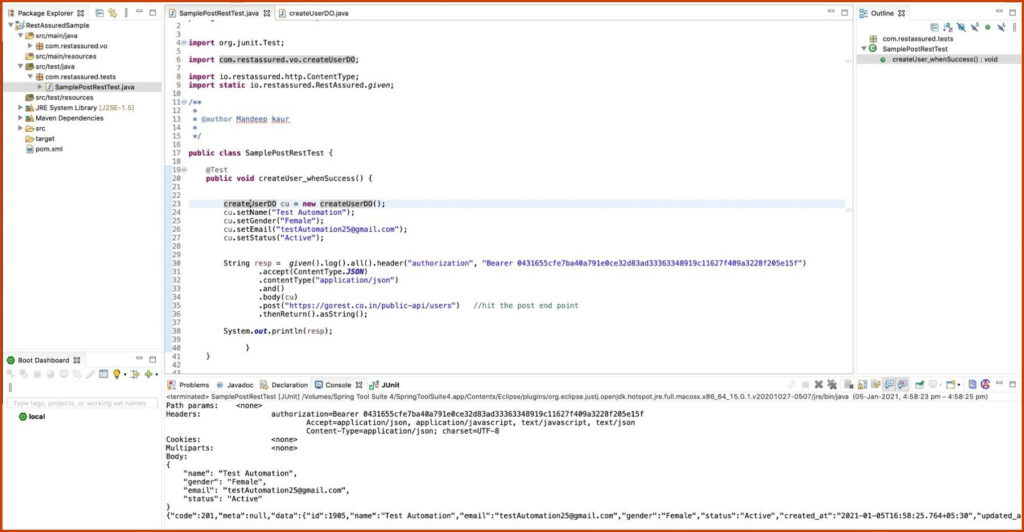
Note: if we need to have logs to verify things, we can simply use log().all() and it can display information on a console like below:
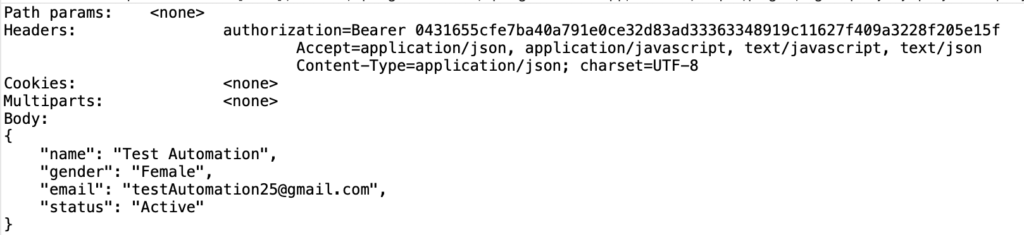
Logs on Console
Since we have converted our object to the body, now to validate the response we can use the process called deserialization of response body, which means converting response body to object.
To do that, the first thing is to create a mapping class for response JSON body, you use the same converter as above json2pojo schema and below code how it is to be done:
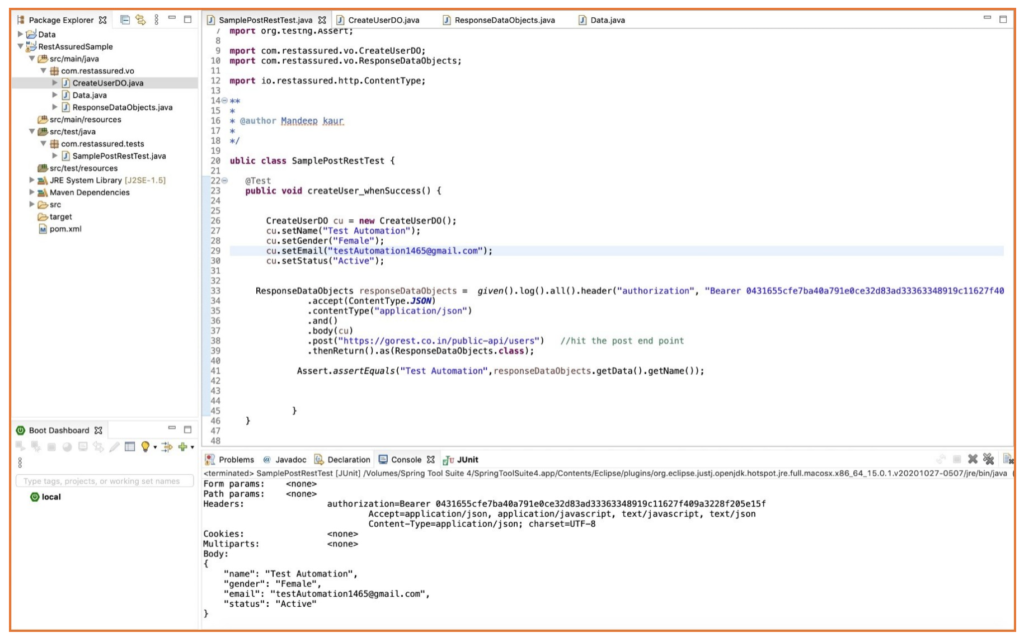
Deserialization of Response body
package com.restassured.tests;

import static io.restassured.RestAssured.given;

import org.junit.Test;
import org.testng.Assert;

import com.restassured.vo.CreateUserDO;
import com.restassured.vo.ResponseDataObjects;

import io.restassured.http.ContentType;

/**
 *
 * @author Mandeep kaur
 *
 */

public class SamplePostRestTest {

	@Test
	public void createUser_whenSuccess() {


		CreateUserDO cu = new CreateUserDO();
        cu.setName("Test Automation");
        cu.setGender("Female");
        cu.setEmail("testAutomation1465@gmail.com");
        cu.setStatus("Active");


      ResponseDataObjects responseDataObjects =  given().log().all().header("authorization", "Bearer 0431655cfe7ba40a791e0ce32d83ad33363348919c11627f409a3228f205e15f")
				.accept(ContentType.JSON)
				.contentType("application/json")
				.and()
				.body(cu)
				.post("https://gorest.co.in/public-api/users")   //hit the post end point
				.thenReturn().as(ResponseDataObjects.class);

		      Assert.assertEquals("Test Automation",responseDataObjects.getData().getName());


             }
	}
Till .post function we were clear what needs to be performed, the next step is thenReturn(), basically, to fetch the response body after that, as (the method )will take the mapping class(ResponseDataObjects ) to deserialize the response and this will return us the object of our mapping class.
And this class can be used to fetch all the information later on, for validations and verification checks.
Our JSON Response
{
    "code": 201,
    "meta": null,
    "data": {
        "id": 1493,
        "name": "Test Automation",
        "email": "testAutomation701@gmail.com",
        "gender": "Male",
        "status": "Active",
        "created_at": "2021-01-07T12:30:58.987+05:30",
        "updated_at": "2021-01-07T12:30:58.987+05:30"
    }
}
And correspondence POJO class:
Note: we need to use @JsonIgnoreProperties(ignoreUnknown=true)as is applicable at deserialization of JSON to Java object (POJO) only
package com.restassured.vo;

import com.fasterxml.jackson.annotation.JsonIgnoreProperties;

@JsonIgnoreProperties(ignoreUnknown = true)
public class ResponseDataObjects {

    private Integer code;
    private Object meta;
    private Data data;

    public Integer getCode() {
        return code;
    }

    public void setCode(Integer code) {
        this.code = code;
    }

    public Object getMeta() {
        return meta;
    }

    public void setMeta(Object meta) {
        this.meta = meta;
    }

    public Data getData() {
        return data;
    }

    public void setData(Data data) {
        this.data = data;
    }

}
package com.restassured.vo;

import com.fasterxml.jackson.annotation.JsonIgnoreProperties;

@JsonIgnoreProperties(ignoreUnknown = true)
public class Data {


    private Integer id;
    private String name;
    private String email;
    private String gender;
    private String status;
    private String createdAt;
    private String updatedAt;

    public Integer getId() {
        return id;
    }

    public void setId(Integer id) {
        this.id = id;
    }

    public String getName() {
        return name;
    }

    public void setName(String name) {
        this.name = name;
    }

    public String getEmail() {
        return email;
    }

    public void setEmail(String email) {
        this.email = email;
    }

    public String getGender() {
        return gender;
    }

    public void setGender(String gender) {
        this.gender = gender;
    }

    public String getStatus() {
        return status;
    }

    public void setStatus(String status) {
        this.status = status;
    }

    public String getCreatedAt() {
        return createdAt;
    }

    public void setCreatedAt(String createdAt) {
        this.createdAt = createdAt;
    }

    public String getUpdatedAt() {
        return updatedAt;
    }

    public void setUpdatedAt(String updatedAt) {
        this.updatedAt = updatedAt;
    }

}
Conclusion:
In this article, we have learnt how to create a payload using various ways such as via string, JSON Object and with object Mapping and how to fetch the response using Deserialization.

 – Basics To Advanced (Coming Soon)")