TestNG is an open source Java testing framework which is distributed under the Apache Software License and is readily available for download. TestNG is inspired by JUnit which was the most widely used testing framework for Java applications. Despite being an easy to use and straightforward framework, JUnit has its own limitations which gave rise to TestNG. It was created by Cedric Beust to simplify a broad range of testing needs.
TestNG takes care of needs across testing lifecycle including unit testing, functional testing and Integration testing etc. The “NG” in TestNG stands for ‘Next Generation” implying that, is a next generation testing framework and it is more powerful than JUnit when it comes to parallel testing, reporting and managing dependencies. This article makes an effort to elaborate the above said aspects in further details.
TestNG Features
Some of the key features include
- Control over test execution with powerful annotations
- Help achieve parallel testing
- Ability to set dependencies on methods
- Support for parameterize
- Support for Data Driven Testing using data providers
- Generate test logs across tests
- Excellent reporting ability
- Can be integrated with Eclipse, Maven, Jenkins etc
How to get started with TestNG
Before learning TestNG, you should have the basic knowledge of automation testing and any automation tools that supports Java. Here we are going to learn TestNG framework with Selenium WebDriver hence knowledge of the same is essential.
TestNG can be integrated with Simple Java project or Maven Integrated Java Project. Before we start writing the automation test scripts, let’s see the steps involved to automate the testcases and its execution.
Step 1: Write the business logic of your test
Step 2: Insert TestNG Annotations in your test code to control the flow of test cases to follow the business logic
Step 3: Validate test cases with TestNG assertion
Step 4: Add details of testcases in the testNG.xml file
Step 5: Run your Tests
Step 6: View the results in HTML reports
We are going to create Java project and integrate TestNG, hence make sure Jdk1.8 and Eclipse IDE is installed in your machine. Note:The example shown are written and executed in Windows 10, 64 bit system.
How to install TestNG
Generally, TestNG comes as jar files. There are two ways of installing TestNG in Eclipse.
- Directly from the Eclipse Marketplace
- Through Help -> Install New Software option
How to Install TestNG through Market place
This option is available in new versions of Eclipse. This is the recommended method as it is the easiest method to install TestNG compared to the other installation method.
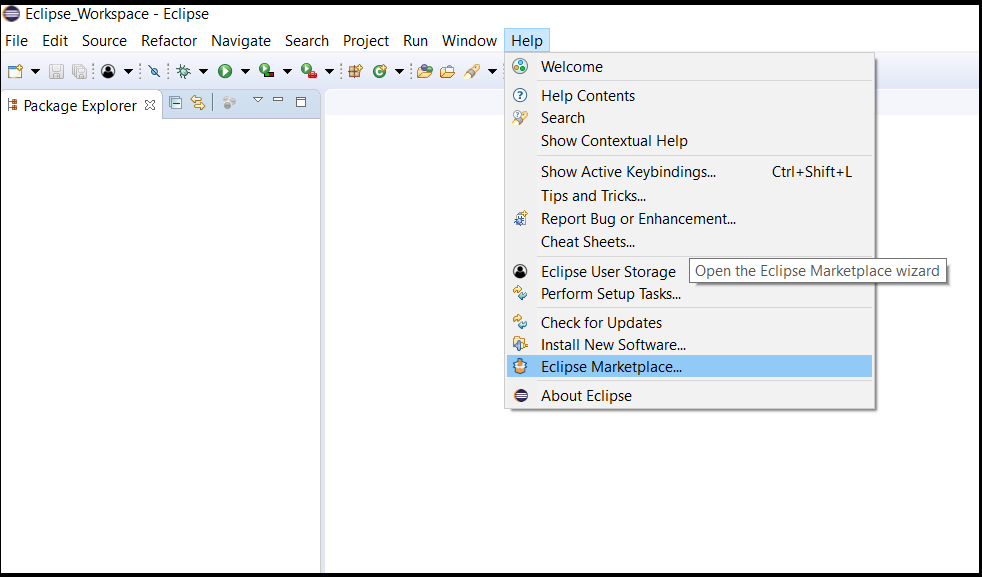
Step 1: Launch Eclipse IDE, click on the Help menu, select the “Eclipse Market place…” option in the dropdown
Step 2: In Eclipse Marketplace dialog box, you see “Find” input field, enter “TestNG” and hit the enter key to search.
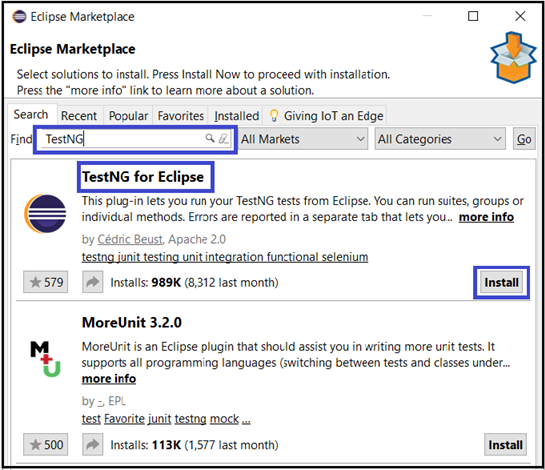
Step3: Now, you’ll see “Install” button for all search results. Click on “Install” button of TestNG for Eclipse as shown in the above screenshot and proceed with the installation . It will take some time ..so be patient ;).
Step 4: Click on “I accept the terms of the license agreement” and then click Finish.
Step 5: If you see a security warning, ignore it by clicking the OK button.
Now, wait for the installation to finish.
Step 6: After the installation, Eclipse will prompt you to restart, just click Yes.
How to verify TestNG Installation
There are multiple ways to verify the successful installation of TestNG.
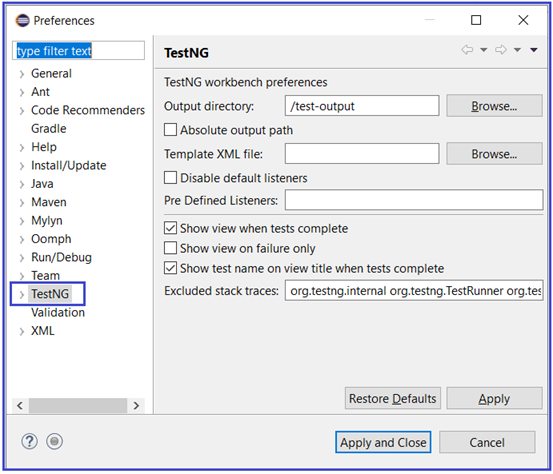
One way is to launch the Eclipse, navigate to “Preferences” from “Window” option in the menu bar, see TestNG listed. Refer the below screenshot for the same.
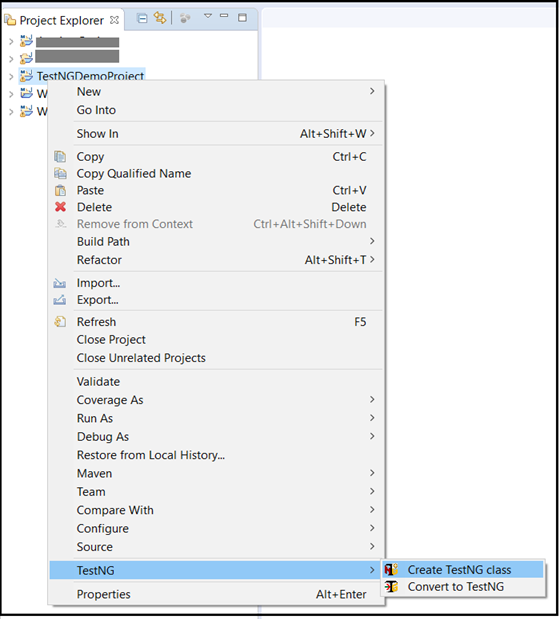
Another way to verify is to right click on the project in Project Explorer section, you will see TestNG listed as shown below.
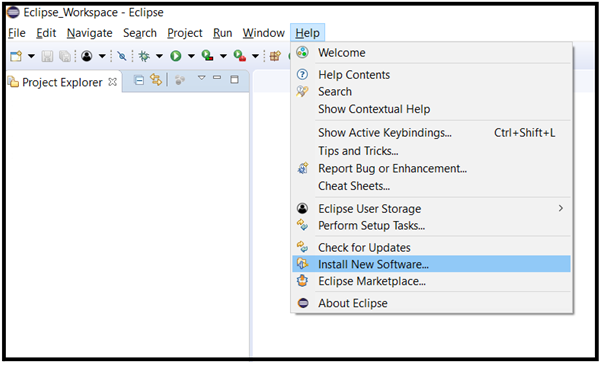
How to install TestNG Plugin in Eclipse using the “Install New Software…” feature.
Step1. Launch the Eclipse IDE, Go to Help menu and click on “Install New Software”..
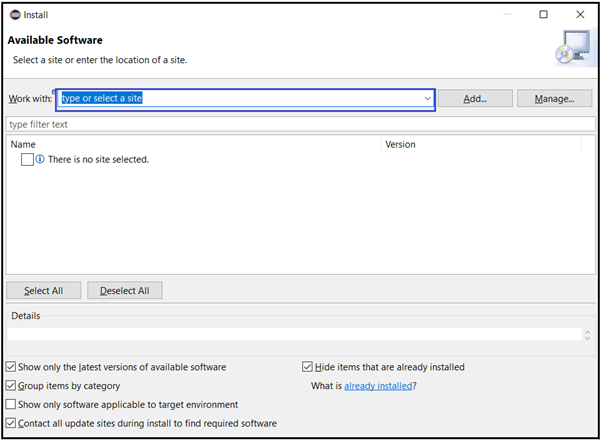
Step2. It will launch an Install window as shown below.
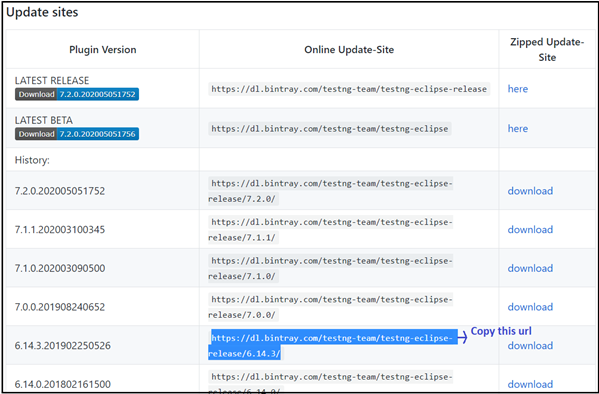
Step 3: You need to copy the build path url from the site https://github.com/cbeust/testng-eclipse. So, go to the site and copy the stable release url from Update sites’ section as shown below
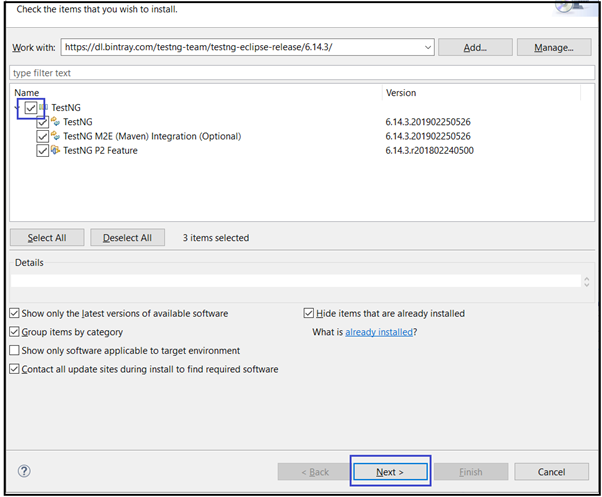
Step 4: Come back to the Eclipse IDE and paste it in “Work With” input box. You will see that the TestNG option listed as shown below. Select the TestNG option and click on Next button and continue the installation process, accept the licence agreement and click on Finish button. If you see a security warning, just ignore and accept it by clicking the OK button. Once the installation is complete, Eclipse will prompt you to restart it. Click on Yes to restart.
Step 5: After the restart, to verify the successful installation of TestNG plugin follow the same procedures mentioned in the First method of installation.
In the next section, we will see how to write TestNG code to build Test framework with simple Java and Selenium WebDriver project with Eclipse IDE.
 – Basics To Advanced (Coming Soon)")
0 Comments
1 Pingback