Overview of WebDriver and WebElement Interface in Selenium

- WebDriver is an interface and extends SearchContext Interface, which declares two methods findElement and findElements Methods (FindElement/FindElements in above image).
- WebDriver has many abstract methods like: get(String url), close(), quit(),getTitle(), getCurrentUrl etc.
- RemoteWebDriver class which implements WebDriver Interface, this class implement all the methods in WebDriver including findElement and findElements.
- ChromeDriver Class extends ChromiumDriver Class which further extends RemoteWebDriver class.
- And finally, IEDriver, SafariDriver and FirefoxDriver classes directly extends RemoteWebDriver class.
- Click here to view complete source code implementation and for selenium java APIs visit here.
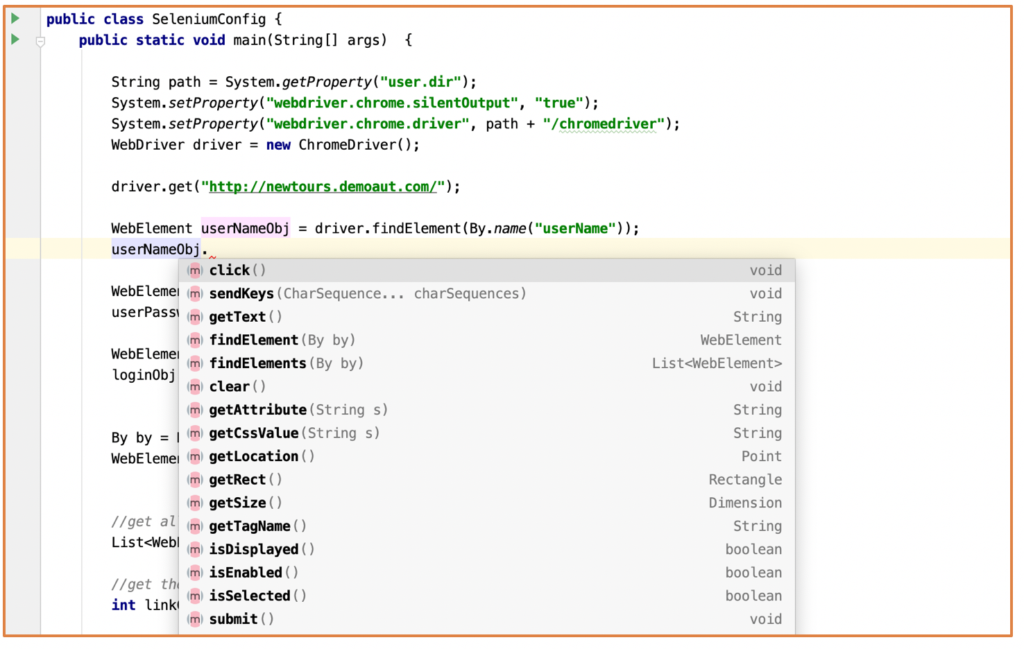
When we say WebDriver driver = new ChromeDriver(); We can access all methods using ChromeDriver instance.Below is the image for the same :

3. WebElement Interface Now, let’s explore WebElement Interface:- As explained on Selenium Official Site a WebElement represents HTML element.
- The interface also extends SearchContext, TakesScreenshot interfaces.
- In general, whatever we see in the HTML page is a WebElement whether it’s a link, search-text, button, Drop-Down, Web-Table etc. So, we can say that every action on a Web-Page while automating your Web Application will have to go through WebElement interface.


WebElement element = driver.findElement(by); 
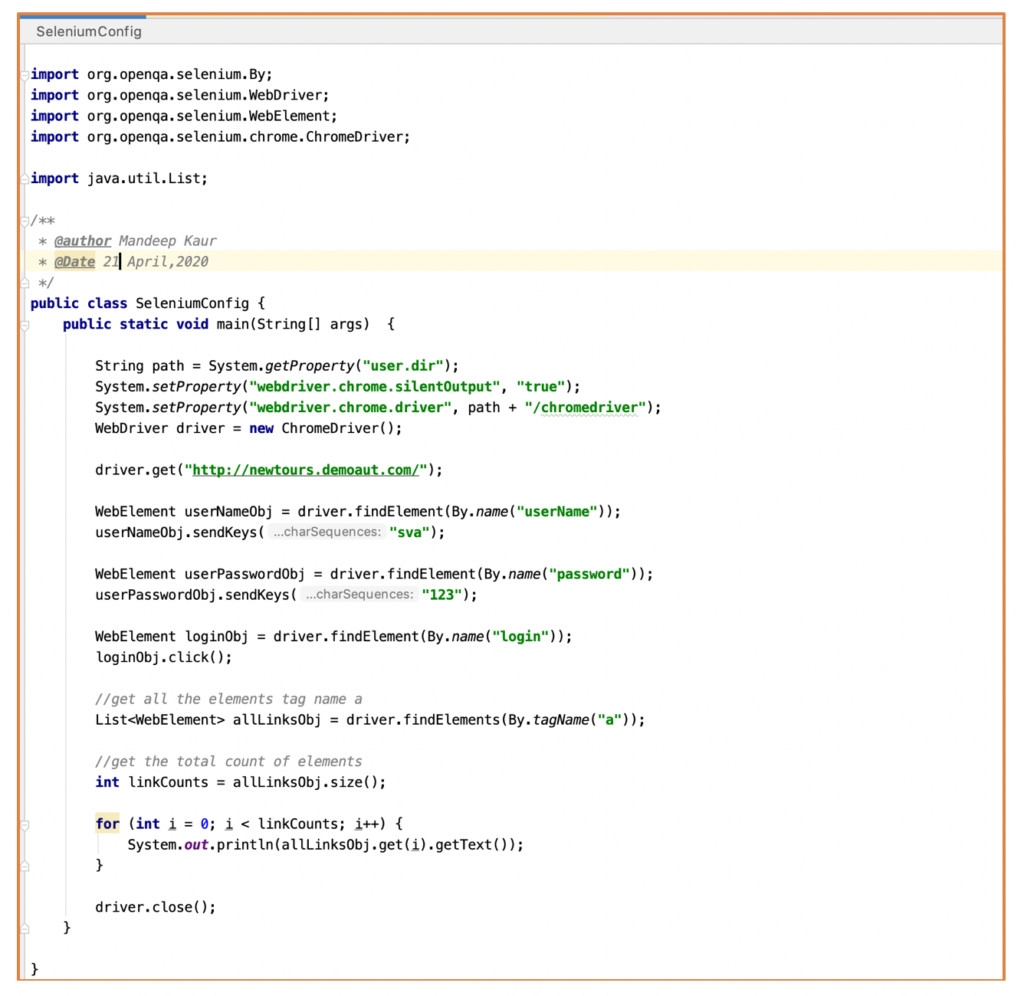
package com.example.automation;
import org.openqa.selenium.By;
import org.openqa.selenium.WebDriver;
import org.openqa.selenium.WebElement;
import org.openqa.selenium.chrome.ChromeDriver;
import java.util.List;
/**
* @author Mandeep Kaur
* @Date 21 April,2020
*/
public class SeleniumConfig {
public static void main(String[] args) {
String path = System.getProperty(“user.dir”);
System.setProperty(“webdriver.chrome.silentOutput”, “true”);
System.setProperty(“webdriver.chrome.driver”, path + “/chromedriver”);
WebDriver driver = new ChromeDriver();
driver.get(“http://newtours.demoaut.com/”);
WebElement userNameObj = driver.findElement(By.name(“userName”));
userNameObj.sendKeys(“sva”);
WebElement userPasswordObj = driver.findElement(By.name(“password”));
userPasswordObj.sendKeys(“123”);
WebElement loginObj = driver.findElement(By.name(“login”));
loginObj.click();
// get all the elements tag name a
List<WebElement> allLinksObj = driver.findElements(By.tagName(“a”));
// get the total count of elements
int linkCounts = allLinksObj.size();
for (int i = 0; i < linkCounts; i++) {
System.out.println(allLinksObj.get(i).getText());
}
driver.close();
}
}
Naveen AutomationLabs

 – Basics To Advanced (Coming Soon)")
Hi Mandeep,
Please mention that the WebDriver hierarchy you have shown belongs to Selenium 4 alpha version like for example in Selenium 4 – ChromeDriver(C) Extends ChromiumDriver(C) and implements RemoteWebDriver(C) implements the WebDriver interface.
but in selenium 3 – there is no ChromiumDriver Class, ChromeDriver(C) directly extends the RemoteDriver
So please correct it dont take it otherwise. thanks
Hi Arjun,
Thanks for your comment. We are considering latest version of Selenium only.