Where we learn technology

Tag: Locators

An alternative to :nth-child

As test automation engineers, we strive to use stable and self-documenting selectors whenever possible, but sometimes using an XPath-like selector is unavoidable. The :nth-child() CSS pseudo-class, which selects an element based on its position amongst its siblings, is often used within these longer selectors. But did you know there’s an alternative to :nth-child() which is a better choice in almost every circumstance?

Element Selection

Choosing good locators is an important aspect of creating stable automated tests, reducing false-positive error rates by ensuring the correct element continues to be selected even for pages under heavy development. There are well-documented locator strategies that you can follow when crafting these locators, but even if you’re following best-practices you may find yourself in situations where an optimal locator cannot be generated:

  • Your web application uses a CSS-in-JS library: Libraries such as Styled Components and EmotionJS allow developers to define CSS styles alongside their web components instead of in separate CSS files. Defining the styling, template, and logic all inside a single JS file makes each component self-contained which helps maintainability and readability, but it comes at cost; the classes that are output by these libraries are auto-generated and lack any semantic meaning. This means that you’re going to have a bad time if you rely on these classes in your test automation. Worse yet, they have the potential to change with every new build.
  • You’re not using data attributes as stable locators: Depending on your situation, adding attributes in your application-under-test that are specifically for use by your test automation scripts may be the best way to achieve stable locators. While this offers the greatest flexibility in terms of generating locators, many teams don’t have commit-access to the application-under-test, and asking developers to do this may not be an option.
  • You want to target the ‘nth’ element in a list of elements: Even with great locators or the ability to add automation-specific data attributes, you may want to simply target a specific element among a list of elements. In cases like this it often doesn’t make sense to add a data-attribute since the attribute value may simply be an index value rather than a self-describing value like a product name or username.

In these and other situations, you’ll often find yourself using :nth-child() as part of your locator.

Using :nth-child()

:nth-child() is a CSS pseudo-class that’s supported in all major browsers and in legacy browsers including IE9. MDN defines its behavior as “match[ing] elements based on their position in a group of siblings.” In addition to its original intended use in CSS stylesheets, it’s ubiquitous in test automation scripts the world over. In fact, if you’ll often see it in selectors generated using Chrome Dev Tools’ Copy selector command.

A classic example of using :nth-child() is selecting the nth item in a list. In situations like this, you don’t want to use a locator that targets on a text value, since the item associated with that text value may change positions or may not be present at all in the future. :nth-child() is a succinct way of expressing the intention to choose not based on an element’s value, but based on its position.

But problems can arise with this approach that are not at all obvious due to how this pseudo-class works.

Drawbacks

Let’s assume you want to target the second element in the following list:

Item 1

Item 2

Item 3

The selector that you’d typically write is #list > .item:nth-child(2). If you’re using Chrome Dev Tools’ Copy selector feature to generate the selector for you, then it’s going to output the inferior #list > div:nth-child(2) selector that targets against the child’s tag name instead of class name. But let’s suppose you wanted to choose the 2nd element even if the class or tag name changes, maybe to avoid the case where a developer changes the tag name and causes your test to break. You instead use the selector #list > *:nth-child(2) which will select the 2nd element regardless of tag or class.

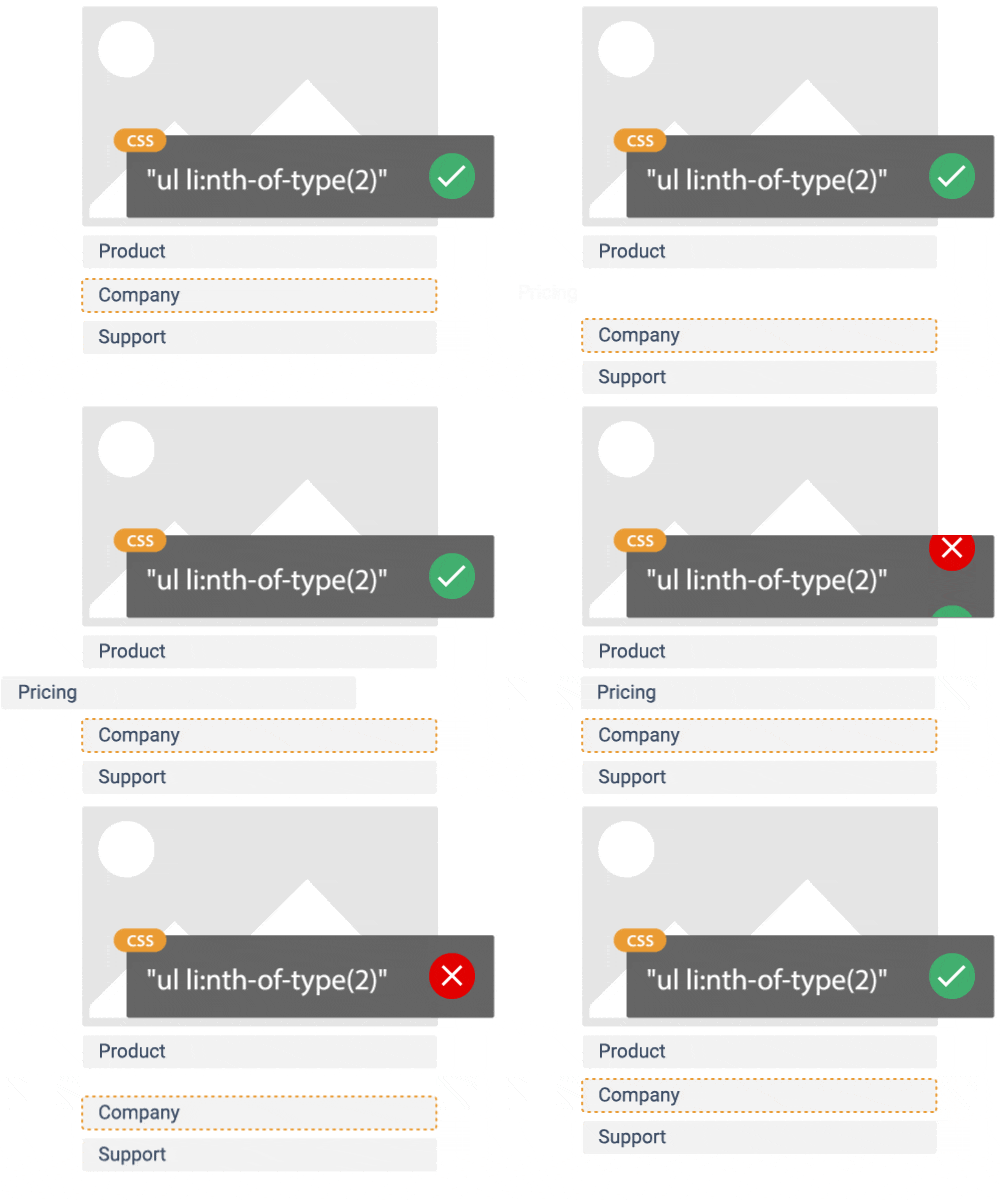
So far so good, but let’s consider a scenario where the page-the-under test is running ads. Often times ad platforms will generate Javascript code by dynamically inserting script tags. Using the example above, the DOM may end up in a state like this:

Item 1

Item 2

Item 3

In this situation, neither selector used above will return the expected result! #list > .item:nth-child(2) will return null because the nth child to #list is not a div! #list > *:nth-child(2) doesn’t fare much better, returning the script element.

This is a contrived example, but you would be surprised how often I’ve seen this in the wild. The automated testing tool I co-created has a feature that auto-generates selectors, and for this reason it will never generate a selector containing :nth-child, but instead uses the :nth-of-type pseudo-class.

Recommendation

:nth-of-type(), like :nth-child(), is supported by all major browsers and has subtlely different behavior in that it “matches elements of a given type, based on their position among a group of siblings”. This behavior has the distinct advantage of being closer to representing how elements actually appear within the browser. Since :nth-of-type() allows you to target on the position of a given tag, you’ll never hit a situation where a non-visible tag like script causes your tests to fail, since it ignores any elements not matching that tag in the test. In the examples above, the selector #list > .item:nth-of-type(2) matches the Item 2 element in the original example as well as the example where a script tag is the second child. This is because it ignores any elements that don’t include the item class.

In conclusion, by coupling :nth-of-type() with a stable sub-selector like .item, you get the benefit of a built-in way to target based on position (avoiding creating unnecessary data-attributes) while avoiding the potential pitfalls of :nth-child(). Consider migrating your tests over to use :nth-of-type()!


That’s all about :nth-of-type() in CSS Selector.


Cheers!!

Naveen AutomationLabs

Blog Contributors:

Author: Todd McNeal

Todd is co-founder of Reflect, a no-code test automation platform for web applications. Prior to co founding Reflect, Todd was Director of Engineering for Curalate.
 
Reviewer:
 

What is Reflect:

Reflect is automated web testing tool that anyone can use.

Automated regression tests without a line of code

Fore more details:

https://reflect.run

4. Appium “Locator strategies”


So far we have seen how to connect our real device/Emulators using Appium. In this session we will focus on how to inspect an object/Element using Appium Inspector.

As I already mentioned in one of my previous blog that, the most important and powerful feature in Appium is Inspector. Because it will help us to find an element and its attributes in simple manner. The Inspector screen is simple and lightweight. One can easily inspect an element and the hierarchy model displayed for the screen will be quite interesting.

Salient features of Inspector:

  1. The hierarchy view of elements
  2. Just a click on preferred element to inspect
  3. You can easily find the element and swipe coordinates
  4. For instant recognition of element, we can use inbuilt buttons like “Tap” and “SendKeys” to click on any particular element and to pass value to any input field. 
  5. Allows to save and modify the Desired Capabilities for future use
  6. On every successful element inspection, attributes like “Name”, “Value”, “Label”, “ID”, “XPath” etc… will be displayed separately in a tabular column
  7. Based on platform, there are lot of location strategy available to find an element like “ID”, “Xpath”, “Class Name”, “UIAutomator Selector”, “Class Chain”, “NSPredicate” etc…

There are list of locator strategy available in Appium based on platforms. Based on its priority level, easy approachability and performance we can select the appropriate locator strategy 

Locator strategies Supported Platform
accessibility id or ID Android and iOS
Name Android and iOS
class Name Android and iOS
Uiautomator selector Android
Predicate string iOS
Class chain iOS
Xpath Android and iOS

Remember: Few Selenium based Locator Strategies like “css selector”, Linktext, tagname, partiallinktext are not supported by Appium API’s because mobile page source (DOM) is not XML based.

ID:

One of the simplest and most commonly used location strategy. In fact every element has an own ID associated with it.

In Android, we can use attributes as ‘ID’ or ‘resource-id’

In XCUI, we can use name or label. [Preferred only for static field values]


AccessibilityID:

This locator is commonly used for iOS based application. In android this locator is recognized as an attribute “content-desc”.  This is one of the best strategy to use for both Android and iOS because it will be same in both the platforms if the app is designed using ReactNative or Xamarin. 

Android: accessibilityid or “content-desc” is always a preferred choice due to its performance.

XCUI: accessibilityid should be used carefully, because for dynamic fields, id will change as per value of the field. So preferred only for static fields.

Syntax:

driver.findElementByAccessibilityId(String selector);

driver.findElement(MobileBy.AccessibilityId(String selector));

driver.findElementById(String selector);

driver.findElement(MobileBy.id(String selector));

@iOSXCUITFindBy(accessibility = “selector”)

@AndroidFindBy(accessibility = “selector”)


Name:

This is one of a common locator strategy in Appium or selenium. Element will be identified using the name of the field.

Syntax:

            driver.findElement(MobileBy.name(String selector));

            driver.findElementByName(String selector);


ClassName:

As we already seen, the “Appsource” hierarchy in Inspector tags are nothing but a className.

For IOS it is the full name of the XCUI element and begins with XCUIElementType.

For Android it is the full name of the UIAutomator2 class and begins with android.widget.

Example: XCUIElementTypeButton and android.widget.Button

Syntax:

driver.findElement(MobileBy.className(String selector));

driver.findElementByClassName(String selector);

@iOSXCUITFindBy(className  = “selector”)

@AndroidFindBy(className = “selector”)


UIautomator selector:

UIAutomator API is an Android native way of finding element, it uses UISelector class to locate elements. In Appium you send the Java code, as a string, to the server, which executes it in the application’s environment, returning the element or elements.

Syntax:

driver.findElement(MobileBy.AndroidUIAutomator(“new UiScrollable(new UiSelector().scrollable(true).instance(0)).scrollIntoView(new UiSelector().textContains(\””+ find_text + “\”).instance(0))”));

Appium allows user to use some list of attributes with UiSelector(). Few listed below,

UiSelector().resourceId(“resourceid”);

UiSelector().text(“text”);

UiSelector().className(“classname”);

We can use UIautomator strategy with UiScrollable function for some complex operations like, auto scrolling and finding an element with the given conditions.


Predicate string:

This locator strategy is in my favorite list when it comes to XCUI automation. This is a NativeJS search approach powered by Apple for its own SDK (XCode) and you can design it more like an XPath query.

There are lot of logical and comparative operators are available for Predicate sting. Please go throw the site

“http://appium.io/docs/en/writing-running-appium/ios/ios-predicate/”

Syntax:

@iOSXCUITFindBy(iOSNsPredicate = “type == ‘XCUIElementTypeStaticText’ AND name BEGINSWITH[c] ‘Shipping Address:'”)

or

driver.findElement(MobileBy.iOSNsPredicateString(“iOSNsPredicateString”));


Class chain

One of a best and powerful locator strategy designed to replace Xpath and for quick digging and finding the hierarchical elements. This is designed by Appium team. This locator strategy is in my favorite list when it comes to XCUI automation.

Syntax:

@iOSXCUITFindBy(iOSClassChain = “**/XCUIElementTypeTable[2]/XCUIElementTypeStaticText[1]”)

or

driver.findElement(MobileBy.iOSClassChain(“iOSClassChainString”));


XPath:

We all know XPath very well, a commonly used and powerful strategy especially for dynamic elements, no need to explain much as we all much use to it.

Web testing without XPath is unimaginable. Also xpath is considered to be the unreliable location strategy.

Appium allows user to use XPath for certain conditions but it is not recommended due to its performance also for some other good reasons like.

  • Due to dynamic changing of elements in mobile, path hierarchy will not be same all the time
  • XPath will take lot of time to find an element (depends on number of elements in the page)
  • Mobile native is not having its DOM as XML. You can find that in Appium Inspector
  • Leads to StaleElementException in many cases

In Android you can see some moderate performance using XPath, but in XCUI it is highly not recommended instead we can go for Predicate String or Class Chain strategy.

How to find an Element by navigating via AppSource?

Now let’s enter into the practical way of Inspecting Elements. Please follow the below steps,

Step 1: To inspect an element we need to know how to enter Desired Capabilities and how to launch the Appium session. If not then please refer to my previous blogs for details.

All set and connection is established successfully, once the mobile phone screen got captured on Appium Inspector you can start spying the elements.

For this tutorial I have selected “JetAudio” media player application for XCUI. You can select any of your preferred application. Come let’s see how to inspecting Elements for XCUI.

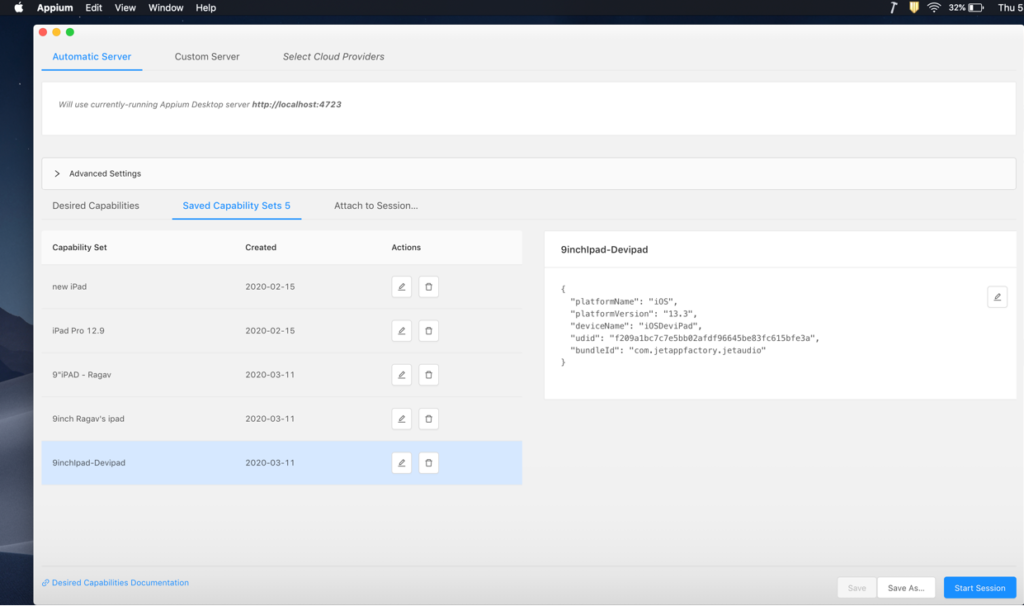
My Desired Capabilities are

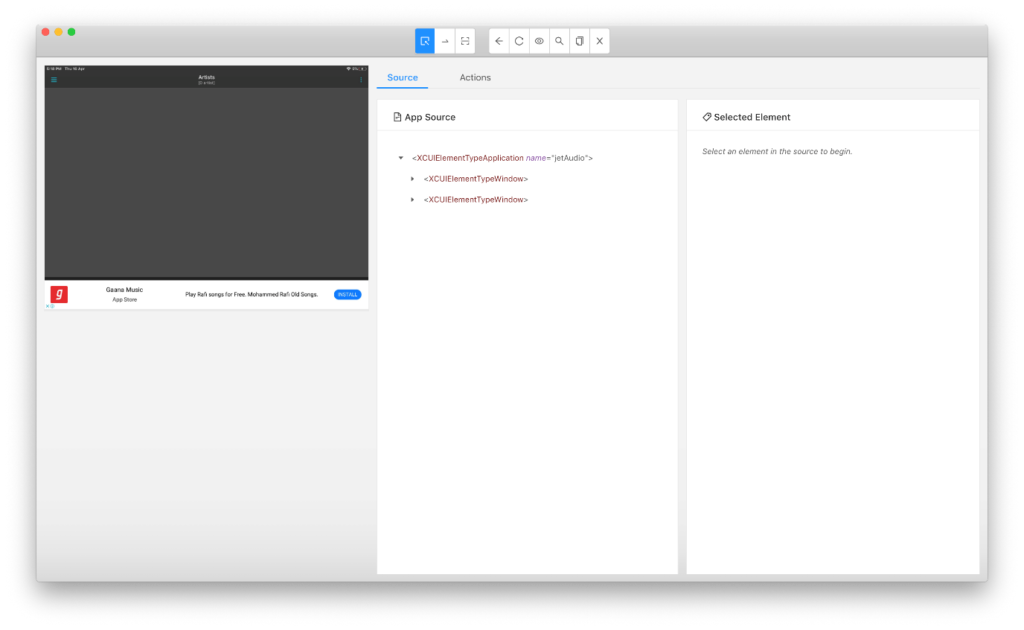
I have selected “Start Session” and my connectivity established successfully.  So that you can see my mobile phone screen on Inspector.

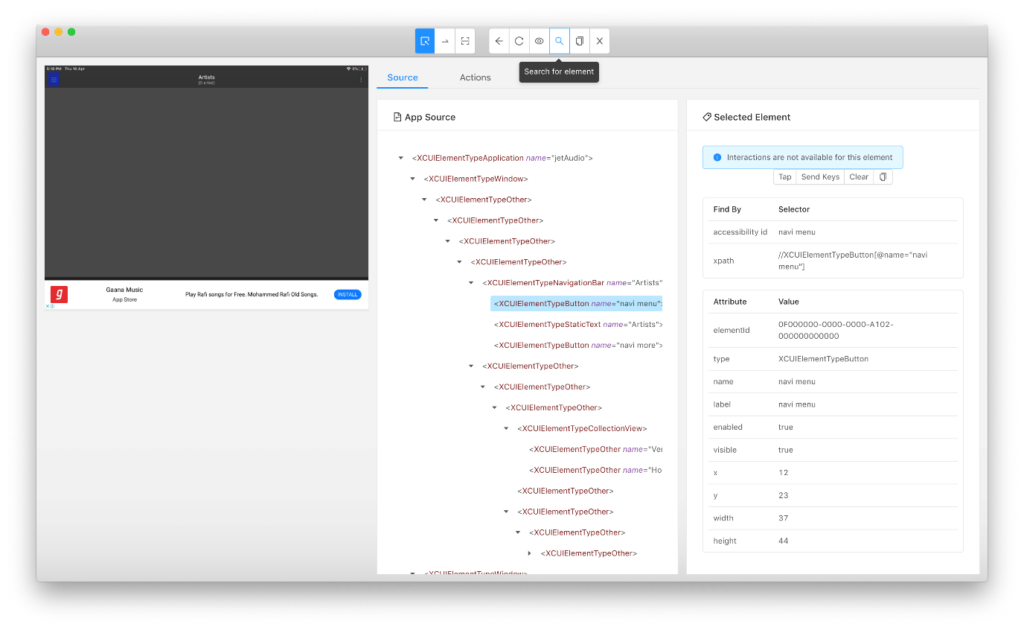
Take a look on how the “App Source” is getting displayed here. There are two entries in the name of “XCUIElementTypeWindow”. The 1st entry is the entire application frame and the second entry is for the footer section (the advertisement that is displaying in the footer). You can expand the 1st row to find out all the parent and child elements of the selected screen.

See the expanded view of App source, the splendor here is all the displaying in the App Sources are nothing but a Class name of an element/frame. Impressive right?

You can also see that, all element attributes are getting displayed in the right side view of Inspector for the selected element. This is why I have mentioned it is one a powerful feature of Appium.

Okay all fine. I can see all the attributes of the element… But my question is How to inspect an element? How can I do that?

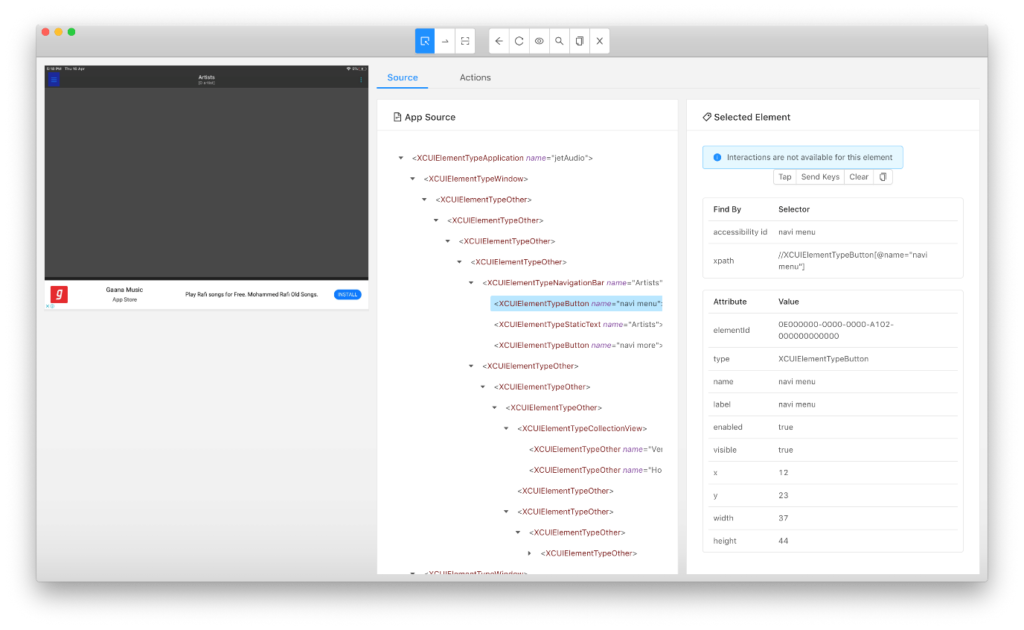
Yes, let me clarify. Once you can see the app view in Inspector, All you need to do is just a click on the chosen element from the screenshot. For example in the below screen shot, I can see the home page of jetaudio player and I have simply clicked on the Hamburger menu (blue highlighted).

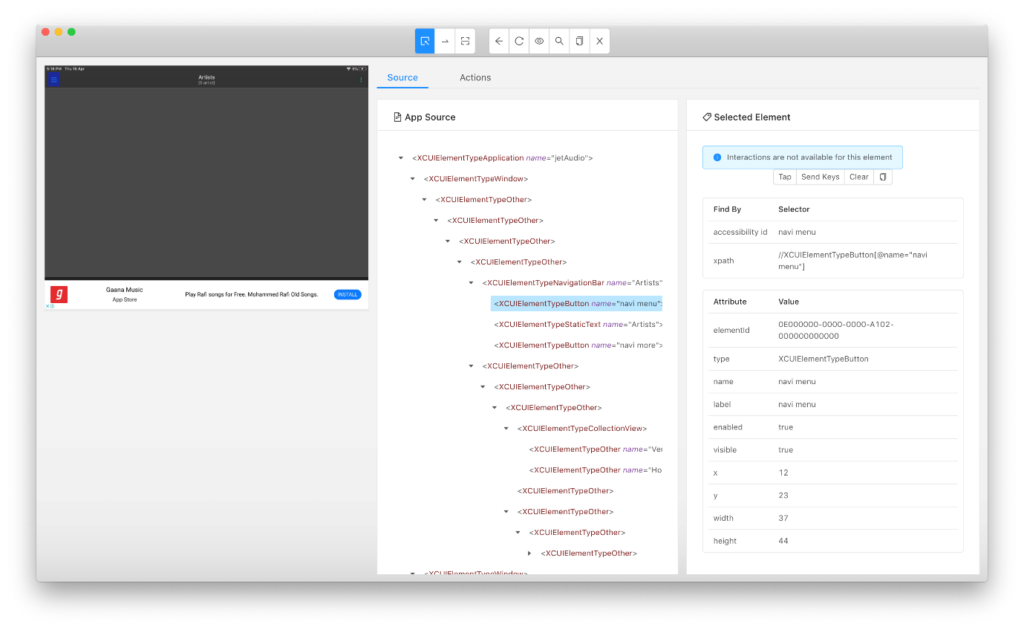
On click of the element, Appium will automatically detects and display’s all the attributes of the element including xpath. It will also display the hierarchical view in “App Source” like below.

Now we have all the attributes in hand, with the help of these attributes we can easily write location strategies in our code. For example the screen shows the “accessibility id” as “navi menu” so that I can write my location identification strategy using “ID”.

driver.find_element_by_id(‘navi menu’) or driver.findElementById(“navi menu”);

How to inspect an element using locator and Selector?

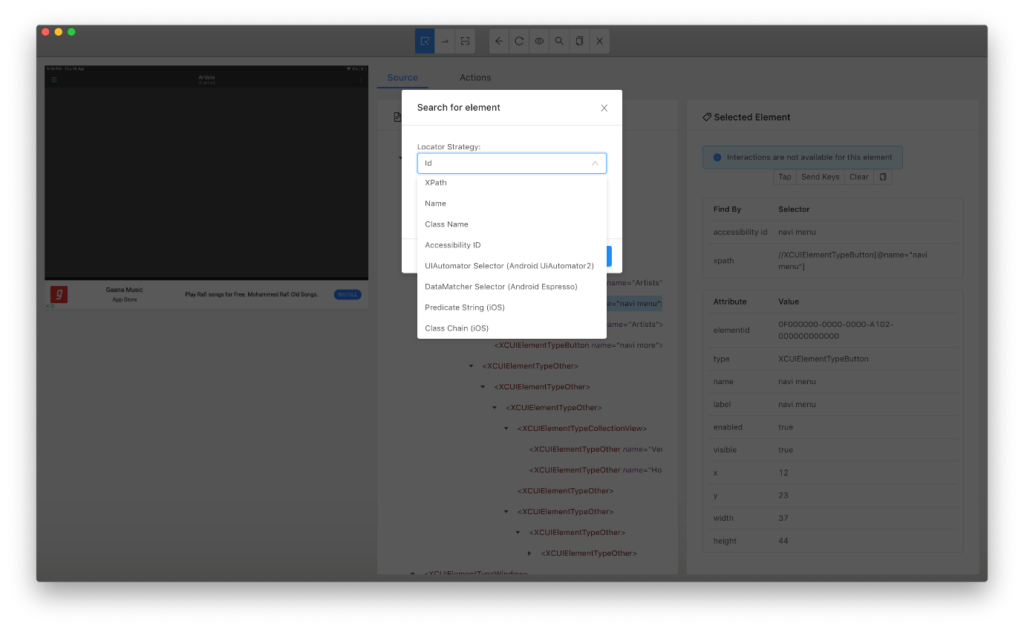
Okay now we will see how to find an element using locator? Finding an element using locator made simple in Appium. Clicking on the icon “Search for elements” will give you list of locators applicable to use with selenium.

locator strategy can be an ‘ID’ or ‘xpath’ or ‘Name’ and we have to enter the Selector value as per the locator selected.

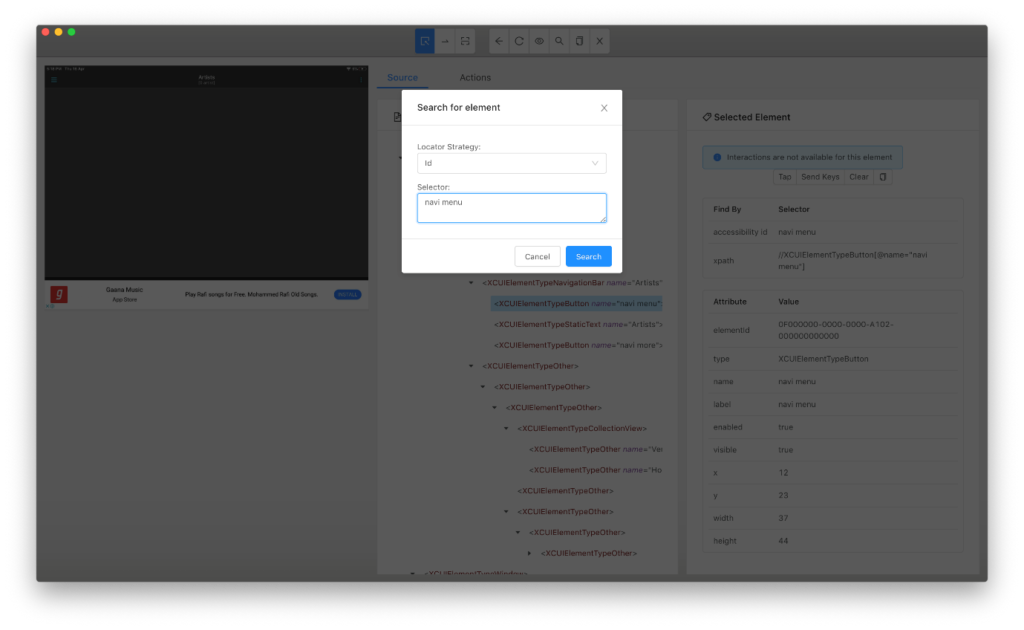
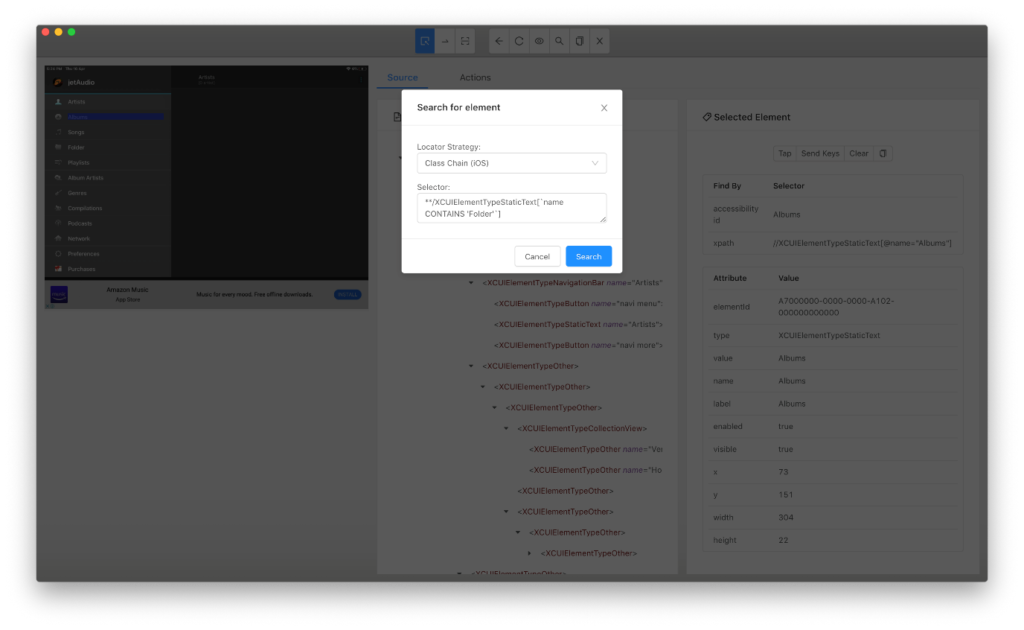
Select the needed locator strategy and enter the Selector (value) in the screen and click on “Search”.

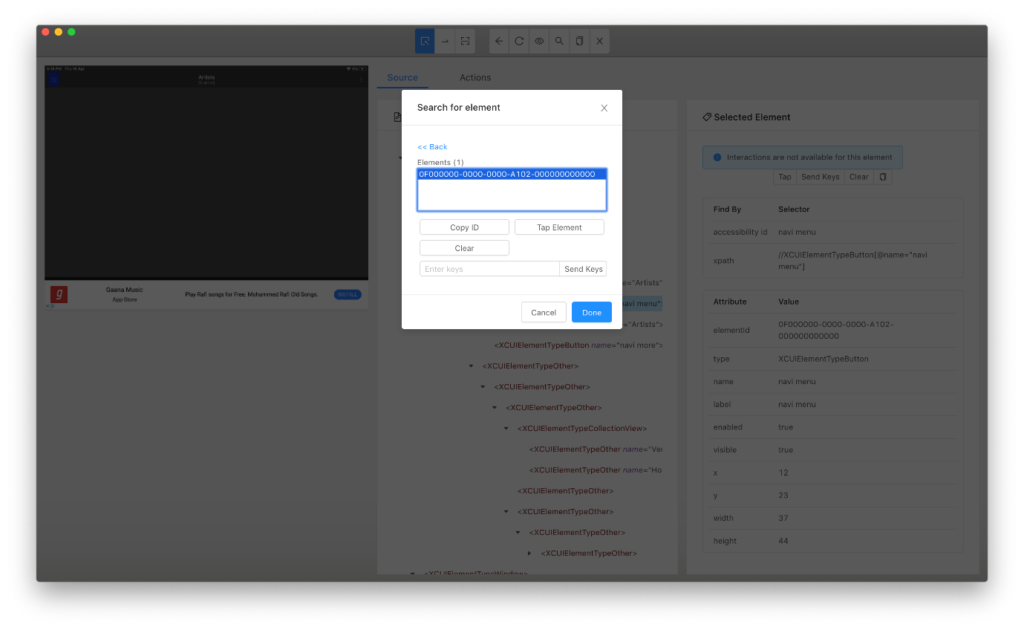
I have selected “ID” as a locator and entered the Selector as “navi menu”

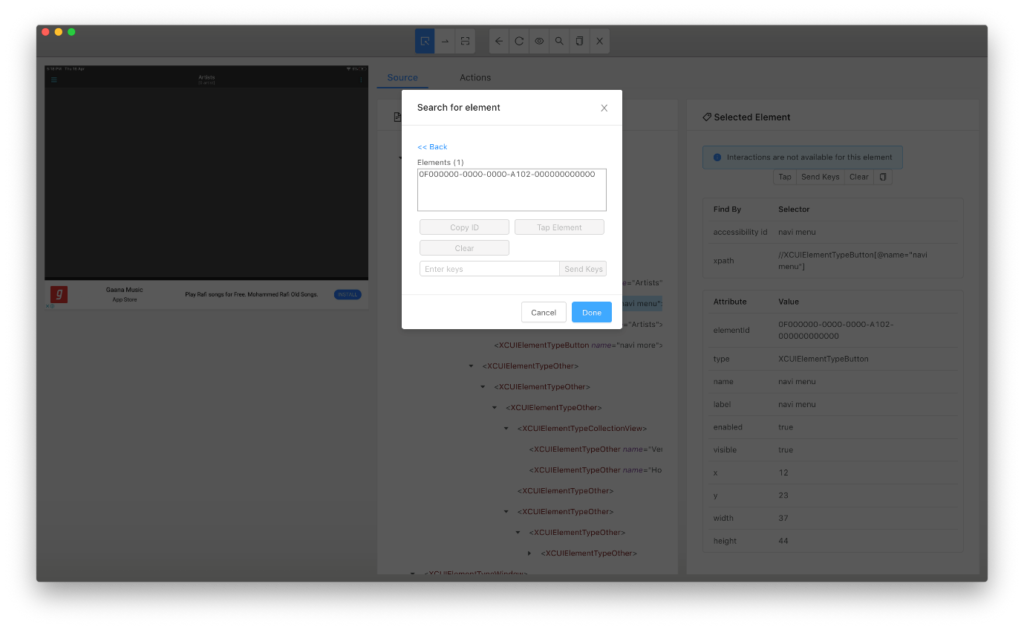
On click of “Search” button the next screen will appear if the given selector is valid and found in the screen. Inspector will always shows the elementID as a search result.

On click of the elementID the searched element will get highlighted in the background screen so that we can recognize and confirm whether the highlighted element is what we are looking for.

We can use the same way for inspecting elements using other locator strategy like UIAutomator, xpath, classchain or Predicate.

One should know how to frame a UIAutomator selector, Predicate string queries. So that it will become easier to inspect element using Inspector.

Just showcasing how to find element using Predicate/ Class chain in the below screens,

For example, if you want to select a complete list of elements belongs to a single class name, then you can query without giving any selection criteria like

  • **/XCUIElementTypeButton   -> class chain
  • Type == “XCUIElementTypeButton”    -> PredicateString

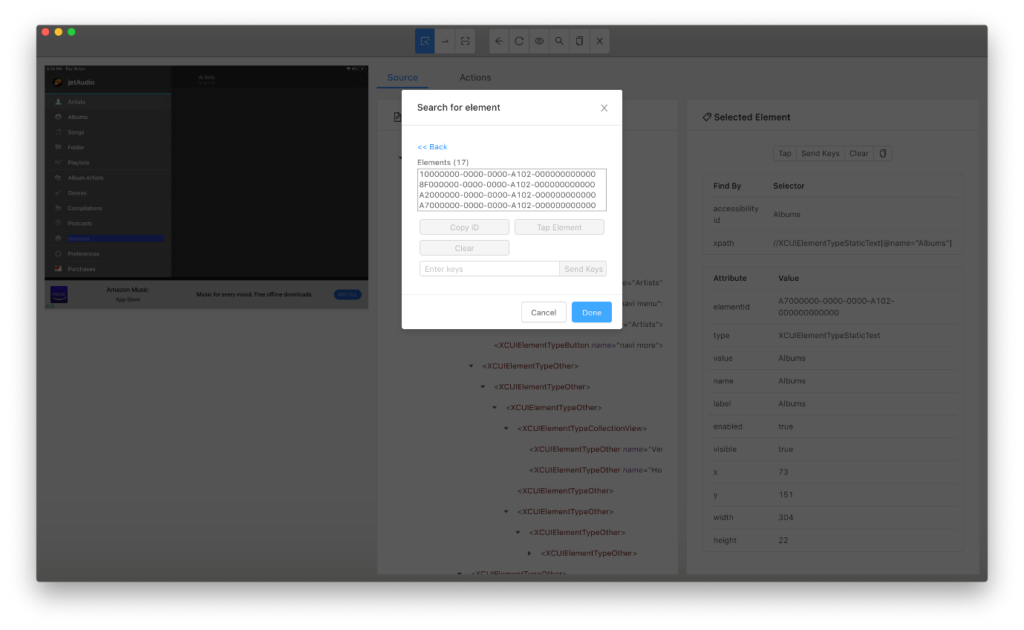
So that this class chain query will fetch complete List of elements having the class name “XCUIElementTypeButton” and returns a List

This query returns a list of 17 MobileElements. And clicking on each elementID’s from search result will highlight the corresponding element in the background.

We will see how to capture these list of MobileElements using Java List and how to iterate/assert the values in upcoming sessions.

Hope it is clear now on how to inspect an element using Appium Inspector.


Cheers!!

Naveen AutomationLabs

Blog Contributors:

Author:  Ragavendran

Ragav, having 10+ years of testing experience on which 7 years of rich experience in automation using UFT, Selenium (Java/Python). Expertise in Web and Mobile automation testing using Appium.

https://www.linkedin.com/in/Ragavendran-Ragav

Reviewer: Naveen Khunteta 

https://www.linkedin.com/in/naveenkhunteta