Guys, we are half a way done with our framework creation process. So far we have implemented below operations in our framework,
- Created a Maven project and added our dependency jars in POM
- Created a Base file (Testengine.java) and initiated logs, Extent report and AppiumDriver
- Created Pages for our mobile screens using POM method
- We have also seen how to add our mobile elements using MobileBy class
In this session, we are going to use all the operations mentioned above, i.e. creating a test case for our Android application and running the same. While test case is running we will capture the test logs and add the test steps in our Extent report with the help of TestNG Listeners. Going to cover pretty much in this session so please stay focused.
Guys I’m not going to focus on loggers, Extent report etc.., as we have already seen enough in our previous blogs. Please use our video tutorial to refresh your skill on reporting and also for easy understanding.
First things first, we will define our test strategy.
What we are going to do now? Since our Base class and POM are done (please refer previous blog)
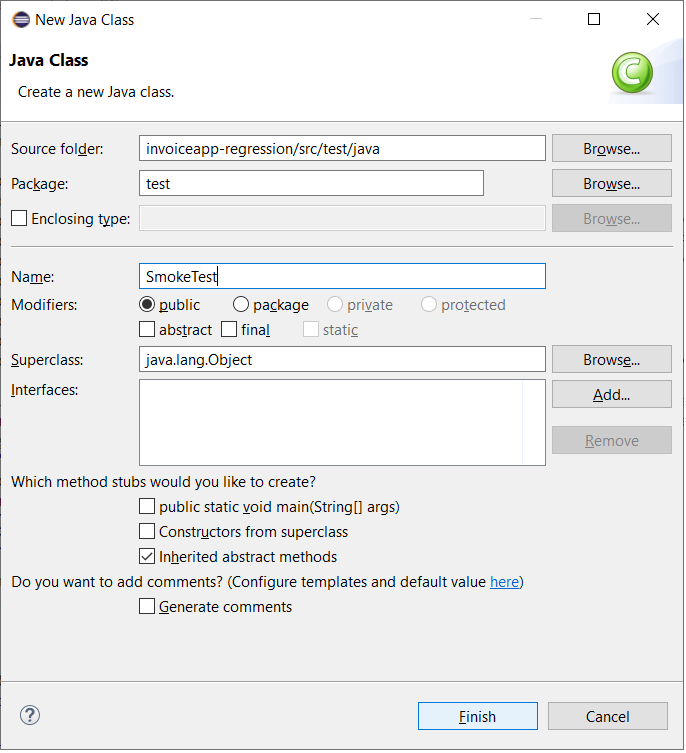
- Creating a new package under the folder “src/test/java” and name it as “tests”
- Under the test package, we will create a new java file and name it as “SmokeTest.java”
- In the “SmokeTest.java” file we will implement the ITestListener interface
- See how and where to use the ITestListener methods in our test class
- Create our first Test case and run the same
All set.. Time to launch….
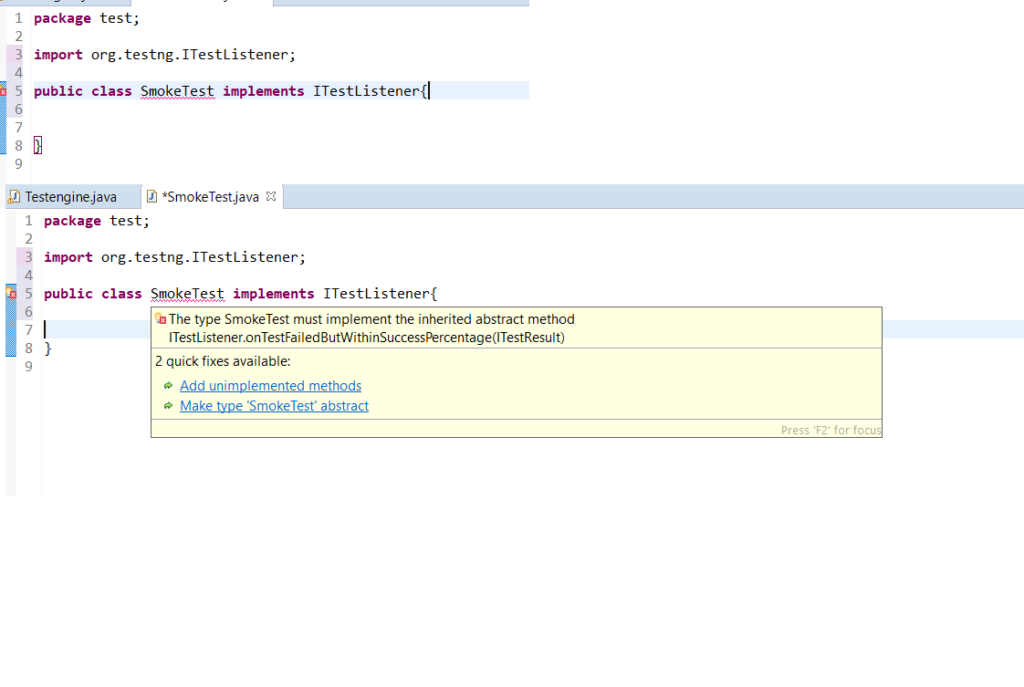
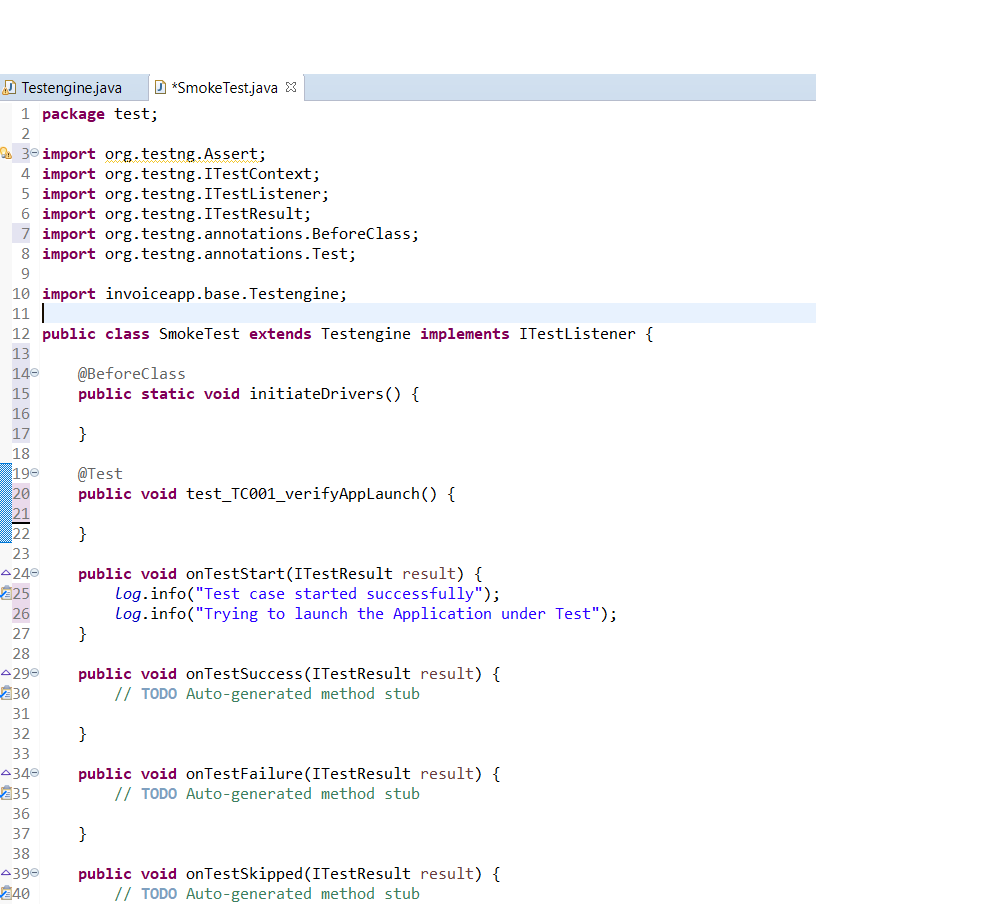
Create a new package under the folder “src/test/java” and name it as “tests” and under the test package, create a new java file and name it as “SmokeTest.java”
In the “SmokeTest.java” file we will implement the ITestListener interface and implements all the unimplemented methods
Once all the unimplemented Methods are added, our “SmokeTest.java” file will look like this,
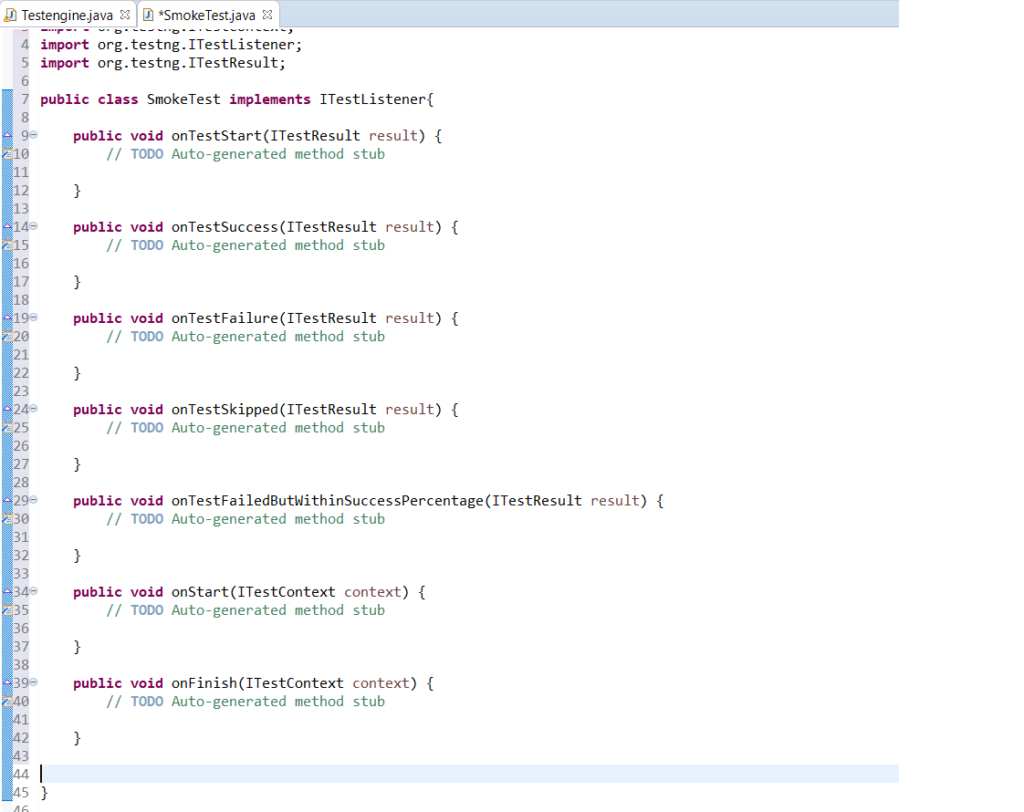
Listener interface is especially for “@Test” method, so it will allow us to have all our pre-requisites and post processing activities in our Listener Methods.
For example,
In the “public void onTestStart” method, I can have all the prerequisite of my Test case, because it will execute before @Test annotation. [Please don’t confuse with @BeforeMethod] both are different
I can set all the activities for my Test case in case of failure on the “public void onTestFailure” method. Ex, Screenshot capturing, adding a failed step in our report and log ect…
Please go through our ITestListener tutorials for more ideas
Quick hint: It is not mandatory to add Listeners in the same class where our @Test methods are available, we can also have a different and dedicated class for Listeners as well. [This can be achieved using TestNG xml file]
Remember: We have Implemented @BeforeTest , @BeforeTest and @BeforeMethod in our Testengine class. Below for reference. @BeforeMethod will open the app(AUT) and makes the app ready for our test case.
package invoiceapp.base;

import org.testng.annotations.BeforeMethod;
import org.testng.annotations.BeforeSuite;
import org.testng.annotations.BeforeTest;
import org.testng.annotations.Test;

import java.io.BufferedReader;
import java.io.FileInputStream;
import java.io.FileNotFoundException;
import java.io.FileReader;
import java.io.IOException;
import java.net.URL;
import java.util.Properties;
import org.apache.log4j.Logger;
import org.openqa.selenium.By;
import org.openqa.selenium.remote.DesiredCapabilities;

import com.aventstack.extentreports.ExtentReports;
import com.aventstack.extentreports.ExtentTest;
import com.aventstack.extentreports.reporter.ExtentHtmlReporter;

import io.appium.java_client.AppiumDriver;
import io.appium.java_client.android.AndroidDriver;
import io.appium.java_client.android.AndroidElement;
import io.appium.java_client.ios.IOSDriver;
import io.appium.java_client.ios.IOSElement;
import io.appium.java_client.remote.AutomationName;
import io.appium.java_client.remote.MobileCapabilityType;

/***
 *
 * @author Ragav
 * @date May 10, 2020
 *
 */

/**
 *
 * @Usage: This class is used to initiate the Appium Driver and all other
 *         reporting stuffs. All static variables are declared here and
 *         inherited by other classes.
 *
 */

public class Testengine {

	public static Logger log;
	public static ExtentHtmlReporter htmlReporter;
	public static ExtentReports extent;
	public static ExtentTest test;
	public static FileInputStream fInputStream;
	protected static Properties properties;

	// Initiating Appium Driver
	public static AppiumDriver<?> driver;

	/*
	 * This method is used for initializing the Log4j and Config.properties
	 */
	@BeforeSuite
	public static void startSuite() {
		log = Logger.getLogger("devpinoyLogger");
		log.info("Test Started successfully");

		log.info("Initializing the Config.properties file");
		// Path where Config.properties file is placed
		String propertyFilePath = "src//main//resources//config.properties";

		BufferedReader reader;
		try {
			reader = new BufferedReader(new FileReader(propertyFilePath));
			properties = new Properties();
			try {
				properties.load(reader);
				reader.close();
				log.info("Properties file loaded successfully:");
				// Config file is loaded successfully, now with the help of
				// properties.getProperty(key) we can retrieve the value.
			} catch (IOException ioE) {
				ioE.printStackTrace();
			}
		} catch (FileNotFoundException fnfE) {
			fnfE.printStackTrace();
			log.fatal("Unable to find/Load the Properties file ");
			throw new RuntimeException("Configuration.properties not found at " + propertyFilePath);
		}
	}


	/*
	 * This method is used for init the Appium Driver and Extent report
	 */
	@BeforeTest
	public static void startTest() {

		// Getting the driver declared using our Capabilities
		try {
			driver = startAppium();
		} catch (Exception e) {
			log.fatal("Driver is not Initiated as Expected" + e.getMessage());
		}
		// LOC for initializing the Extent Report
		log.info("Initializing the Extent Report");
		try {
			log.info("Extent report is available under the directory " + System.getProperty("user.dir") + "/Reports/");
			// starting the HTML report
			htmlReporter = new ExtentHtmlReporter(System.getProperty("user.dir") + "/Reports/testReport.html");
			// To Initialize the reporters
			extent = new ExtentReports();
			// attach only HtmlReporter
			extent.attachReporter(htmlReporter);
			// Providing internal name for the report
			htmlReporter.config().setReportName("Test Report");
			// To create a test case and steps, we need to use reference variable for
			// "ExtentTest" class.
			// This test reference will help us to create test.
			test = extent.createTest("testcase Name");
		} catch (Exception e) {
			log.error("Unable to Initialize the Extent Report" + e.getMessage());
		}
	}


	/*
	 * This method is used for initiate the AppiumDriver with caps and connection protocol
	 */
	public static AppiumDriver<?> startAppium() {
		// Initializing the Appium driver
		try {
			DesiredCapabilities cap = new DesiredCapabilities();
			// All Capability values are retrieved from Config.properties file.
			cap.setCapability(MobileCapabilityType.PLATFORM_NAME, properties.getProperty("PLATFORM_NAME"));
			cap.setCapability(MobileCapabilityType.PLATFORM_VERSION, properties.getProperty("PLATFORM_VERS"));
			cap.setCapability(MobileCapabilityType.DEVICE_NAME, properties.getProperty("DEVICE_NAME"));
			cap.setCapability("appActivity", "com.invoiceapp.InvoiceLaunchScreenAct");
			cap.setCapability("appPackage", "com.invoiceapp");
			cap.setCapability("autoLaunch", true);
			cap.setCapability(MobileCapabilityType.NEW_COMMAND_TIMEOUT, 500);
			cap.setCapability(MobileCapabilityType.AUTOMATION_NAME, AutomationName.ANDROID_UIAUTOMATOR2);

			// Declaring the driver as "Android driver" with the Host and Port number to communicate with Appium desktop
			driver = new AndroidDriver(new URL("http://127.0.0.1:4723/wd/hub"), cap);
			//Printing the driver details in Log file
			log.info("Driver declared successfully : " +driver);
		} catch (Exception e) {
			driver = null;
			log.fatal("Driver declaration failed : " +driver);
			log.fatal(e.getStackTrace());
		}
		//Returning the instance of the driver to the parent method
		return driver;
	}

	@BeforeMethod
	public static void openApp() {
		log.info("Test case started successfully");
		log.info("Trying to launch the Application under Test");
		try{
		driver.launchApp();
		log.info("Application launched successfully");
		}catch(Exception e) {
			log.info("Unable to launch the application :" +e.getMessage());
		}
	}


}
Now to initiate the AndroidDriver before our @BeforeMethod, I have added @BeforeClass in our SmokeTest.java file. This is just to make sure our driver is initiated and a new instance has been created properly before executing @BeforeMethod or @Test.
Quick hint: It is not necessary to add all the @Before and @After (methods/annotations) in the same class, based on our needs we can have it in different class as well. Please find the code below,
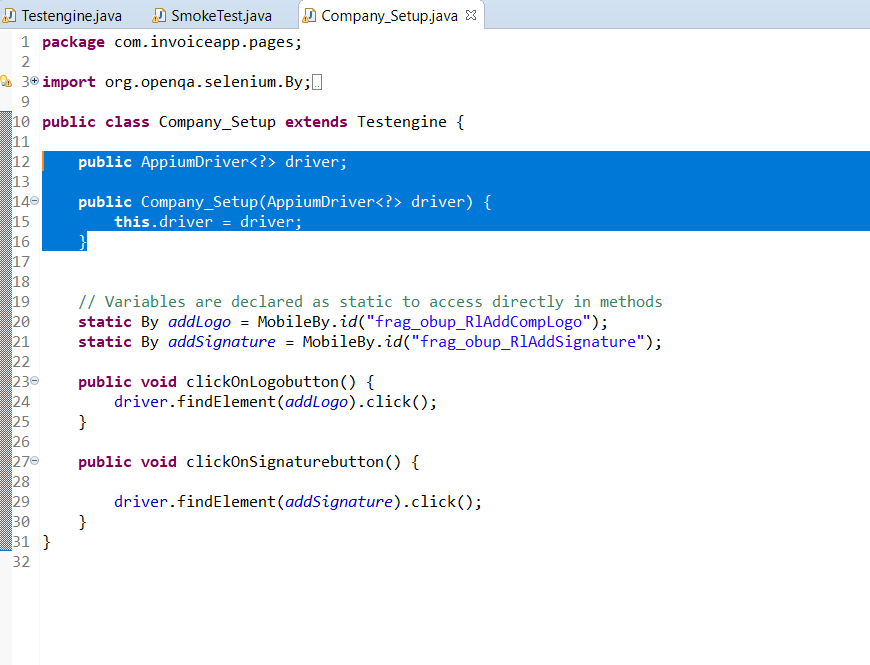
Hope it is clear till now, as I said we need to add our POM logic in this test case, to do so we have another package called “pages” where we have a class called “Company_Setup” with POM right, now it’s time to initiate that class using constructor.
We all know the use of Constructor in a class. For quick reference,
- Constructor is a default method of a class,
- Constructor will be executed first whenever an instance/reference has been created for a class
- If no constructor defined manually, a default hidden constructor will be created by JVM to execute the class. etc….
So using constructor in “Company_Setup” class we can define our Driver which will be applicable for all methods inside the class.
I’m going to add a local variable for Driver and declare it inside the constructor. Code below,
Quick hint: If driver is not declared/initiated properly we will get a “NullPointerException” 
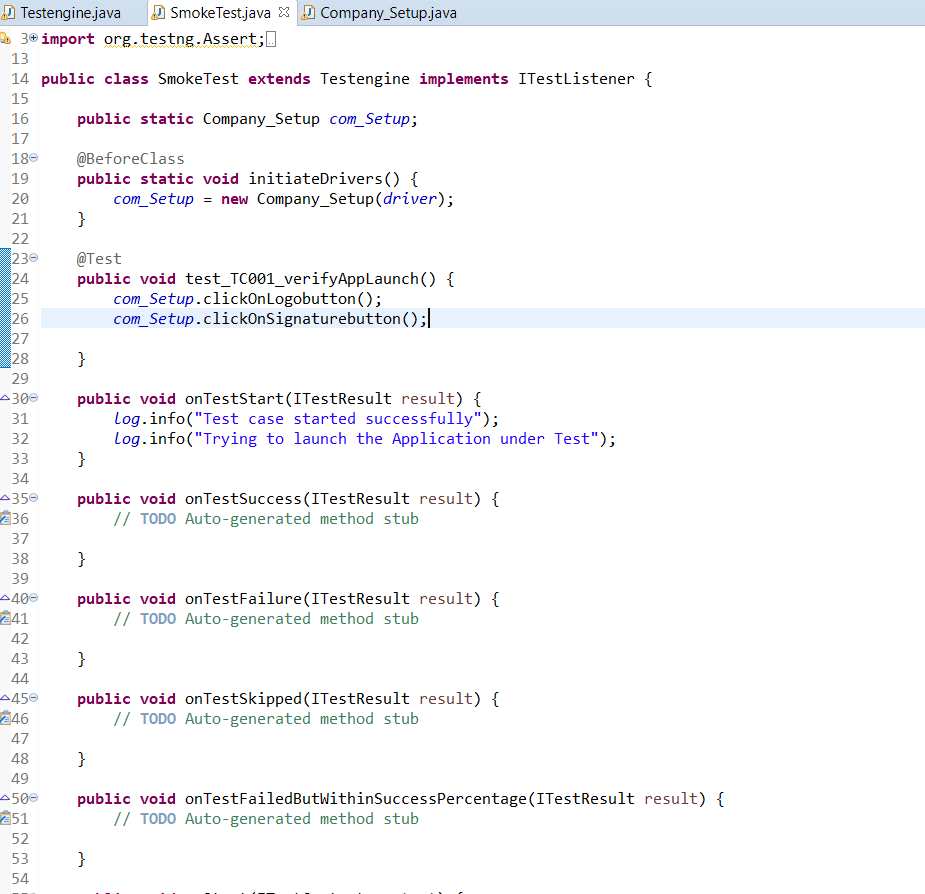
Since “Company_Setup” accepts a driver as an input, we need to initiate “Company_Setup” class and pass the driver from @BeforeClass method. Simple right, code below.
Public static Company_Setup com_Setup;
@BeforeClass
	public static void initiateDrivers() {
		com_Setup = new Company_Setup(driver);
	}
Now, we are going to add test steps in our @Test method using the “com_Setup” reference to access the Company_Setup class. Like below
This looks good, but not perfect because this will simply execute the test case and we cannot make sure on the test case test case status because there is no test conditions applied. We all know without “Assert” a test case never be fulfilled.
Time to add Assert in our test case, There are lot of methods to verify and Assert a condition, here I’m going to use a classical way of Assertion. i.e. In our POM classes under method I’m gonna add a try/Catch block to execute a test case like below, (it’s a classical way found in most of the Old frameworks)
package com.invoiceapp.pages;

import org.openqa.selenium.By;

import invoiceapp.base.Testengine;
import io.appium.java_client.AppiumDriver;
import io.appium.java_client.MobileBy;
import io.appium.java_client.android.AndroidDriver;

public class Company_Setup extends Testengine {

	public AppiumDriver<?> driver;
	public static Boolean assertion = false;

	public Company_Setup(AppiumDriver<?> driver) {
		this.driver = driver;
	}

	// Variables are declared as static to access directly in methods
	static By addLogo = MobileBy.id("frag_obup_RlAddCompLogo");
	static By addSignature = MobileBy.id("frag_obup_RlAddSignature");


	public Boolean clickOnLogobutton() {
		assertion = false;
		try {
			driver.findElement(addLogo).click();
			assertion = true;
			log.info("Add Logo, button clicked successfully");
		} catch (Exception e) {
			assertion = false;
			log.error("Unable to click on the Add Logo button, " + e);
		}
		return assertion;
	}

	public Boolean clickOnSignaturebutton() {
		assertion = false;
		try {
			driver.findElement(addSignature).click();
			assertion = true;
			log.info("Add Logo, button clicked successfully");
		} catch (Exception e) {
			assertion = false;
			log.error("Unable to click on the Add Logo button, " + e);
		}
		return assertion;
	}
}
Since methods are returning Boolean values and to capture the result of each method, we can make an Assert in our test case like below,
package test;

import org.testng.Assert;
import org.testng.ITestContext;
import org.testng.ITestListener;
import org.testng.ITestResult;
import org.testng.annotations.BeforeClass;
import org.testng.annotations.Test;

import com.invoiceapp.pages.Company_Setup;

import invoiceapp.base.Testengine;

public class SmokeTest extends Testengine implements ITestListener {

	public static Company_Setup com_Setup;

	@BeforeClass
	public static void initiateDrivers() {
		com_Setup = new Company_Setup(driver);
	}

	@Test
	public void test_TC001_verifyAppLaunch() {
		Assert.assertTrue(com_Setup.clickOnLogobutton());
		Assert.assertTrue(com_Setup.clickOnSignaturebutton());
	}

	public void onTestStart(ITestResult result) {
		log.info("Test case started successfully");
		log.info("Trying to launch the Application under Test");
	}

	public void onTestSuccess(ITestResult result) {
		// TODO Auto-generated method stub

	}

	public void onTestFailure(ITestResult result) {
		// TODO Auto-generated method stub

	}

	public void onTestSkipped(ITestResult result) {
		// TODO Auto-generated method stub

	}

	public void onTestFailedButWithinSuccessPercentage(ITestResult result) {
		// TODO Auto-generated method stub

	}

	public void onStart(ITestContext context) {
		// TODO Auto-generated method stub

	}

	public void onFinish(ITestContext context) {
		// TODO Auto-generated method stub

	}

}
A proper test case has been added in the @SmokeTest.java file and now we can able to execute it as a “TestNG Test”.
Guys, whatever illustrated here is a common way of adding and executing a test case. There are still plenty of ways to do this. Please elaborate your knowledge by thinking in different angles and try to put your own thoughts. We are here to help you.
Execute the scripts and add your comments, eager to see the results.
In our next blog, we will see how to implement “PageFactory” and create a common methods using POM for both Android and iOS.
I’m using the AUT version 1.10.82 committed the same in my git repo. Please download and use the app if you have any plan to clone code from my git repo.
Points to Remember:
- ITestListener is an interface which extends ITestNGListener
- Another popular interface is there called “ITestResult”
- @Test is a testNG annotation, not a method(I mentioned as methods in blog just for your understanding)
- Soft Assert and Hard Assert are two types are asserts available
- Some times Assert and few annotations can be driven from JUnit make sure to import the proper TestNG package
I will commit the codes discussed here in my Github repo. You can clone it and start modifying as per your idea.
https://github.com/Karthickragu/Appium_Blog
Cheers!
Naveen AutomationLab

 – Basics To Advanced (Coming Soon)")
Leave a Reply