Where we learn technology

Category: Selenium (Page 2 of 2)

Handling of Dynamic Web Table in Selenium

  1. Overview

In this article , we will learn to handle Dynamic Web Table in Selenium WebDriver .

2. Basic Concepts:

  • A table with rows and columns on a web page is called a web table. In HTML, a table is created using  tag. 
  • Table contains  headers represented as, rows asand Coloums as tag
  • There are two types of web Tables

  1. Static web table: Number of rows and columns will be static means constant that will not be changed. Here we just need to find the WebElement of the particular row or column and simply can perform operations on the cell.
  2. Dynamic table: Number of rows and columns will be dynamic. It will be kept on changing based on data and this the area where we will be focussing on.

3. Ways to Handle Dynamic WebTable:

  1. The standard way where we will iterate over the rows and columns and reach to a particular cell and get the cell value.
  2. By using custom XPath

Before proceeding further, let’s see how dynamic table looks like :

Table with checkbox , rows and coloumns

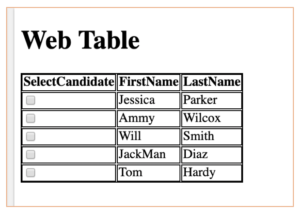
And below is the HTML representation of the above web table:

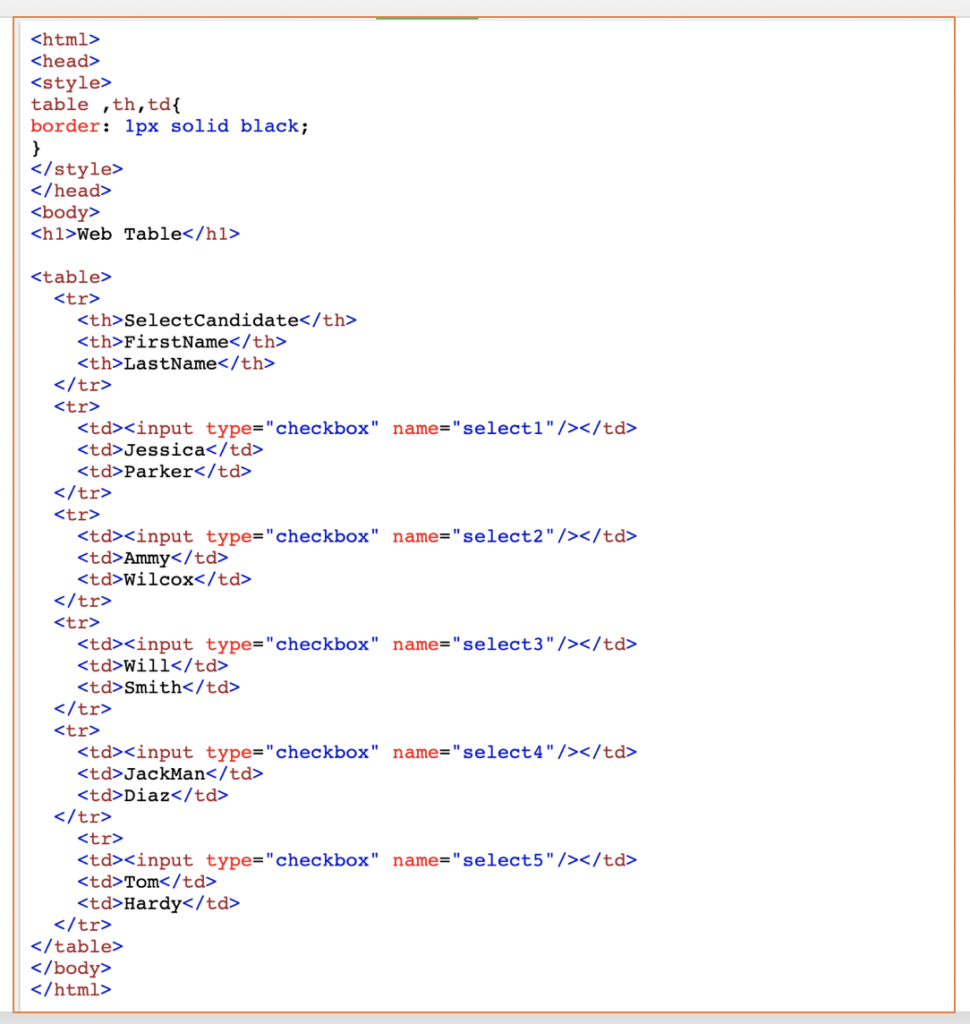
So, based on the data input we can increase or decrease our number of rows or columns.

Since we have seen what a web table is and how it is created, now let’s take the simple scenario :

1)click on checkbox where firstName is Will and remember it’s a dynamic table, hence “WILL” now on 3rd row can be shifted to other row based on the insertion or deletion of data.

  • Let’s implement it by First Method:

Let’s accomplish this task first by looking at the code snippet below

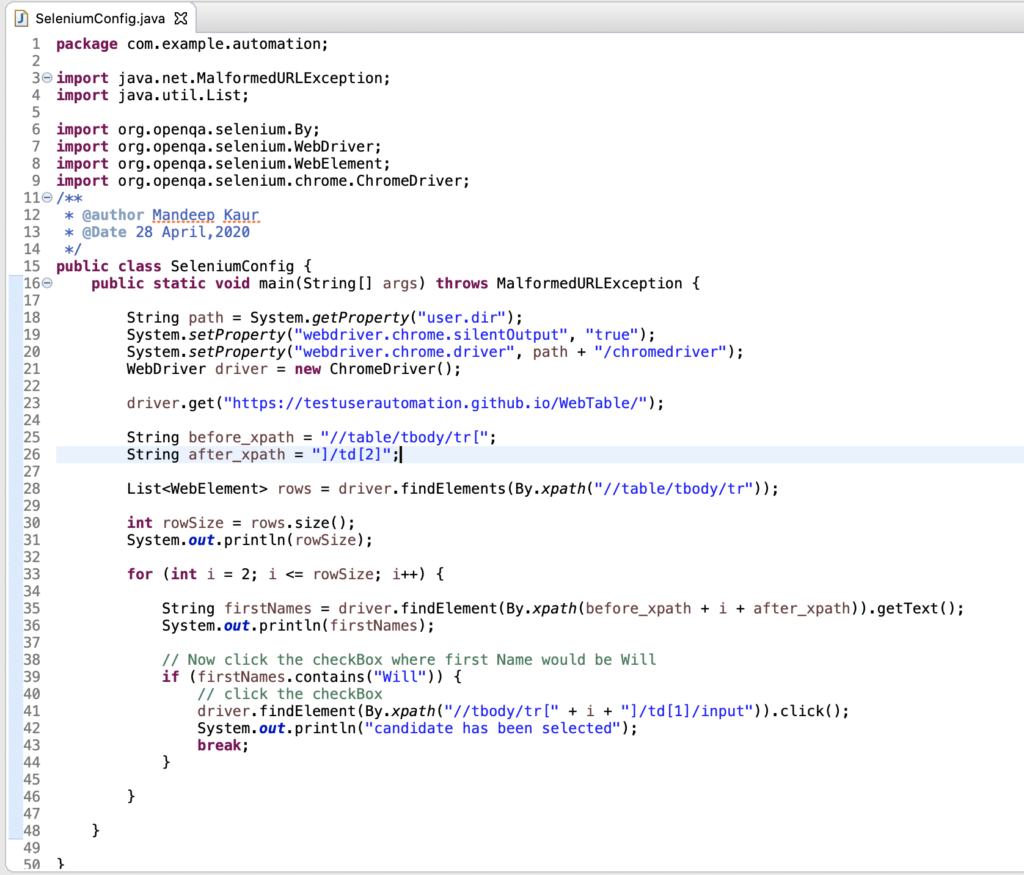
We’ll break this code into steps to get a deeper understanding of it:

Step1 : Capture xpath of the FirstName Row and observe the pattern

  • First Row xpath: //table/tbody/tr[2]/td[2] –>jessica
  • second Row xpath: //table/tbody/tr[3]/td[2] –>Ammy 
  • Third Row xpath: //table/tbody/tr[4]/td[2] –>Will and so on
  • Here can we say that our rowis getting changed and our columnis constant.

Step2: Catch before and after XPath from the point our row started changing as done in the code.

Step 3: Now, we have captured the before and after XPath.Find out the total row size by size() function of the java collections.

Step 4: Start iterating over the rows, start the row index with 2 as the first row would be reserved for headers.

Step 5:Get the text of all the rows and store it to the variable firstNames and print it to see if we are able to capture it

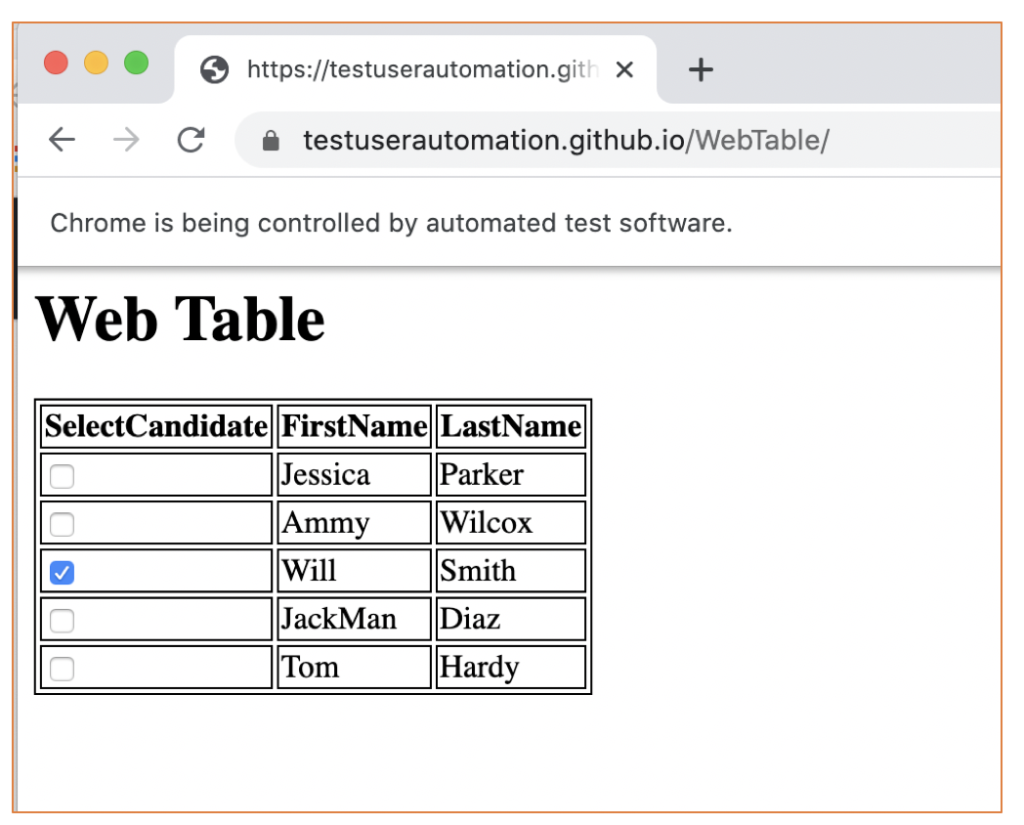
Step 6 : Final step of our task , that click the checkbox where FirstName is Will

For this step, we put one condition that if firstNames contains WILL then only checkbox has to be clicked. if it exists it will click the checkbox prior to WILL.

Since WILL is existing in the table , it will click the checkbox and we can capture it from the browser:

and our output on the console is similiar to following :

  • By Second Method : with Custom XPath

We can achieve our task with single statement :

 driver.findElement(By.xpath(“//td[contains(text(),’Will’)]//preceding-sibling::td//input[@type=’checkbox’]”)).click();

yes , that ‘it , below code for your reference

Let’s try to understand this method :

firstly visit over XPath_Axes , here you will get to know how to traverse from one node to another node.

Next, in the above we have spied over FirstName with text Will and we found out Will Sibling is td when we proceed upwards and then we get our input as a checkbox and from here we can simply capture it.

4. Which Method to choose

As can be conveyed from the above methods, the custom method is the best way to handle web dynamic table :

Reasons :

  1. In the First Method, it’s a lengthy method whereas the second method is just a single line statement
  2. In the first Method, we had to use for loop with conditions and then selecting the value, on the other hand, we need not have to use for loop
  3. As we are iterating through till all the rows it makes code slower in the first Method considering the other method can be seen fast, dynamic and efficient

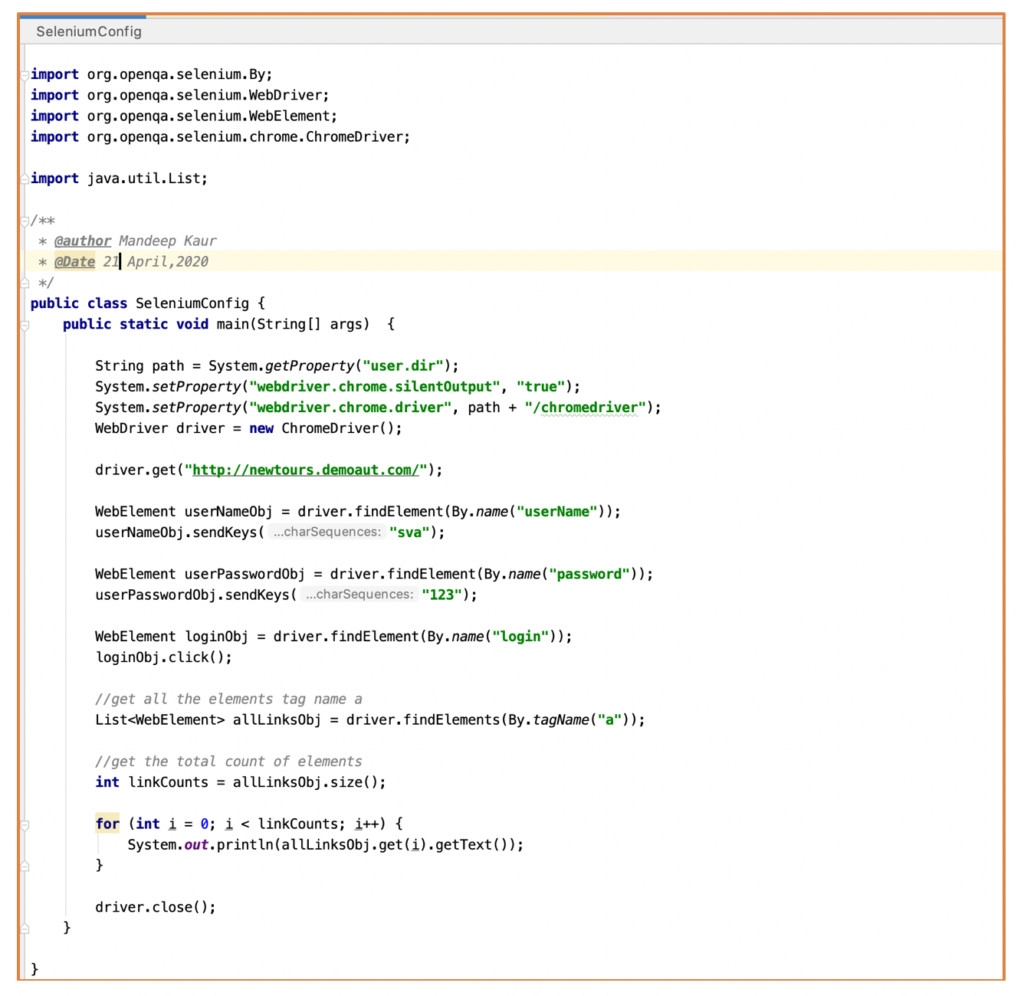
Code Snippet with both methods :

package com.example.automation;
import java.util.List;
import org.openqa.selenium.By;
import org.openqa.selenium.WebDriver;
import org.openqa.selenium.WebElement;
import org.openqa.selenium.chrome.ChromeDriver;
/**
@author Mandeep Kaur
@Date 28 April,2020
*/
public class SeleniumConfig {
public static void main(String[] args) {
String path = System.getProperty("user.dir"); System.setProperty("webdriver.chrome.silentOutput", "true"); System.setProperty("webdriver.chrome.driver", path + "/chromedriver");
WebDriver driver = new ChromeDriver(); driver.get("https://testuserautomation.github.io/WebTable/");
// Method 1
String before_xpath = "//table/tbody/tr["; String after_xpath = "]/td[2]";
List rows = driver.findElements(By.xpath("//table/tbody/tr"));
int rowSize = rows.size();
System.out.println(rowSize);
for (int i = 2; i <= rowSize; i++) {
String firstNames = driver.findElement(By.xpath(before_xpath + i + after_xpath)).getText();
System.out.println(firstNames);
// Now click the checkBox where first Name would be Will
if (firstNames.contains("Will")) {
// click the checkBox
driver.findElement(By.xpath("//tbody/tr[" + i + "]/td[1]/input")).click(); System.out.println("candidate has been selected");
break;
}
}
// Method 2 : By custom xpath:
driver.findElement(By.xpath("//td[contains(text(),'Will')]//preceding-sibling::td//input[@type='checkbox']")) .click();
driver.close();
}
}

5. Conclusion

In this article , we learnt about how to handle dynamic Web Tables.


Cheers!!

Naveen AutomationLabs

Blog Contributors:

Author:  Mandeep Kaur
Mandeep, having 5+ years of Testing experience in automation using Selenium (Java). Expertise in API and Performance testing using JMeter.
https://www.linkedin.com/in/mandeep-kaur-486ba9106
 
Reviewer: Naveen Khunteta 
https://www.linkedin.com/in/naveenkhunteta


Selenium WebDriver -Navigation Commands – Difference between get() and navigate().to() methods.

1. Overview  

In this short article, we’ll be focusing on various Navigation commands that allow the browser to move forwards, backwards in the browser’s history.

2. Difference Between the driver.get(“url”) and driver.navigate().to(“url”);

On the basis of Method Calls:

driver.get() used to launch a particular website url, whereas driver.navigate().to() is also used to launch the particular website by passing the URL but we can use forward and backward button to navigate between the pages during test case writing.

If you want to use back() and forward() method after driver.get() method, but you need to use it with Navigation Methods only.

Both are exactly same, both are synonyms of each other. In fact navigate.to() method is calling get() method internally.

On account of Server API Calls:

driver.get() method internally sends HTTP POST request to Selenium Server Standalone.  

driver.navigate().to method sends HTTP POST request to Selenium Server Standalone.

Both are calling HTTP POST method: /session/:sessionId/url

GET /session/:sessionId/url Retrieve the URL of the current page.
POST /session/:sessionId/url Navigate to a new URL.

3. Method Explanation

All Navigation methods are defined in RemoteNavigation class which is implementing Navigation Interface.

Note:

  • navigate.to() method is overloaded method as referred below.
  • It can take String url or URL url as a parameter.
  • get() method takes only String url.


Now, to access the navigation methods, just type driver.navigate(). like below:

Let’s try to understand these methods in detail:

  1. Navigate To Command – driver.navigate().to(“url”)

There are two ways to define this method:

This method Loads a new web page in the current browser window. It accepts a String parameter and returns void.


This method accepts URL class instance by importing package import java.net.URL; and returns void.

2)     Forward Command – driver.navigate().forward();

This method enables the web browser to click on the forward button in the existing browser window, it takes you forward by one page on the browser’s history.  It neither accepts nor returns anything.

3) Back Commanddriver.navigate().back();

This method enables the web browser to click on the back button in the existing browser window. it takes you backwards by one page on the browser’s history. It neither accepts nor returns anything.

4)  Refresh Command- driver.navigate().refresh();

This method refreshes the current page. It neither accepts nor returns anything.


Let’s look at this function in more details with below code snippet:

Upon executing the above code, we will get the output on console similar to:

Now many of us would be wondering why this exception occurs?

Let’s break down our answer to get a deeper understanding:

  • When WebDriver executes the above code then it assigns an internal id  to every WebElement and it refers this id to interact with that element and now we are refreshing our web Brower with driver.navigate().refresh();

  • It refreshes the entire page due to which the section of the DOM also gets refreshed and so is the element. In this scenario the internal id(something like “id =725541f2-6c3b-4a31-acd5-7c14ef0f8f97” as shown in below snapshot ) which WebDriver was using has become stale(old), so now for every operation on this WebElement, we will get StaleElementReferenceException .

To overcome this problem, the most recommended way is to reinitialize the element again and this time WebDriver will assign a different Id to this element, and example for this has been done for you below :

Let’s see complete code with all the navigate operations together:

package com.example.automation;

import org.openqa.selenium.WebDriver;
import org.openqa.selenium.chrome.ChromeDriver;

/**
*
@author Mandeep Kaur
*
@Date 23 April,2020
*/

public class SeleniumConfig {
public static void main(String[] args) {

String path = System.getProperty(“user.dir”);
System.setProperty(“webdriver.chrome.silentOutput”, “true”);
System.setProperty(“webdriver.chrome.driver”, path + “/chromedriver”);
WebDriver driver = new ChromeDriver();

//Navigate to the google
driver.navigate().to(“https://www.google.com/”);

//Navigate to the yahoo
driver.navigate().to(“https://in.yahoo.com/?p=us”);

//Navigate back to google
driver.navigate().back();

//Navigate back to yahoo
driver.navigate().forward();

//Navigate to the instagram
driver.navigate().to(“https://www.facebook.com/”);

//Refresh the page
driver.navigate().refresh();

//close the driver
driver.close();
}

}

4. Conclusion

In this article, we learnt about various selenium navigation commands.


Blog Contributors:

Author:  Mandeep Kaur
Mandeep, having 5+ years of Testing experience in automation using Selenium (Java). Expertise in API and Performance testing using JMeter.
https://www.linkedin.com/in/mandeep-kaur-486ba9106
 
Reviewer: Naveen Khunteta 
https://www.linkedin.com/in/naveenkhunteta

Overview of WebDriver and WebElement Interface in Selenium

Overview of WebDriver and WebElement Interface in Selenium

 
1. Introduction 
 
In this article, we are going to explore these powerful interfaces WebDriver and WebElement.
 
2. WebDriver Hierarchy
 
Before proceeding any further, let’s have a look at WebDriver Hierarchy first:


Explanation:
  • WebDriver is an interface and extends SearchContext Interface, which declares two methods findElement and findElements Methods (FindElement/FindElements in above image).
  • WebDriver has many abstract methods like: get(String url), close(), quit(),getTitle(), getCurrentUrl etc.
  • RemoteWebDriver class which implements WebDriver Interface, this class implement all the methods in WebDriver including findElement and findElements.
  • ChromeDriver Class extends ChromiumDriver Class which further extends RemoteWebDriver class.
  • And finally, IEDriver, SafariDriver and FirefoxDriver classes directly extends RemoteWebDriver class.
  • Click here to view complete source code implementation and for selenium java APIs visit here.
 
 
Let’s understand with a simple example:
 
When we say WebDriver driver = new ChromeDriver();
 
We can access all methods using ChromeDriver instance.
 

Below is the image for the same :


3. WebElement Interface
 
Now, let’s explore WebElement Interface:
 
  •  As explained on Selenium Official Site a WebElement represents HTML element.
  • The interface also extends SearchContext, TakesScreenshot interfaces.
  • In general, whatever we see in the HTML page is a WebElement whether it’s a link, search-text, button, Drop-Down, Web-Table etc. So, we can say that every action on a Web-Page while automating your Web Application will have to go through WebElement interface.
 
4. Ways to Define WebElement
 
       1)With the help of WebDriver instance
 
WebElement element = driver.findElement(By.);
 
findElement() – Basically it is a  method which finds a first single matched WebElement on the web page and returns the WebElement.
 
And similarly findElements() – It  returns List of matching WebElements that can be used to perform further actions.
 
Below code snippet where driver.findElements returning the List of WebElement.
 

By is an abstract class by which we can extract below methods which also be called as locators:


    2) By returning WebElement WebElement element = driver.findElement(By) and with above locators we can locate the WebElement on      the web page
 
    3)Using By Locator By by = By.name(“userName”);
WebElement element = driver.findElement(by);


5. Operations on WebElement
 
Once we figured out the WebElement with the help of locators then we can perform any actions on it.
 
Let’s look at below example:
 
WebElement userNameObj = driver.findElement(By.name(“userName”));
 
In above line of code, we found the WebElement with locator by name with WebElement instance as userNameObj.
Post that we need to send some userName to the WebElement, for that we need to write code as below
userNameObj.sendKeys(“sva”);
With the help of sendKeys, I just simply passed the username.
 
Let’s spend some time to look which all the post operations we can perform on WebElement:


As shown above, we can easily perform all these operation click(), clear(), sendKeys(), getText() and getAttribute() etc.
 
Below is the code snippet for your reference:


package com.example.automation;

import org.openqa.selenium.By;

import org.openqa.selenium.WebDriver;

import org.openqa.selenium.WebElement;

import org.openqa.selenium.chrome.ChromeDriver;

import java.util.List;

/**

* @author Mandeep Kaur

* @Date 21 April,2020

*/

public class SeleniumConfig {

public static void main(String[] args) {

String path = System.getProperty(“user.dir”);

System.setProperty(“webdriver.chrome.silentOutput”, “true”);

System.setProperty(“webdriver.chrome.driver”, path + “/chromedriver”);

WebDriver driver = new ChromeDriver();

driver.get(“http://newtours.demoaut.com/”);

WebElement userNameObj = driver.findElement(By.name(“userName”));

userNameObj.sendKeys(“sva”);

WebElement userPasswordObj = driver.findElement(By.name(“password”));

userPasswordObj.sendKeys(“123”);

WebElement loginObj = driver.findElement(By.name(“login”));

loginObj.click();

// get all the elements tag name a

List<WebElement> allLinksObj = driver.findElements(By.tagName(“a”));

// get the total count of elements

int linkCounts = allLinksObj.size();

for (int i = 0; i < linkCounts; i++) {

System.out.println(allLinksObj.get(i).getText());

}

driver.close();

}

}

 
6. Conclusion
 
In this article, we learnt about WebDriver and WebElement Interface.


Cheers!

Naveen AutomationLabs

 
Blog Contributors:
Author:  Mandeep Kaur
Mandeep, having 5+ years of Testing experience in automation using Selenium (Java). Expertise in API and Performance testing using JMeter.
 
Reviewer: Naveen 


Selenium WebDriver Architecture Overview & WebDriver APIs

Selenium WebDriver Architecture Overview & WebDriver APIs

 
1. Overview
 
This article describes about Selenium WebDriver Architecture and to know about how selenium works internally.
 

2. The Basics

  • Selenium WebDriver is a browser automation framework that allows you to execute your tests against different browser.
  • WebDriver interacts and controls the actual browser in either locally or remotely. 
  • We can use WebDriver to automate and validate Web-Applications.
 
3. How selenium WebDriver Works Internally
 
Let’s take a look at the below architecture:


The above picture depicts, there are four components of Selenium Architecture:
 
1. Selenium Client Library
2. JSON Wire Protocol over HTTP
3. Browser Drivers
4. Browsers
 
We will try to understand each of these four components briefly:
 
1. Selenium Client Library
 
Selenium supports multiple libraries such as Java, Ruby, Python, etc.
It means that we can write our code with any of these scripting/programming languages.
Selenium Client Library sends the request in the form of API to the Browser Driver with the help of JSON Wire Protocol over HTTP (hypertext Transfer Protocol).


2. JSON Wire Protocol over HTTP

  • JSON stands for JavaScript Object Notation. It is a lightweight data-interchange format which transfers the data between a server and a client on the web.
  • JSON Wire Protocol is a REST API that transfers the data between HTTP server .Every Browser Driver uses a HTTP server to receive HTTP requests.

3. Browser Driver

  • Browser Drivers are used to communicate with browsers.
  • Each browser has its specific Browser WebDriver.
  • When a browser driver is received any command then that command will be executed on the respective browser and the response will go back in the form of HTTP response.
Following are the operations performed when we run our automation script using specific Browser driver:
 
1. For each Selenium command, a HTTP () request is created and sent to the browser driver.
2. The browser driver uses a HTTP server for getting the HTTP requests.
3. HTTP Server sends all the steps to perform a function which are executed on the browser.
4. The HTTP server sends the status back to the automation script.

 
3. Browsers
 
Selenium supports multiple browsers such as Firefox, Chrome, IE, Safari etc.
 
 
Now let’s proceed to see the real implementation of the same:


Note: Because there are many Browsers in the market today, Selenium community has created WebDriver as an interface.

This interface defines some set of methods whose implementation will be provided by implementing classes such as ChromeDriver, FirefoxDriver, SafariDriver etc.

WebDriver’s main feature is to control and provide instructions to the Browser. So, you can choose any driver based on your browser. In above case we have chosen ChromeDriver.
 
Below code for your reference:
 
package com.example.testAutomation;import org.openqa.selenium.WebDriver;import org.openqa.selenium.chrome.ChromeDriver;

/**
 * @author Mandeep Kaur
 * @Date 17 April,2020
 */
public class SeleniumConfig {
   
public static void main(String[] args) {

        String path = System.getProperty(“user.dir”);
        System.setProperty(
“webdriver.chrome.driver”, path + “/chromedriver”);
        WebDriver driver =
new ChromeDriver();
        driver.get(
“https://www.hubspot.com/”);

    }
}

 
4. Now, let’s see what will happen internally when you execute the above script:
 
1. Upon executing the above code, Selenium client library (java) will convert the automation script to Rest API and communicates with the Chrome Driver over JSON Wire Protocol. 

2. Once API interacts with Browser Driver, then the Browser Driver will pass that request to the browser over HTTP and then the commands in your selenium script will be executed on the browser.

3. Based on the Rest Methods Type: Get/Post/Delete, response will be generated on the browser end and it will be sent over HTTP to the browser driver and from the Browser Driver over JSON Wire Protocol sends it to the UI Console.

4. Click on this link for complete understanding of JSON Wire Protocol

 
Let’s try understanding this with an example:
 
Below are the API’s gets evoked when we write any operation using selenium .
For example, when we write driver.get(“url”) below highlighted API will be executed Internally.


Let’s move on to the practical implementation to see how exactly it works:
 
1. Download the selenium Standalone server from here and place it to a directory and keep your chrome/gecko driver in the same directory.
2. Open command Terminal/command Prompt and navigate to the above directory and run the command java -jar selenium-server-
standalone-3.141.59.jar and we will get our selenium server up and running as can be seen below


Next, we will open our browser and enter the URL as  http://localhost:4444/ :
 
 
You will be landing to this page


Click on console, you will be navigated to below page
 
Click on create Session and you will be prompted with a pop up to select the browser you want to run the automation script and click OK


And we see our session got created and chrome browser will be launched automatically and same can be confirmed from the Terminal:


Move the cursor to Capabilities and you will see our code WebDriver driver = new ChromeDriver(); has been converted into API in JSON-Payload internally


Now, let’s open the postman (It’s a tool to validate the request and Response)
 
Request: To get the current session running, we will evoke sessions API from JSONWireDocumentation with end-point: /sessions

 
And here we got our current “session id”:


This also can be done by running the command curl -X GET  http://localhost:4444/wd/hub/sessions


Let’s evoke “/sessionId/url” API to see how we can retrieve the URL when we pass driver.get(“url” ) in our code:
 
 
Here method Type will be post and we have to pass the body with URL we want to get, in this case will take https://www.hubspot.com/


And yes, we got our URL in launched Chrome and same operation through Terminal can be achieved like below


5. Conclusion
 
 
In this article, we have learnt the complete internal architecture of Selenium WebDriver.
 
That’s it 🙂 You have learnt about Selenium WebDriver Architecture and WebDriver Rest APIs.


Cheers!

Naveen AutomationLabs


Blog Contributors:
Author:  Mandeep Kaur
Mandeep, having 5+ years of Testing experience in automation using Selenium (Java). Expertise in API and Performance testing using JMeter.
 
Reviewer: Naveen 

How to write your first Selenium WebDriver Code

How to write your first Selenium WebDriver code


1. Introduction 

 
In this article, we will have a quick look at the download and installation of java, eclipse and practical introduction to working with our first selenium script.


2. Set up java and Eclipse

 
Eclipse IDE requires java, so we will be installing Java SE JDK1.8
 
Here are the steps to install JDK :
 
Step 1: Download JDK from here and choose the JDK according to your OS (Windows/Mac based on 32 bit and 64-bit version). 
 
Sign up for oracle account and login with the same, you will be able to download the JDK and install in your system by clicking it and accepting the consent till you get the finish/close button.
 
Step 2: To check if java is installed, open a command window or terminal and type java -version, and output will be similar to


Otherwise, we’ll get an error as :
 
‘java’ is not recognised as an internal or external commands
 
The above error may vary depending on the OS and the java version installed
 
Step 3: For windows, we need to define the java Environment path to locate the executables like javacjava, etc
  • Open search and type advanced system setting


  • In the shown options, select the View advanced system settings link
  • Under the Advanced tab, click Environment Variables
 
 
·       In the System variables section, click New 


·        Set JAVA_HOME as the Variable name and the path to the JDK installation and click OK
 
 
  • Click OK and click Apply to apply the changes
 

In Mac OSX 10.5 or above, Apple recommends  to set the $JAVA_HOME variable to (/usr/libexec/java_home
 
1) open the terminal and run the command Open ~/.bash_profile, if file exists it will open the bash file 
otherwise, we will get the error message as:


The file /Users/userName  .bash_profile does not exist.
 
2) The next step is to create the bash file, simply run command $ vim  ~/.bash_profile  and add 
export JAVA_HOME=$(/usr/libexec/java_home) save and close the file.


3) Now, run the source ~/.bash_profile to apply the changes. 
 
4) To check the value of JAVA_HOME  run the command echo $JAVA_HOME and the output should be similar like 
 
/Library/Java/JavaVirtualMachines/jdk1.8.0_241.jdk/Contents/Home
 
Step 4Download the latest version of Eclipse IDE from here and choose the version according to OS
 
you should be able to download .exe file for Windows and .dmg for Mac after successful completion of the installation, you are all set to launch the IDE.
 
Step 5: Lastly, we need to download Selenium Java Client Driver  to run our first selenium script 
 
Selenium Java Client Driver from here and choose the latest version and Save it your preferred location in your machine (say C:\documents) 
 
Configure Eclipse IDE with WebDriver :
  • Create a new Java Project in Eclipse:


  • Give a Project Name : Test Automation
  • Right-click on the project and click on Properties>Java Build Path>Click on configure build path>Click on Library Tab>Add External JARs and Select the Selenium WebDriver JARs from the location, where you have saved the Selenium JARs in your System.   


 and click on apply and press OK
 
Now, let’s first download the latest chrome Driver from here according to your OS and save the driver in some directory and to check the compatibility with browser and driver click here
 
3. Selenium Integration :
 
In this section, we will start with a simple selenium script  such as open a browser, navigating to URL and verify the title of the page 
Now, create a java package under your project, and create a class  and provide a  class name as SeleniumConfig 
 
In order to launch the Chrome browser, we have to do two steps
1. Set a system property “webdriver.chrome.driver” to the path of your ChromeDriver file
2. Instantiate a ChromeDriver class.
 
 
Below is the code snippet for your reference :
 
package com.example.testAutomation;
 
import org.openqa.selenium.WebDriver;
import org.openqa.selenium.chrome.ChromeDriver;
 
/**
 * @author Mandeep Kaur
 * @Date 16 April,2020
 */
public class SeleniumConfig {
public static void main(String[] args) {
 
String path = System.getProperty("user.dir");
 
// For Windows define path as C:\Users\abc\Desktop\chromedriver.exe
 
System.setProperty("webdriver.chrome.driver", path + "/chromedriver");
WebDriver driver = new ChromeDriver();
 
/**
* Now, let's open the browser with the help of the driver and get the
* title of the site: Here we will use the dummy Site for testing
*/
 
driver.navigate().to("https://www.hubspot.com/");
String actualTitle = driver.getTitle();
 
// Finally, we can validate if the actual title is matched with our
// expected
// Title:
 
String expectedTitle = "HubSpot | Inbound Marketing, Sales, and Service Software";
if (actualTitle.equalsIgnoreCase(expectedTitle))
System.out.println("Test Passed!");
else
System.out.println("Test Failed");
 
// once all the operations are done, we can close the web driver
 
driver.close();
}
 
}
 
That’s it!! You have written your first Selenium Program 🙂
 
Cheers!
Naveen AutomationLabs

Blog Contributors:Author:  Mandeep Kaur

Mandeep, having 5+ years of Testing experience in automation using Selenium (Java). Expertise in API and Performance testing using JMeter. https://www.linkedin.com/in/mandeep-kaur-486ba9106

Reviewer: Naveen Khunteta https://www.linkedin.com/in/naveenkhunteta

Take Screenshot of WebElement in Selenium || New Selenium 4 feature – Naveen AutomationLabs

Take Screenshot of WebElement in Selenium || New Selenium 4 feature

In this blog, I have explained how to take screenshot for a web element in Selenium 4 version. This is the new feature in Selenium 4, earlier we could only take screenshot only for web page, now you can take screenshot for elements and use them with your bug report.

Watch Full video here:

Source Code:

package WM;

import java.io.File;
import java.io.IOException;
import java.util.concurrent.TimeUnit;

import org.apache.commons.io.FileUtils;
import org.openqa.selenium.By;
import org.openqa.selenium.OutputType;
import org.openqa.selenium.WebDriver;
import org.openqa.selenium.WebElement;
import org.openqa.selenium.chrome.ChromeDriver;

import io.github.bonigarcia.wdm.WebDriverManager;

public class TakeElementScreenshot {

public static void main(String[] args) throws IOException {

WebDriverManager.chromedriver().setup();
WebDriver driver = new ChromeDriver();
driver.manage().timeouts().implicitlyWait(20, TimeUnit.SECONDS);

driver.get(“https://app.hubspot.com/login”);

WebElement email = driver.findElement(By.id(“username”));
WebElement password = driver.findElement(By.id(“password”));
WebElement loginButton = driver.findElement(By.id(“loginBtn”));
WebElement forgotPwd = driver.findElement(By.linkText(“Forgot my password”));

email.sendKeys(“naveen@gmail.com”);
password.sendKeys(“Test@123”);
takeElementScreenshot(email, “emailElement”);
takeElementScreenshot(password, “passwordElement”);
takeElementScreenshot(loginButton, “loginButtonElement”);
takeElementScreenshot(forgotPwd, “forgotPwdLink”);

driver.quit();

}

//take screenshot using getScreenshotAs() method.
public static void takeElementScreenshot(WebElement element, String fileName) {

File srcFile = element.getScreenshotAs(OutputType.FILE);
try {
FileUtils.copyFile(srcFile, new File(“./target/screenshots/” + fileName + “.png”));
} catch (IOException e) {
e.printStackTrace();
}

}

}

How to control Chromedriver using curl

How to control Chromedriver using curl

Here is how to use Chromedriver without libraries like selenium-webdriver. This can be useful for debugging.
The following example visits a web page and reads the a headline’s text contents.

1. download chromedriver.exe on windows/mac, go to the same directory and run this command:

On Mac: ./chromedriver &
On Windows: chromedriver.exe

2. Create a session:
Java Code:
WebDriver driver = new ChromeDriver();

Curl Command:
curl -XPOST http://localhost:9515/session -d ‘{“desiredCapabilities”:{“browserName”:”chrome”}}’

3. launch a URL:
Java Code:
driver.get(“https://www.google.com”);

Curl Command:
curl http://localhost:9515/session/142a7f9bb57b8fda48636c8709df9591/url -d ‘{“url”:”https://www.google.com”}’

4. find an element:
Java Code:
WebElement element = driver.findElement(By.name(“q”));

Curl Command:
curl http://localhost:9515/session/142a7f9bb57b8fda48636c8709df9591/element -d ‘{“using”:”name”, “value”:”q”}’

5. enter text in element:
Java Code:
element.sendKeys(“Naveen AutomationLabs”);

Curl Command:
curl http://localhost:9515/session/142a7f9bb57b8fda48636c8709df9591/element/0.45843488917986774-1/value -d ‘{“value”:[“Naveen Automation Labs”]}’

6. Quit Browser/close the session:
Java Code:
driver.quit();

Curl Command:
curl -X DELETE http://localhost:9515/session/142a7f9bb57b8fda48636c8709df9591


Cheers!!
Naveen AutomationLabs

Usage of Cucumber Options which we use in TestRunner File


Usage of Cucumber Options which we use in TestRunner File


TestRunner File is used to build a Communication between Feature Files and StepDefinition Files. 


features: We use Cucumber features option to define path of feature file(s). 

glue: We use Cucumber glue option to define path of step definition file(s). 

format: We use Cucumber format option to generate output or test results in different types of formats. 
Eg: HTML Report, JUnit or TestNG Report, Cucumber Report and So. 

monochrome: We use Cucumber monochrome option to print console output in a very readable format. 
monochrome must be set to true in order to achieve it. 

strict: We use Cucumber strict option to check if any step if not defined in step definition file. 
If any step is not defined in step definition file then it will stop an execution of program. 

dryRun: We use Cucumber dryRun option to check whether all the steps from feature files has got methods and implemented or no in Step Definition File. 
Before execution of program dryRun must be set to true and we need to make sure that all steps are implemented in Step Definition File. 
Once we are sure that all steps are implemented then dryRun must be set to False and we should continue with Test Execution.

tags: We use Cucumber tags option when we have more number of scenarios in a single feature file which represents different purpose [Smoke, Sanity, Regression etc] in such cases we can make use tags option.
Eg: tags={ ” @ Smoke ” } >> It will pick only and only those scenarios which are tagged with Smoke in feature files.


This blog is contributed by Pavan KrishnanReddy Working as Testing Executive at Infosys Limited  
Cheers!
Naveen AutomationLabs

What are the Challenges you faced in Selenium?

Selenium Interview questions- What are the Challenges you faced in Selenium? Selenium Interview Question for Fresher and Experienced


Challenges faced using selenium automation testing, and how to solve them
1. Image or text overlapping issue

2. No facility to deal with Captcha, Bar Code

3. Doesn’t support any non web based (Like Win 32, Java Applet, Java Swing, .Net Client Server etc) applications

4. When you compare selenium with QTP, Silk Test, Test Partner and RFT, there are many challenges in terms of maintainability of the test cases

5. Since Selenium is a freeware tool, there is no direct support if one is in trouble with the support of applications

6. Bitmap comparison is not supported by Selenium

7. Any reporting related capabilities, you need to depend on third party tools

8. You need to learn any one of the native language like (.Net, Java, Perl, Python, PHP, Ruby) to work efficiently

9. Difficult to identify dynamic objects

10. Working with frames

11. Selenium test playback is slow (IDE)

12. JavaScript sandbox, Flash, Applets, Silverlight, and HTML 5’s Canvas all present problems in Selenium

13. Dealing with pop-up windows: Selenium can sometimes fail to record common popups in web apps. The Alert interface brings with it the following commands: void dismiss(), void accept (), getText(), void sendKeys(String stringToSend). The first two basically click on the “cancel” and “OK” buttons respectively on a popup window.

14. Timeout resulting from synchronization problems: One should ideally use selenium.IsElementPresent(locator) to verify that the object is in a loop with Thread.Sleep

15. Testing Flash apps: To automate flash apps with Selenium, one can use Flex Monkium. The application source code must be compiled with the swc files generated by Flex Monkium. Then the app and the Selenium IDE are connected, and the tests can be recorded with IDE.

16. Unexpected error launching Internet Explorer. Browser zoom level should be set to 100% by default for the IE browser to overcome this error

17. Protected Mode must be set to the same valueerror occurs when trying to run Selenium WebDriver on a fresh Windows machine. This issue can be fixed by using capabilities when launching IE

18. Cross Browser Testing Issues

19. Ajax Components

SELENIUM DRIVER REQUIREMENTS

SELENIUM DRIVER REQUIREMENTS

Quick reference

Browser Supported OS Maintained by Download Issue Tracker
Chromium/Chrome Windows
macOS
Linux
Google Downloads Issues
Firefox Windows
macOS
Linux
Mozilla Downloads Issues
Edge Windows 10 Microsoft Downloads Issues
Internet Explorer Windows Selenium Project Downloads Issues
Safari macOS El Capitan and newer Apple Built in Issues
Opera Windows
macOS
Linux
Opera Downloads Issues
Newer posts »