In this blog, let’s learn setting up Email Notification in Jenkins.
In real time, we build jobs periodically for Jobs that we create in Jenkins. As and when job is completed, if we want to be notified to know about job execution status [Success or Failure or Unstable] then it is a good feature to be added into Jenkins Job Configuration.
To achieve Email Notification in Jenkins, now let’s see how can we do it.
We need to install below plugins:
1. Email Extension Plugin.
2. Email Extension Template Plugin.
Go to Jenkins Dashboard.
1. Click on Manage Jenkins.
2. Click on Manage Plugins.
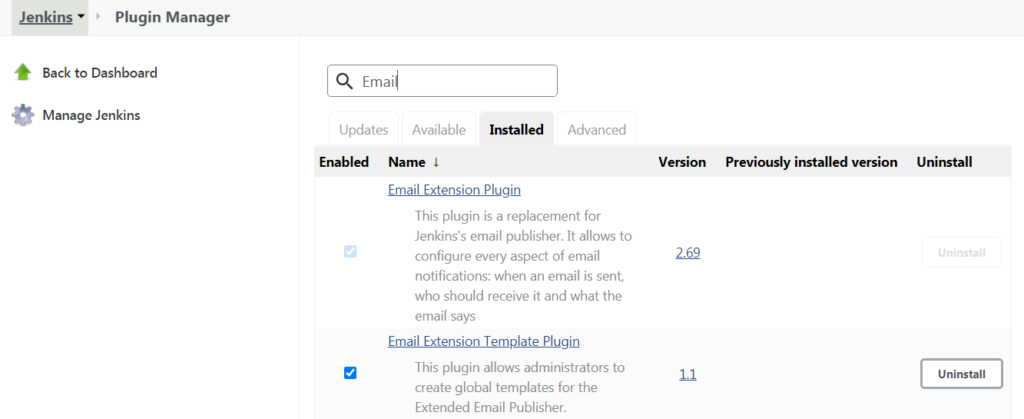
In Manage Plugins, go to Available section and search by “Email” and install suggested email plugins related to Email Notification that are Email Extension Plugin and Email Extension Template Plugin.
In my case, as Email Extension and Email Extension Template Plugins are already installed, both plugins are appearing in installed section.
Once plugins are installed, then we are good to configure job for Email Notifications in Jenkins.
Let’s now see configuring job for Email Notifications in Jenkins after plugins are installed.
Go to Manage Jenkins.
Click on Configure System.
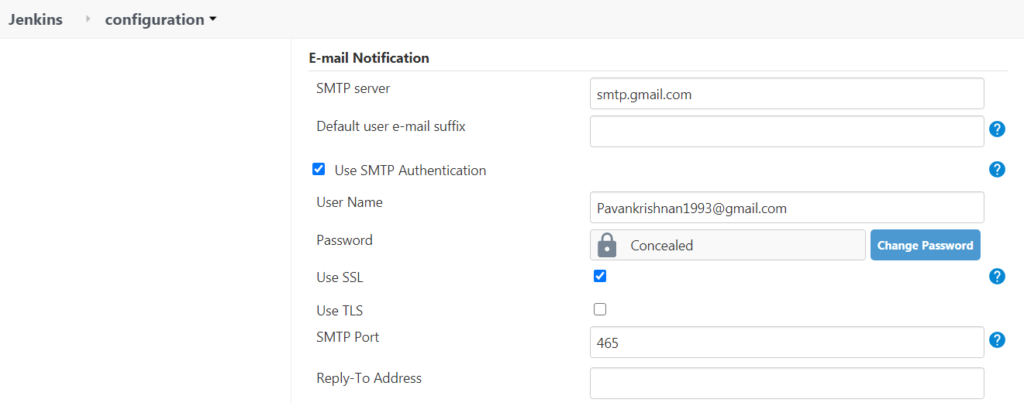
Scroll down to E-mail Notification in Configure System Section.
Follow above simple steps to do Email Notification Configuration.
Here I’m using Gmail for achieving Email Notification in Jenkins.
1. SMTP server – For gmail, it is mandatory to provide as smtp.gmail.com.
2. Use SMTP Authentication should be checked – Only then we should be able to see User Name and Password sections.
3. Provide your Gmail Credentials in User Name and Password Fields.
4. Use SSL should be checked.
5. Give SMTP Port Number as 465. [If 465 doesn’t work for you, try with 587]
Once setup is done for Email Notification.
Let’s do Test Configuration by Sending Test Email.
Once Test configuration by sending test e-mail is Checked, you should be able to see Test e-mail recipient option as shown below.
Now enter Gmail ID to which you want to send out a Test Mail and click on Test Configuration.
If everything configured as expected then a Test Mail to should be triggered into given Gmail ID and followed message should be displayed “Email was successfullysent” as shown below.
Test E-Mail Recipient could be any Gmail ID – Now you can Check for Test Mail in Given Mail Account.
If in case, Test Configuration is Failed. Go to your Gmail Account for which Email Notification was configured.
Click on Security.
Now Go to Less secure app access and Allow Turn on Access to Less secure app access. [By default it should be selected to Off]
Now Go to Manage Jenkins.
Click on Configure System.
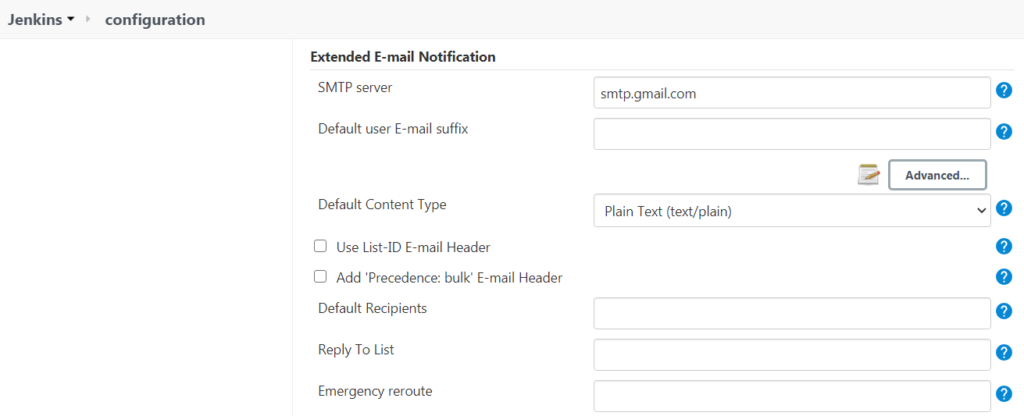
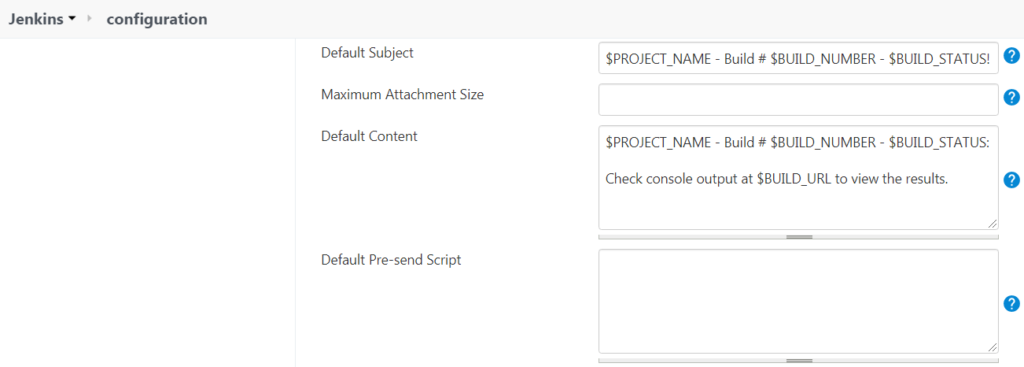
Scroll down to Extended E-mail Notification in Configure System Section.
Enter all Required Fields as shown in below Screenshots.
Note:
In Extended E-mail Notification section, you just need to provide SMTP server details as smtp.gmail.com.
Do not change anything from Default Subject and Default Content Fields that are suggested by Jenkins.
Now Click on Apply and Save.
Wow, now we are all set to use Email Notification Feature in Jobs.
Now go to Jenkins Job.
Click on Configure.
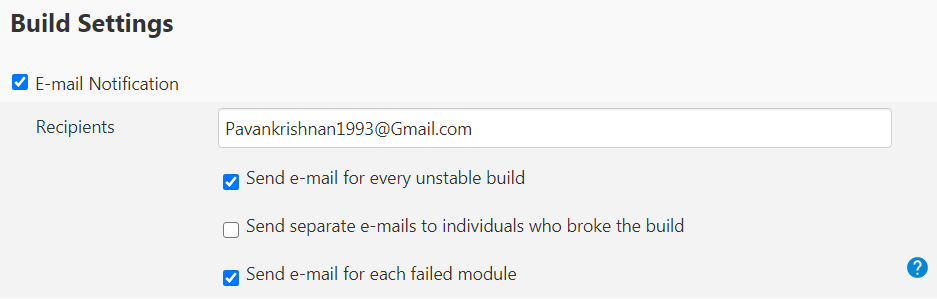
Go to Build Settings section and provide Email IDs as shown below to which Email Notifications has to be sent.
Note:
Here Email Notifications will be sent only and only for Unstable and Failed Builds.
Surprise:
If you want to achieve Email Notification through Jenkins Pipeline. Follow below simple steps.
1. Configurations for E-mail Notification and Extended E-mail Notification should be done in Configure System section.
2. Add below code inside Jenkins Pipeline Step.
stage('Gmail')
{
	steps
	{
		emailext body: "*${currentBuild.currentResult}:* Job Name:
                ${env.JOB_NAME} || Build Number: ${env.BUILD_NUMBER}\n More
                information at: ${env.BUILD_URL}",
		subject: 'Declarative Pipeline Build Status',
		to: 'Pavankrishnan1993@gmail.com'
	}
}
Above code will send a Mail with followed information as below:
1. emailext body:
A. Current Build Status [Success or Failure or Unstable].
B. Job Name as specified in Jenkins Job.
C. Build Number that is executed in Jenkins.
2.Subject: In this section, you can provide Subject name as per your Requirement.
3. to: In this section, you can provide Mail IDs to which Email Notification should be sent.
Note:
The above code can be used in different steps for Job Success, Failure or Unstable..!!
Conclusion: In this blog, we have seen how can we configure Email Notification in Jenkins for Jobs with simple steps for Builds and Pipeline.
In our previous blog we have seen how to create a POM and with the help of POM and TestNG we executed our first test case in our Appium automation framework. Now we are taking our next step in the ladder that is “Page Factory”.
We all knows that POM is a pattern or style in other words it acts like a “Object Repository” i.e. Declaring a Page and page objects/elements in our java class. Page Factory is also same like POM but in addition it comes with lot of predefined notations and attributes to help the automation tester to initiate or declare an element in more standard and robust way.
Let me show an example of POM and Page Factory for better understanding,
Imagine, I have a Login test case to be executed and using POM I have a Login class which is having the below method,
Public void verify_Login() {
//my code goes here
}
Using the above method, my intension is to verify login functionality using a valid username and Password. For this I can go with 4 types of approaches,
Without defining the Locator and Locator strategy as a variable seperately, instead directly implementing the locator in driver.findElement() method.
public void verify_Login() {
    driver.findElement(MobileBy.AccessibilityId("username")).sendKeys("Admin");
    driver.findElement(MobileBy.AccessibilityId("password")).sendKeys("Admin123");
    driver.findElement(MobileBy.AccessibilityId("login_button")).click();
}
2. Defining the Locator and Locator strategy as a “String” variable
3. Defining the Locator using “By” variable (‘By’ from selenium or ‘MobileBy’ from Appium using POM)
public static By loc_Username = MobileBy.AccessibilityId("username");
	public static By loc_Password = MobileBy.AccessibilityId("password");
	public static By loc_login_btn = MobileBy.AccessibilityId("login_button");

	public void verify_Login() {
		driver.findElement(loc_Username).sendKeys("Admin");
		driver.findElement(loc_Password).sendKeys("Admin123");
		driver.findElement(loc_login_btn).click();
	}
4. Defining each Locator directly as a “MobileElement“ with the help of Page Factory. This is what we gonna see in this session.
We have already covered till point #3 in our previous blogs, in this blog we will see point #4 which is nothing but Page Factory model.
I will give you a sample code snippet below for Page Factory to discuss and for better understanding
public class LoginPage_PF extends Testengine {

	private AppiumDriver<?> driver;

	public LoginPage_PF(AppiumDriver<?> driver) {
		this.driver = driver;
		PageFactory.initElements(new AppiumFieldDecorator(driver), this);
	}
}
In the above code, it is very clear that we have a Constructor and using this keyword we are declaring the driver. What is the next line means?
This is the point we initiated the Page Factory. Here PageFactory is a class which is having a static method “publicstatic <T> T initElements(WebDriver driver, Class<T> pageClassToProxy)” this method is used to initiate the driver instance of a given class and which will return an instantiated instance of the class with WebElement.
AppiumFieldDecorator() which is one of an overridden constructor of the class “AppiumFieldDecorator”. This constructor is used to decorate/initiate each mobile element directly as a “MobileElement” variable.
In combination of PageFactory.initElements and AppiumFieldDecorator we can initiate a variable/element with the help of @FindBy annotations.
Remember, one of the main advantage using Page Factory is declaring locators/elements directly as a “MobileElement”. To do so it is important to initiate the driver as soon as the class is invoked this is one of a main reason why we are initiating page factory in Constructor.
Quick Hint: “this” keyword is a reference variable which refers to the current object, so instead of using this keyword in the below line, we can directly mention the class name as well.
PageFactory.initElements(new AppiumFieldDecorator(driver), this);
 Or
 PageFactory.initElements(new AppiumFieldDecorator(driver), LoginPage_PF.class);
Quick Hints:
“PageFactory” class comes from the package “org.openqa.selenium.support”.
“AppiumFieldDecorator” comes from the package “io.appium.java_client.pagefactory.”
Any @ notations are internally referring to interfaces
It is always a good practice to comment for each element or for a group of elements about its usage and how to use.
Tips: There is another ways of initiating PageFactory, is while creating an instance of the page, for example
It is up to you to select any one of these ways in your framework.
Hope we are clear with the Constructor and initElements parts, Let’s move to Page Factory Annotations
What are Page Factory Annotations?
Page Factory annotations are used to provide the way of finding a MobileElement. Also it will make the user feel the code more readable and understandable.
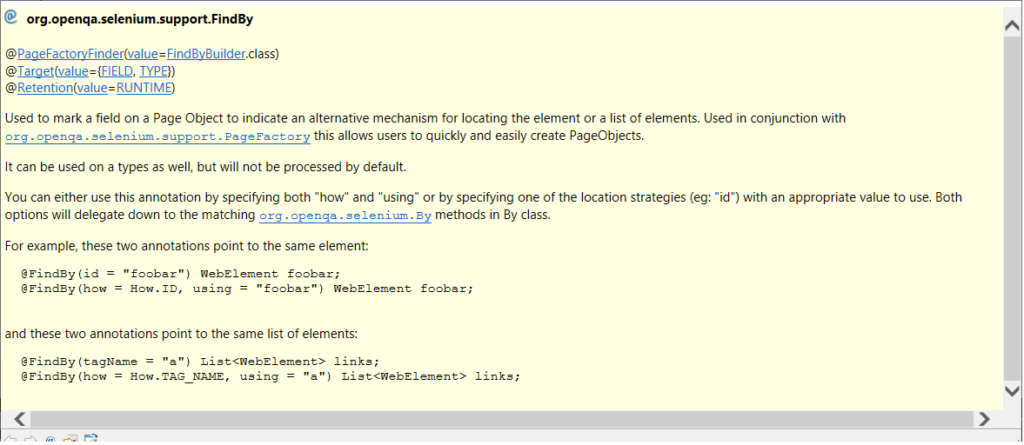
@FindBy() is one of an annotation which helps user to declare a WebElement
Quick Hint: We are telling ‘@’ special key as an annotation, actually it is an interface with @infront. Example: public@interface Test, public@interface FindBy.
About @FindBy in java docs
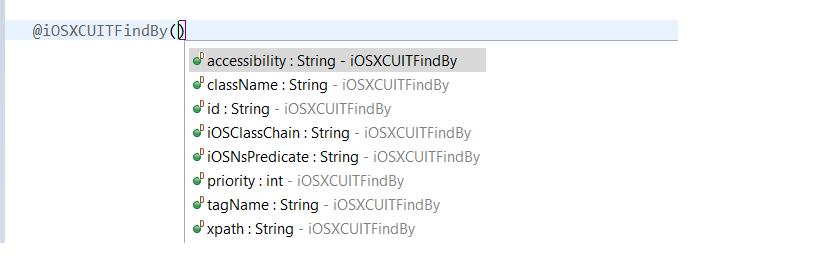
@FindBy is used to find and initiate WebElements, and to define MobileElements we need to use annotations like @iOSXCUITFindBy and @AndroidFindBy
@iOSXCUITFindBy is used to declare variable as “IOSElement” which is for Apple idevices
@AndroidFindBy is used to declare variable as “AndroidElement” which is for Android based devices
Here, we are instructing Appium to use @AndroidFindBy to find an element using the strategy “id” and look for the text “username” in DOM, same for @iOSXCUITFindBy
Hence we already initialized our variable as a MobileElement, no need to use driver.findElement() method every time to access any element, instead we can directly use the variable name followed by selenium/Appium operations to be performed, for example
loc_Username_android.sendKeys(“Admin”);
Cool right!!! the background is, “driver.findElement(By.ID(“username”))” will convert any given locator as a MobileElement/WebElement in runtime and uses the selenium/Appium operations like click(), sendKeys() etc.. Since we already declared our variables as a MobileElement no need to use the findElement() method.
Please find below for the code snippet, which includes explicit wait just to let you know how to use the MobileElement.
package com.invoiceapp.pages;

import org.openqa.selenium.support.PageFactory;
import org.openqa.selenium.support.ui.ExpectedConditions;
import org.openqa.selenium.support.ui.WebDriverWait;
import invoiceapp.base.Testengine;
import io.appium.java_client.AppiumDriver;
import io.appium.java_client.android.AndroidElement;
import io.appium.java_client.pagefactory.AndroidFindBy;
import io.appium.java_client.pagefactory.AppiumFieldDecorator;

public class LoginPage_PF extends Testengine {

	protected AppiumDriver<?> driver;
	public WebDriverWait wait;


	/**
	 * Constructor with a parameter
	 * @param driver as an instance of AppiumDriver<?>
	 */
	public LoginPage_PF(AppiumDriver<?> driver) {
		this.driver = driver;
		PageFactory.initElements(new AppiumFieldDecorator(driver), this);
	}

	// Looking for the text field "Username" in Login page
	@AndroidFindBy(id = "username")
	AndroidElement loc_Username_txt;

	// Looking for the text field "Password" in Login page
	@AndroidFindBy(id = "password")
	AndroidElement loc_Password_txt;

	// Looking for the Button field "Username" in Login page
	@AndroidFindBy(id = "login_button")
	AndroidElement loc_login_btn;

	public void verify_Login() {
		wait = new WebDriverWait(driver, 10);
		wait.until(ExpectedConditions.visibilityOf(loc_Username_txt));
		loc_Username_txt.sendKeys("Admin");

		wait.until(ExpectedConditions.visibilityOf(loc_Password_txt));
		loc_Password_txt.sendKeys("Admin123");

		wait.until(ExpectedConditions.visibilityOf(loc_login_btn));
		loc_login_btn.click();
	}

}
Hope we are very clear till this level. Now the question comes, How to call this class from our Test class?
Okay, so we are using constructor in our Page class i.e. “PageFactory_Example” which expect an argument to be passed. Please find the code below to understand how to pass the driver as an argument for the PageFactory_Example.class
package test;

import org.testng.annotations.BeforeClass;
import org.testng.annotations.Test;
import com.invoiceapp.pages.LoginPage_PF;
import invoiceapp.base.Testengine;

public class PageFactoryTest extends Testengine {

	public static LoginPage_PF login;

	@BeforeClass
	public static void initiateDrivers() {
		// Passing the driver as an argument to LoginPage_PF constructor
		login = new LoginPage_PF(driver);
	}

	@Test
	public void test_TC001_verifyAppLaunch() {
		login.verify_Login();
	}
}
That’s all folks!!! We are now good to go with the PageFactory model in our framework. In our next blog we will see how to create a separate class for PageFactory and to get the instance of that to initiate all our elements instead of initiating everytime in our Page classes.
Also we will see how to utilize Page Factory annotations to define a MobileElement in such a way it which works for both Android and iOS, also how to create a common method for both OS, and few additional topics around Page Factory annotations like @CatcheLookup and using “how” keyword ect..
Stay focused!!!
Note: Whatever code used here are basic level and its only to understand the concept of Page Factory. We are not going to use the same code in our Framework. In our next blog I will definitely demonstrate the same using our AUT.
Hope this helps understanding the concept of Page Factory. Please post your suggestion or questions in comments sections if you have any.
I will commit the codes discussed here in my Github repo. You can clone it and start modifying as per your idea.
https://github.com/Karthickragu/Appium_Blog
Cheers!
Naveen AutomationLab
Blog Contributors:
Author: Ragavendran
Ragav, having 10+ years of testing experience on which 7 years of rich experience in automation using UFT, Selenium (Java/Python). Expertise in Web and Mobile automation testing using Appium.


 – Basics To Advanced (Coming Soon)")