Where we learn technology

Day: 27 May 2020

1. What is TestNG and How to install it

TestNG is an open source Java testing framework which is distributed under the Apache Software License and is readily available for download. TestNG is inspired by JUnit which was the most widely used testing framework for Java applications. Despite being an easy to use and straightforward framework, JUnit has its own limitations which gave rise to TestNG. It was created by Cedric Beust to simplify a broad range of testing needs.

TestNG takes care of needs across testing lifecycle including unit testing, functional testing and Integration testing etc. The “NG” in TestNG stands for ‘Next Generation” implying that, is a next generation testing framework and it is more powerful than JUnit when it comes to parallel testing, reporting and managing dependencies. This article makes an effort to elaborate the above said aspects in further details.

TestNG Features

Some of the key features include

  • Control over test execution with powerful annotations
  • Help achieve parallel testing
  • Ability to set dependencies on methods
  • Support for parameterize
  • Support for Data Driven Testing using data providers
  • Generate test logs across tests
  • Excellent reporting ability
  • Can be integrated with Eclipse, Maven, Jenkins etc

How to get started with TestNG

Before learning TestNG, you should have the basic knowledge of automation testing and any automation tools that supports Java. Here we are going to learn TestNG framework with Selenium WebDriver hence knowledge of the same is essential.

TestNG can be integrated with Simple Java project or Maven Integrated Java Project. Before we start writing the automation test scripts, let’s see the steps involved to automate the testcases and its execution.

Step 1: Write the business logic of your test

Step 2: Insert TestNG Annotations in your test code to control the flow of test cases to follow the business logic

Step 3: Validate test cases with TestNG assertion

Step 4: Add details of testcases in the testNG.xml file

Step 5: Run your Tests

Step 6: View the results in HTML reports

We are going to create Java project and integrate TestNG, hence make sure Jdk1.8 and Eclipse IDE is installed in your machine. Note:The example shown are written and executed in Windows 10, 64 bit system.

How to install TestNG

Generally, TestNG comes as jar files. There are two ways of installing TestNG in Eclipse.

  1. Directly from the Eclipse Marketplace
  2. Through Help -> Install New Software option

How to Install TestNG through Market place

This option is available in new versions of Eclipse. This is the recommended method as it is the easiest method to install TestNG compared to the other installation method.

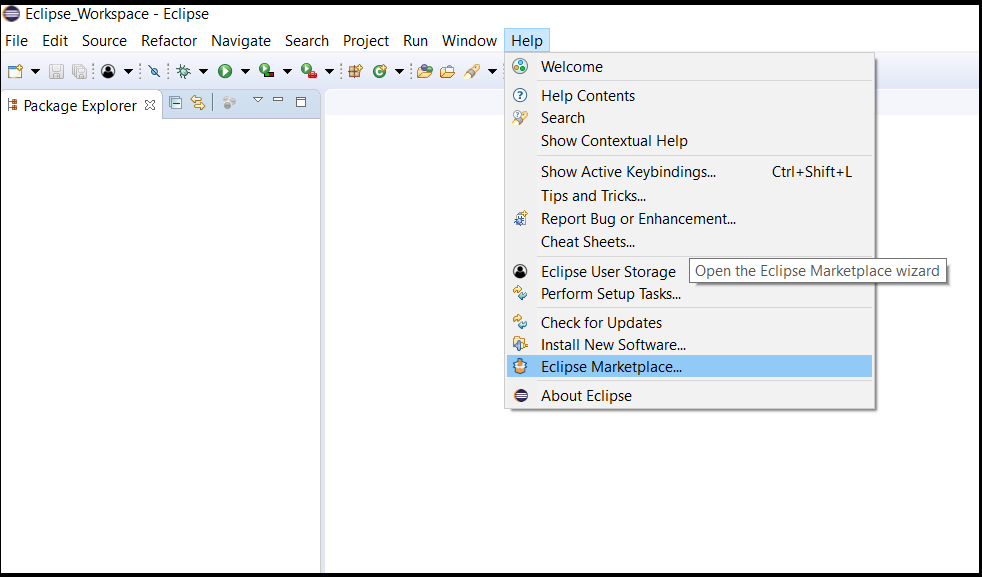
Step 1: Launch Eclipse IDE, click on the Help menu, select the “Eclipse Market place…” option in the dropdown
Step 2:  In Eclipse Marketplace dialog box, you see “Find” input field, enter “TestNG” and hit the enter key to search.
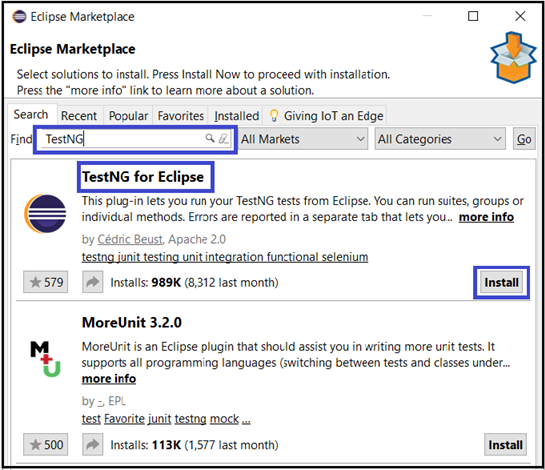
Step3: Now, you’ll see “Install” button for all search results. Click on “Install” button of TestNG for Eclipse as shown in the above screenshot and proceed with the installation . It will take some time ..so be patient ;).

Step 4: Click on “I accept the terms of the license agreement” and then click Finish.

Step 5: If you see a security warning, ignore it by clicking the OK button. 

Now, wait for the installation to finish.

Step 6: After the installation, Eclipse will prompt you to restart, just click Yes.

How to verify TestNG Installation

There are multiple ways to verify the successful installation of TestNG.

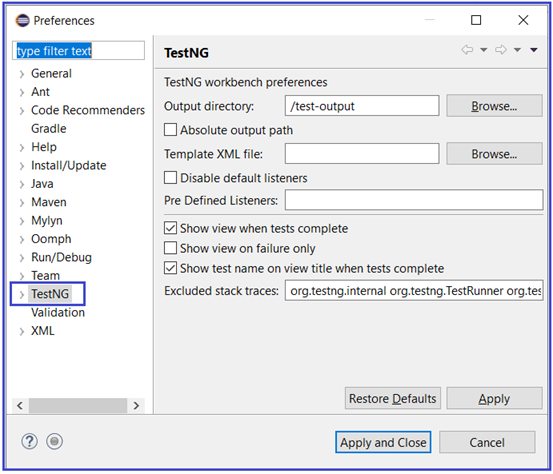
One way is to launch the Eclipse, navigate to “Preferences” from “Window” option in the menu bar, see TestNG listed. Refer the below screenshot for the same.
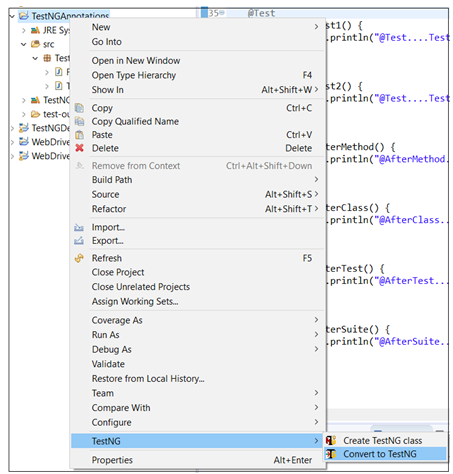
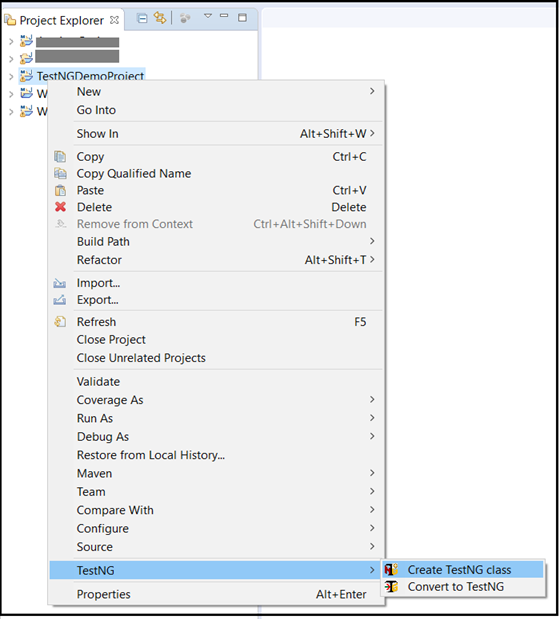
Another way to verify is to right click on the project in Project Explorer section, you will see TestNG listed as shown below.
How to install TestNG Plugin in Eclipse using the “Install New Software…” feature.

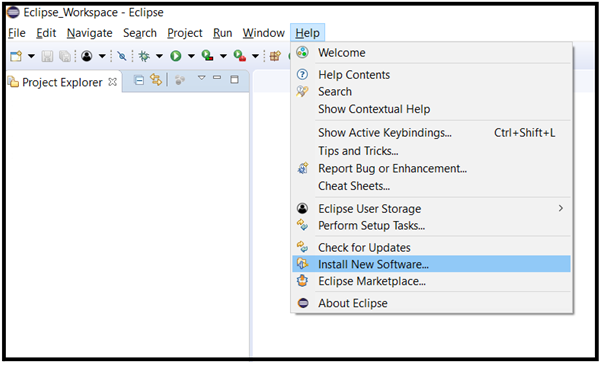
Step1. Launch the Eclipse IDE, Go to Help menu and click on “Install New Software”..
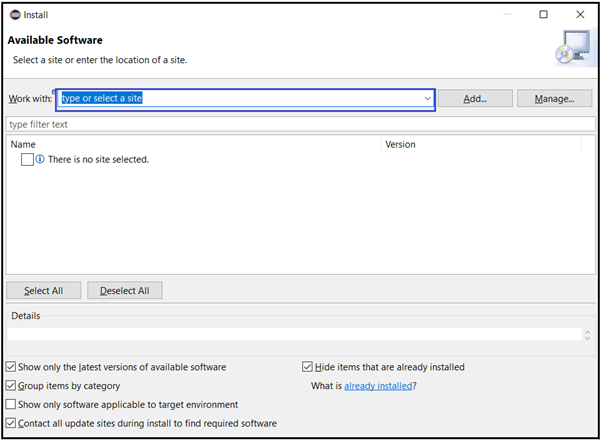
Step2. It will launch an Install window as shown below.
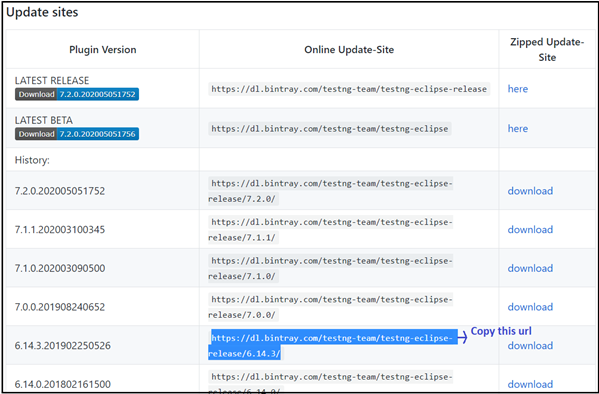
Step 3: You need to copy the build path url from the site https://github.com/cbeust/testng-eclipse. So, go to the site and copy the stable release url from Update sites’ section as shown below
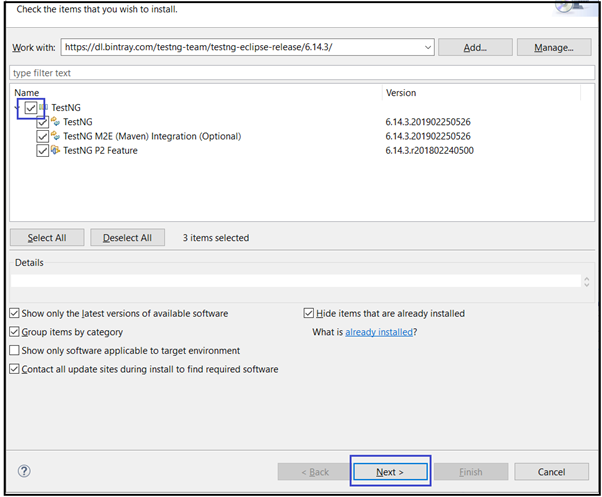
Step 4: Come back to the Eclipse IDE and paste it in “Work With” input box. You will see that the TestNG option listed as shown below. Select the TestNG option and click on Next button and continue the installation process, accept the licence agreement and click on Finish button. If you see a security warning, just ignore and accept it by clicking the OK button. Once the installation is complete, Eclipse will prompt you to restart it. Click on Yes to restart.
Step 5: After the restart, to verify the successful installation of TestNG plugin follow the same procedures mentioned in the First method of installation.

 In the next section, we will see how to write TestNG code to build Test framework with simple Java and Selenium WebDriver project with Eclipse IDE.
2. How to Create TestNG Class with Different Annotations

As mentioned in earlier section, TestNG can be integrated with Simple Java project or Maven Integrated Java Project. First, we will see with a simple Java project.

  1. Go to the Eclipse IDE, create a new Java project. Right click on the Package Explorer panel, Select New option and then click on Project. You will see a New Project Wizard, select Java Project listed under Java Section, click on Next button, now you will be asked to provide the project name. Write the project name in Project Name input box and click on Finish Button.
  2. You will see that project is created in the Package Explorer along with default “src” folder in it.
  3. At this stage, we need to Integrate TestNG plug-in to the current project. So right click on the Project Name, go to Properties-> Java Build path-> Click on Add Library option, select TestNG and click on “Next” button and “Finish”. Finally click on “Apply and Close” button to close the Properties window.
  4. Create a new package under src folder. Then create a new Java class without the Main method.
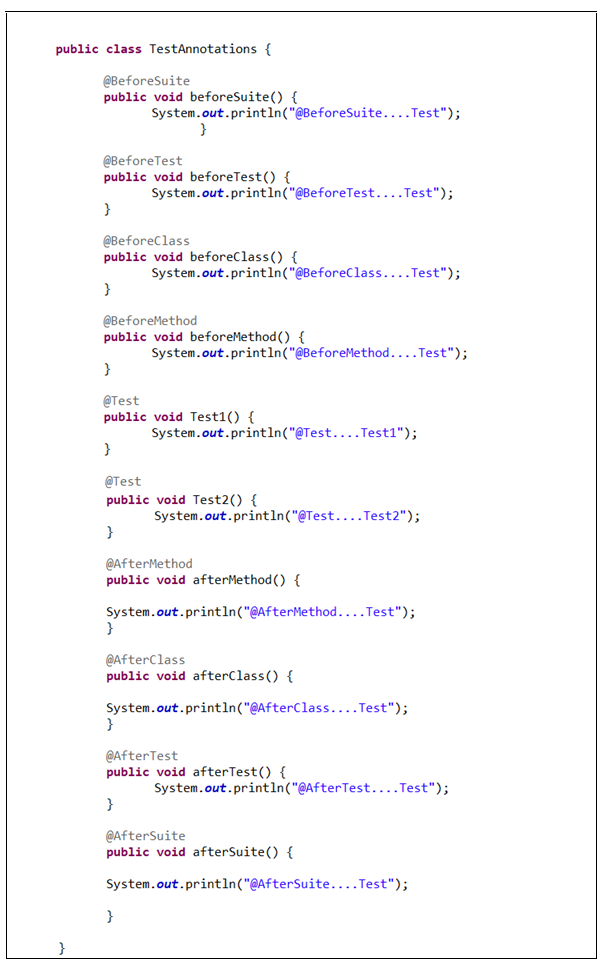
  5. Write the below code in it.
TestNG Annotations

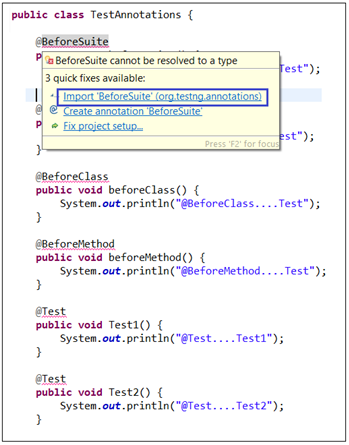
After writing the codes, you will notice that TestNG annotations are underlined with red, it means that the Eclipse IDE doesn’t know which library to refer for, just place the cursor over it, and select import from “org.testng.annotations” as show in the below screenshot to import.

How to use TestNG Annotations

An annotation is a tag that provides additional information about the class or method. It is represented by ‘@’ prefix. TestNG uses these annotations to help create a framework. Below listed are some of the most widely used annotations in test framework.

@Test

The test scripts (test methods) where the main business logic resides, should be tagged with @Test annotation. It has various attributes based on which the method can be reformed and executed which we will see later. By default, these @Test methods are executed in alphabetical order.

@BeforeSuite

A Test suite consists of multiple classes, this annotated method will be run before all the tests methods of all the classes implemented in the test suite. This annotation marks the entry point of execution. @BeforeSuite annotation in TestNG can be used to perform the needed generic functions like setting properties in configuration files and starting Selenium driver or initializing the logging procedure which are necessary. It is executed only once in the test execution hierarchy

Example:

@BeforeTest

This annotated method will be run before your first @Test annotated method in your class (and after @BeforeSuite if used  in the code) You can use this annotation to launch the browser, setting up your own customized profile for your browser etc. that are must to run the test scripts. This annotated method is executed once for every tests defined in the <test> tag in testng.xml file. (We will see what Testng.xml file in further section)

Example:

@BeforeClass

This annotated method will be run before any @Test method of that class is executed but after @BeforeTest method. We can use this to go to the application website or anything that you would like perform/ set before executing the test scripts.

Example:

@BeforeMethod

This annotated method will be run before every @test annotated method. You can use it to login to the application before executing your tests.

@AfterMethod

This annotated method will be run after every @test annotated method. You can use it to logout from the application after executing your tests. It can also be used to take screenshot of every method execution

Example:

@AfterClass

This annotated method will be run after all @Test methods of the class is executed but before @BeforeTest annotated method is run. This annotation can be used to delete cookies or some that you want to do at class level

Example

@AfterTest

This annotated method will be run after all test method belonging to the classes inside the <test> tag in testNG.xml file is run. It can be used to close the browser or anything that you want to do after the execution of all test methods.

@AfterSuite

This annotated method will be run after all tests in this suite have run. This annotation can be used to clean up the processes before completing off your tests when you have multiple classes in functioning.

Example:

You can customize all the above annotated methods as per you testing needs. To summarize these, @Before annotated method behave as pre-test conditions, @After annotated methods behave as post-test conditions and @Test annotated method is where the business logic resides and it is executed in the alphabetical order by default

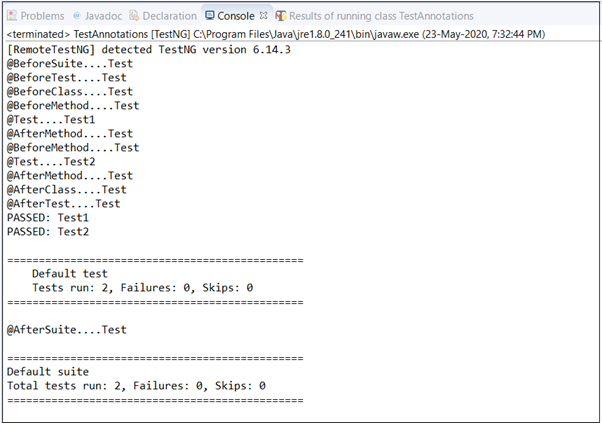
When you run the above code, the output will be as shown in the below screenshot

Example:

As explained in the above section, first all pre-test conditions are executed.

@BeforeSuite annotated method is executed only once before all other annotated methods’ execution.  

@BeforeTest:  It is executed only once since we have created only one   <test > tag defined. It is explained in the further section.

 @BeforeClass:  It is executed before any @Test annotated method execution of the current class. In the above example there is only one class so only once it is executed, next

@BeforeMethod, before every @Test annotated method. In our example we have two @Test annotated methods so twice it is executed.

Next, @Test annotated methods are executed.

Finally, post-test conditions are executed in the below order

@AfterMethod: It is executed after every @Test annotated method. In our example there are two @Test annotated methods so twice it is executed after each testcases

@AfterClass: After all the @Test annotated methods of the current classes are executed. In the above example only one class is defined so only once it is executed

@AfterTest: It is executed after all @Test annotated method from all classes have been executed

@AfterSuite is executed in the end.

Let’s see how  to execute this project in the next section.

5. How to Run TestNG Class from Command Line and Eclipse

Let’s understand how the TestNG project can be executed. Since it doesn’t contain Java main method, it can’t be run as Java Application. We can run in the below two ways.

1. Through Eclipse IDE

2. Through Command line.

How to run TestNG project from Eclipse IDE

We can use one of the below mentioned methods.

  • Run as TestNG Test
  • Create Testng.xml and execute it

Run as TestNG Test:

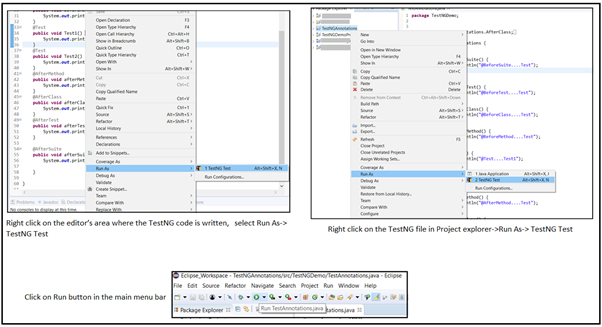
  1. From the editor’s area: Right click on the editor’s area where the TestNG code is written, select Run As-> TestNG Test.
  2. From the Package Explorer: This method can be used to run single or multiple classes.

Go to Package Explorer in the Eclipse IDE ->select single/ multiple classes/ test package, right click on it -> Choose Run As->TestNG Test

3. From the Menu bar, Click on Run button .

Refer below screenshot for the above-mentioned methods.

Different ways to run TestNG project

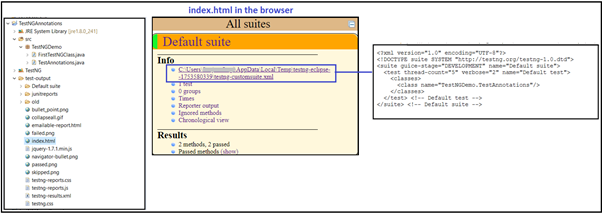
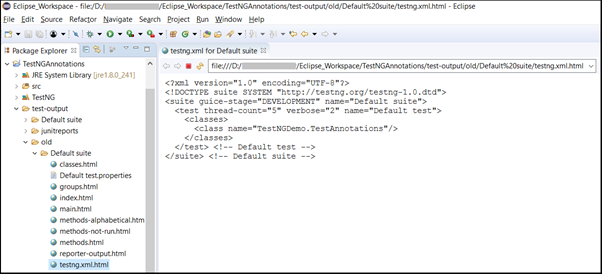
When TestNG file/files are run in the above-mentioned ways, TestNG creates a default Testng.xml file and executes the test.  This default testng.xml can be located in two places.

  1. In the index.html file
  2. Under test-Ouput folder

1. TestNG will generate a default report that can be viewed in index.html file present under test-Output folder. Right click on the Project in the Package explorer and Refresh after TestNG project is executed. Copy the path of the index.html file and open it in the browser. [Note: We will go through index.html file in detail in the further section]

2. Right click on the Project in the Package explorer and click on Refresh after TestNG project is executed. Go to test-Output folder under Project directory. Expand it, then go to old-Default suite. You will see textng.xm.html file. Open it and check the code.

How to run TestNG project through command line.

In order to run Testng.xml file through command line, we need testng.jar and jcommander.jar files.  These jar files can be searched and downloaded from https://mvnrepository.com/.

Once it is downloaded, place it in “libs” folder under your Eclipse project directory. Before we run it, we need to compile our project. The compiled code can be found in “bin” folder under the project directory. We can execute the TestNG project in two ways. Either you set the class path first for lib and bin folder and then execute or combine both the commands in one step. Both the ways are shown below. So go to command prompt,

Step 1.  set classpath=[Project Folder]\bin;[Project Folder]\libs\*   

Step 2. java org.testng.TestNG testng.xml

Or

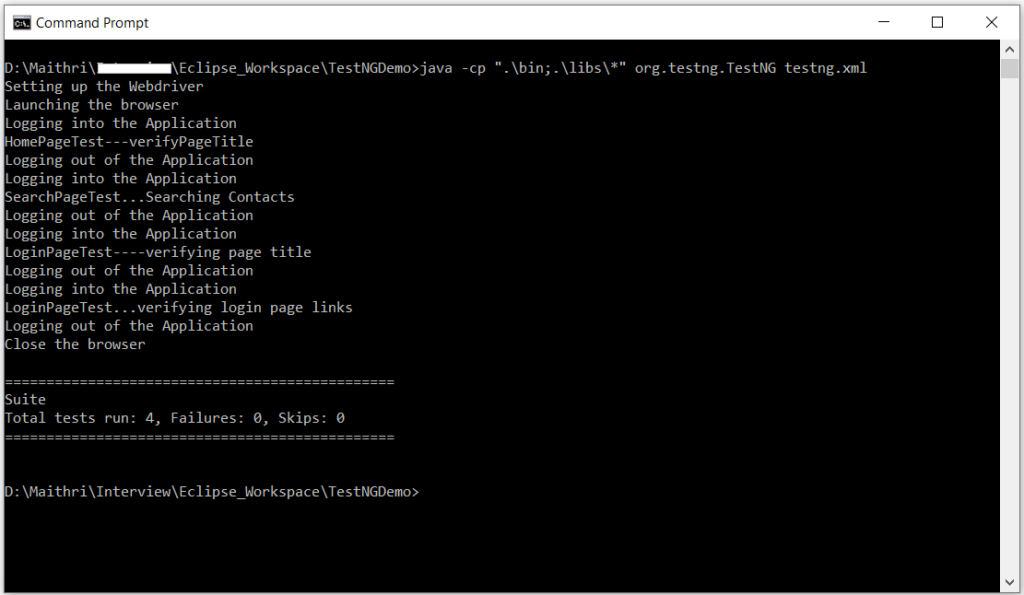
Step 1. java -cp “.\bin;.\libs\*” org.testng.TestNG testng.xml

For example:  Navigate to project folder and type the below command

or navigate to project folder and the type the below command

Text Box: java -cp “.\bin;.\libs\*” org.testng.TestNG testng.xml

We can execute multiple testng.xml files just by appending it.

Example:

Please refer below screenshot for command line execution

In the next section, we will see how to create Testng.xml and execute it through Eclipse IDE .

4. How to create and run TestNG project through Testng.xml

TestNG.xml file is a configuration file that helps organizing our tests. It allows testers to create and handle multiple test classes, define test suites and tests. Also, we can achieve parallel testing and parameterize test cases through Testng.xml which we will see later sections. Let’s see how to create tesng.xml file.

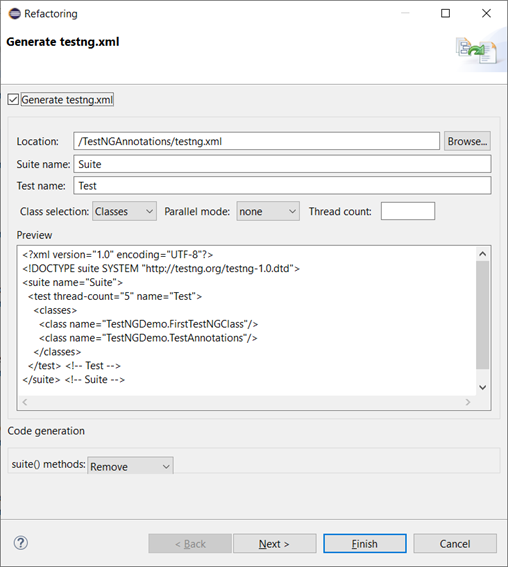
Go to project folder, right click on it, select TestNG option listed and click on Convert to TestNG as shown in the below screenshot.

On clicking “Convert to TestNG” option, you will see the below dialog box as shown in the below screenshot. Click on Finish button to finish .

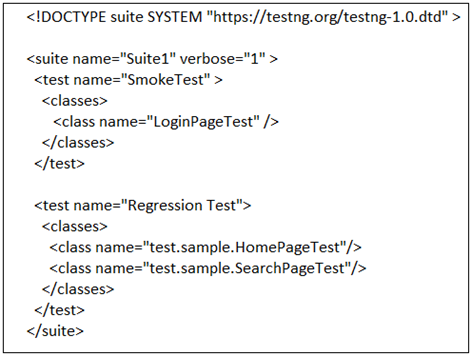
Here is the sample of testng.xml file

Example 1:

Let us understand the different components of testng.xml file.

Suite: A Suite is represented by one XML file. It can contain one or more tests and is defined by the <suite> tag. Example:

verbose: It is used to log the execution details in the console. The value should be 1-10. As you increase the value of verbose attribute, you will get more detailed log in the console window.

Test: A Test is represented by <test> and can contain one or more TestNG classes.Example:

Class : TestNG class is a Java class that contains at least one TestNG annotation. It is represented by the <class> tag and can contain one or more test methods.Example :

Test Method: A Test method is a Java method annotated by @Test methods in the source file. Example:

Example 2

We can specify package names instead of class names: In this example, TestNG will look at all the classes in the package “test.sample” and will run only classes that have TestNG annotations.

How to Run Testng.xml in the Eclipse IDE

Select the testng. xml file in the package explorer, right-click on it, move to Run As option and then select TestNG suite option.

How to create multiple classes, packages and execute TestNG suite

  1. Launch the Eclipse IDE, create a Java project, create two packages under src folder. Say Basic Features and TestUtility.
  2. Create three classes in Basic Features package say LoginPageTest.java, HomePageTest.java and SearchPageTest.java
  3. Create one class in TestUtility package, say BaseTest.java
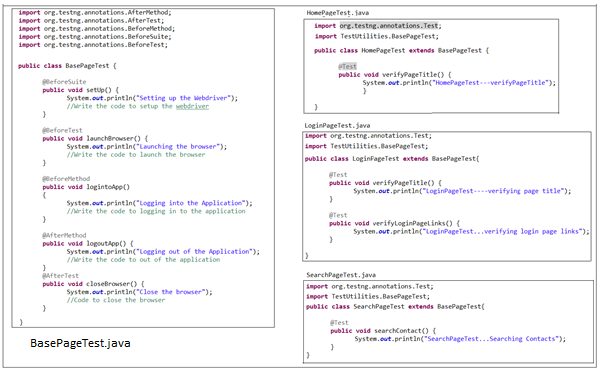
  4. Write the below codes in the classes
  5. Create Testng.xml and execute it.

Refer below folder structure in the Package Explorer

Now, write the below codes in the respective class files as shown below

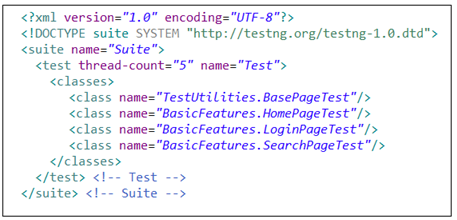
Next, create testng.xml file as shown below

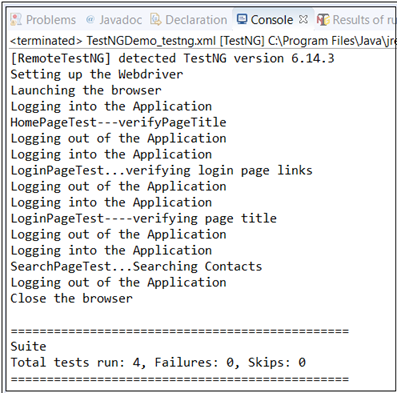
Now, execute the testng.xml file and you will see the below output

Let’s have a look at the execution order in the above project.

First, all pre-test Conditions are executed . In the above example, it is defined in BasePageTest.java and is executed in the below mentioned order

  1. @BeforeSuite: It is executed before executing any of the @Test annotated methods and any @Before annotated methods. It is executed only once.
  2. @BeforeTest: It is executed before all the classes included in the test included in  <test> tag. In the above case it is <test thread-count=“5” name=“Test”>. Thread count is used in parallel testing, it can be excluded.
  3. @BeforeMethod: It is executed before every @Test annotated method in all the classes that have extended BasePageTest class.

Next, @Test annotated method where the business requirement resides are executed. That is after pre-test annotated methods,

  • @Test: @Test annotated methods are executed as per the classes organized in Testng.xml. In the above case, it will execute first all @Test annotated methods in SearchPageTest.java, then from LoginPageTest.java and finally HomePageTest.java. And within the class, it is executed in alphabetical order.

Then, all post-test conditions are executed

  • @AfterMethod: It is executed after every @Test annotated method. In our example there are four @Test annotated methods so it is executed after each @Test methods.
  • @AfterTest: It is executed after all @Test annotated method from all classes have been executed

 It is not necessary to use all the annotations, So based on testing needs these annotations, classes and tests should be defined.

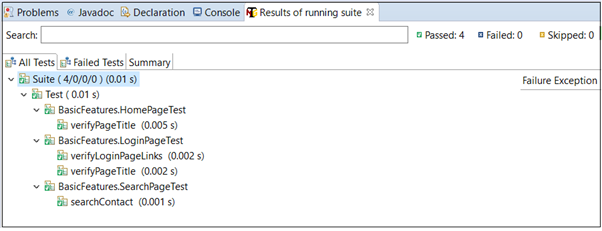
View the test execution results in the Results of running suite tab

We can create multiple testng.xml files for different test phases and create test suite as per the testing needs. Example: RegressionSuite.xml, SmokeTestSuite.xml etc.

In the next section, we will see how to create Maven project and integrate TestNG with Selenium Webdriver code.