Where we learn technology

Day: 20 May 2020

What is OAuth 2.0?

What is OAuth 2.0?

First Question that will come to everyone’s mind “is it Authentication or Authorization”?


Well, it is Authorization, to be precise Authorization between services. Now next doubt that would arise is why the services would be communicating with each other, generally in API environment what happens is, it is actually user and API exchange information or vice-versa. 

But hold on, when there are two or more services along with the user involved in communication, then there should be some way so that the services should know each other at least an introduction!! to whom they are dealing with and this introduction happens on behalf of user with the help of “Token” and this whole process in known as OAuth2.0.

Example:

Let say there are three entities user, App1 and App2 User wants to use one feature of App1 but that feature in App1 will require some input data(say file, videos etc). This data is actually stored in App2(suppose in google drive). 

Now the user wants that App1 should directly communicate with App2 take the required data from there and use it, what the user is actually interested is “End Result”.

Given the scenario now we can dive in to more technical aspect.
Resource Owner -> The user is resource owner.

Client – > App1 is the client because it is actually using some features/services of App2.


Client ID -> It is the unique identifier by which App2 remembers App1. It is used to keep track of an api because there may be times when App2 will be communicating with different api’s.


Client Secret -> It is like a password of a particular client ID store at App2.
Resource Server -> It is primarily used to generate Access token requested by any api so that particular api can use this access token in order to request to access a resource from target api.


AuthServer -> what is this??? his name was mentioned in our example. This server is actually sometimes is part of Resource Server. It is responsible to generate the “Token” used for Authorization. 

Auth server is sometimes part of api and sometimes not it totally depends upon the architecture of api. As a real time example of this – When we try to login to any website using google/facebook login, in backend this auth server is used for Authorization purpose.

Grant Types – There are generally two types of grant types in OAuth2.0


a) Authorization Code – The Authorization code grant type is used by confidential and public clients to exchange an Authorization code for an access token.

b) Client Credentials – It is used by clients to obtain an access token outside of context of a user. This is typically used by clients to access resources about themselves rather than to access a user’s resources.

c) Refresh Token – The Refresh Token grant type is used by clients to exchange a
refresh token for an access token when the access token has expired. This allows clients to continue to have a valid access token without further interaction with the user.


d) Device Flow – It is used for Authorizing apps on devices that don’t have a web
browser.


In this blog we will be discussing Authorization code grant type which is most widely used in
general. 

Please refer below diagram for the same:


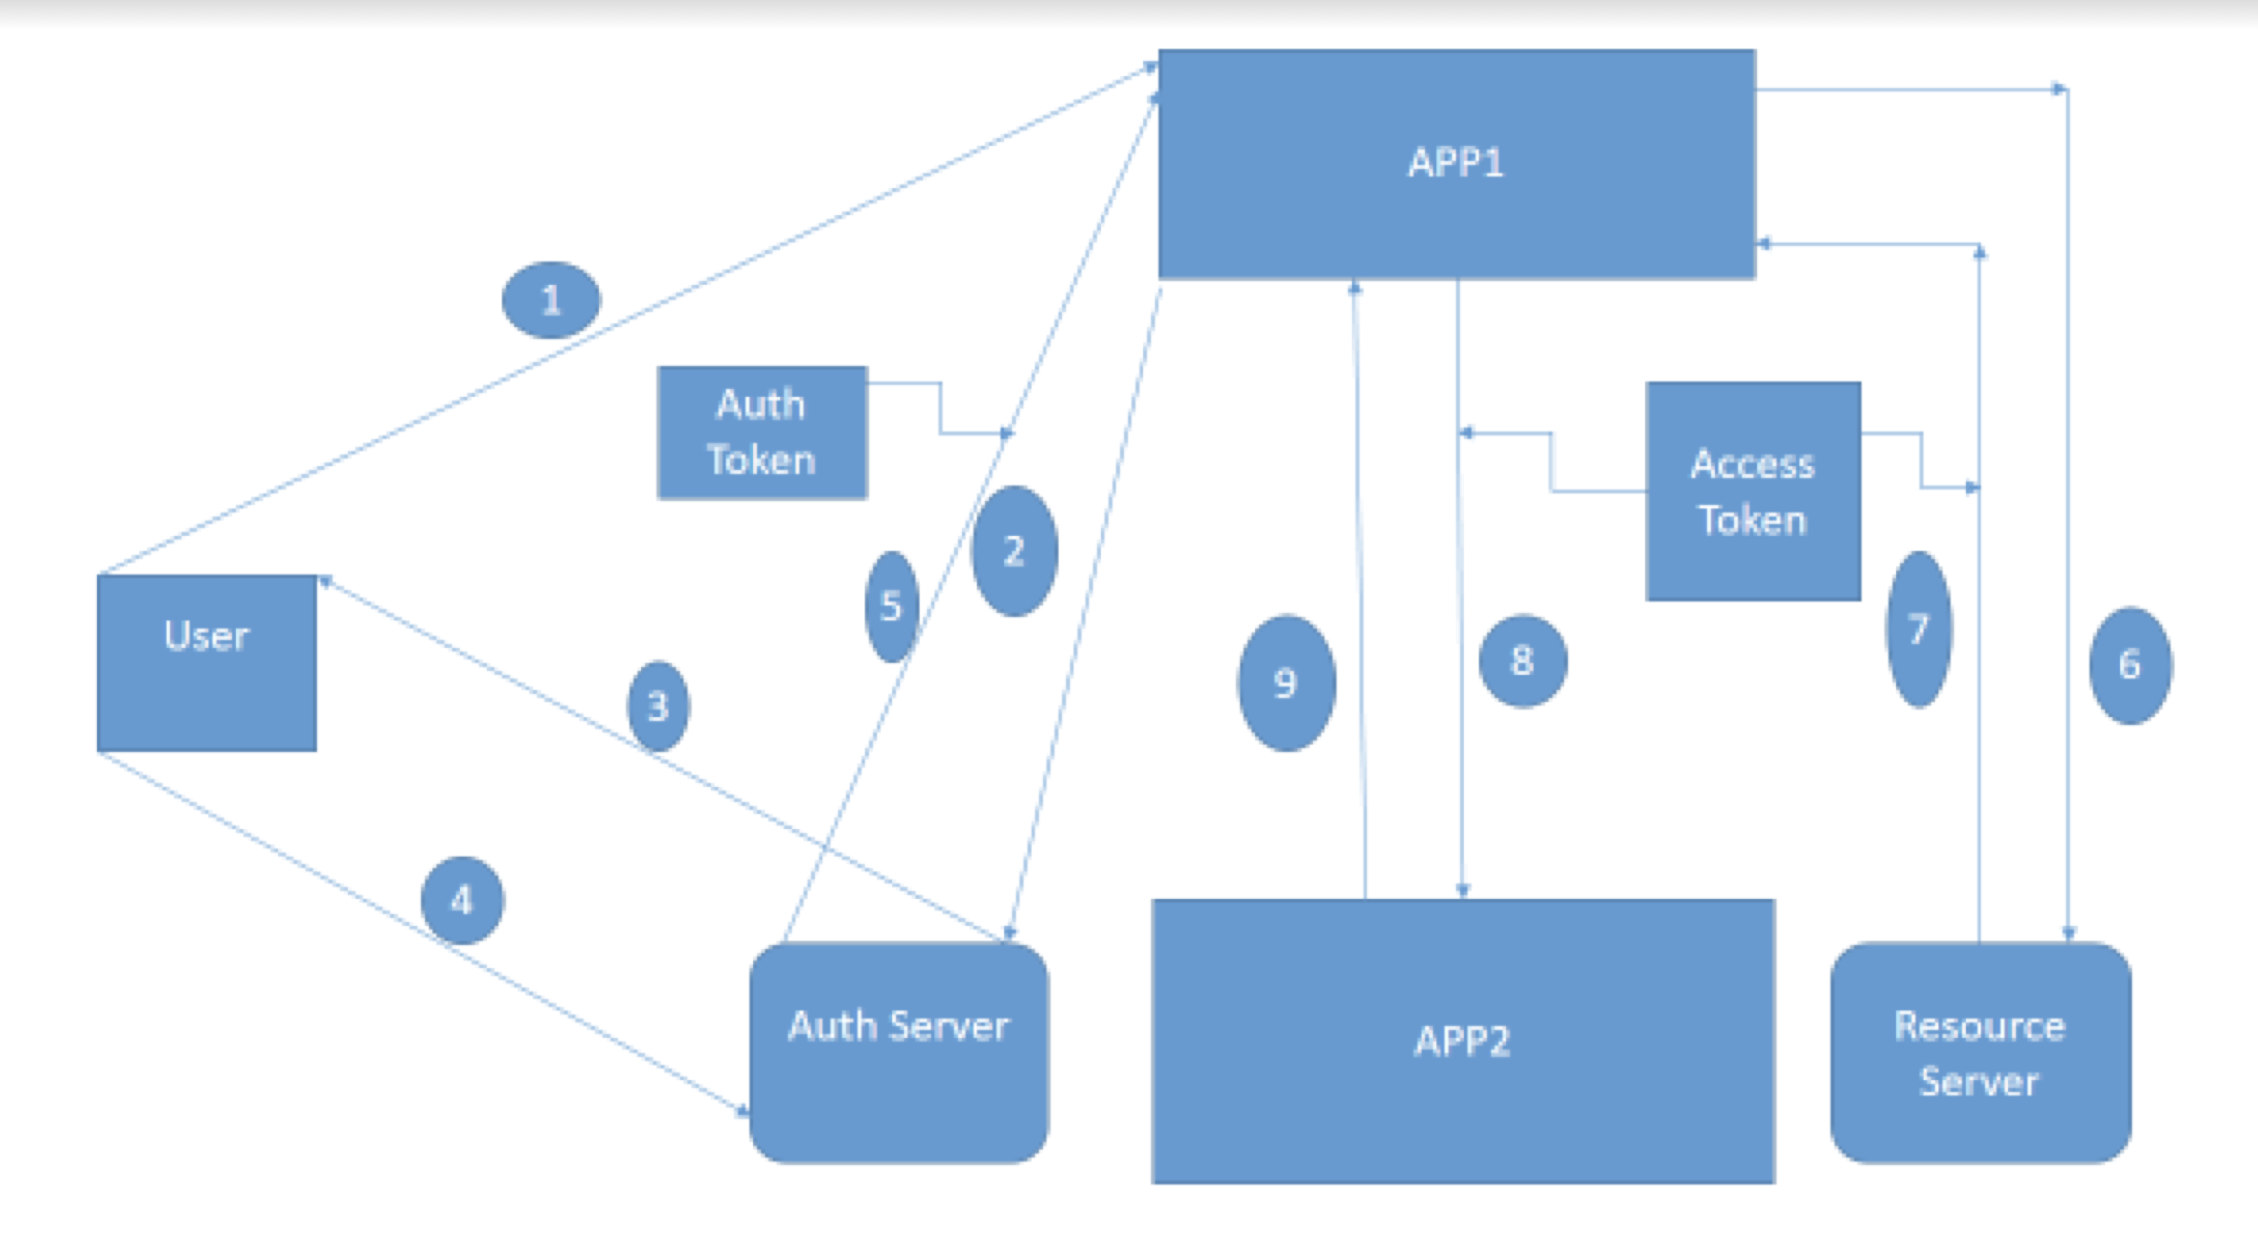
  1. User sends a request to App1 to do some task.
  2. App1 need some input from App2 so it will contact Authorization
    server (Auth Server) to have access for the same.
  3. Auth Server will say to App1 wait who are you I don’t you, let me
    check with my user.
  4. User will check the message from Auth Server and will say yes it is
    a legit request from App1 please do the needful.
  5. Auth Server will say Ok, fine and it will give one “Auth Token” to
    App1. One important point here “By Auth token App1 is only
    authorized to use the neccessary functionality/api of App2 i.e. to get
    some data required here, it is not entitled to access anything extra”.
  6. App1 – Thanks for the Authorization Auth Server, App1 will contact
    Resource Server in order to have Access token to access a particular
    resource in App2.
  7. Resource Server – Sure, please find your “Access Token”.
  8. Using this access token App1 will sent a request to App2.
  9. App1 will finally get the response from App2.
    ** Here Access Token for more security point of view else it can happen that these auth
    token can be used by some other applications.
    ** The Access token are not mandatory to use in Javascript applications.

Real time examples of OAuth2.0:


Let us go to bookmyshow.com and try to sign in –

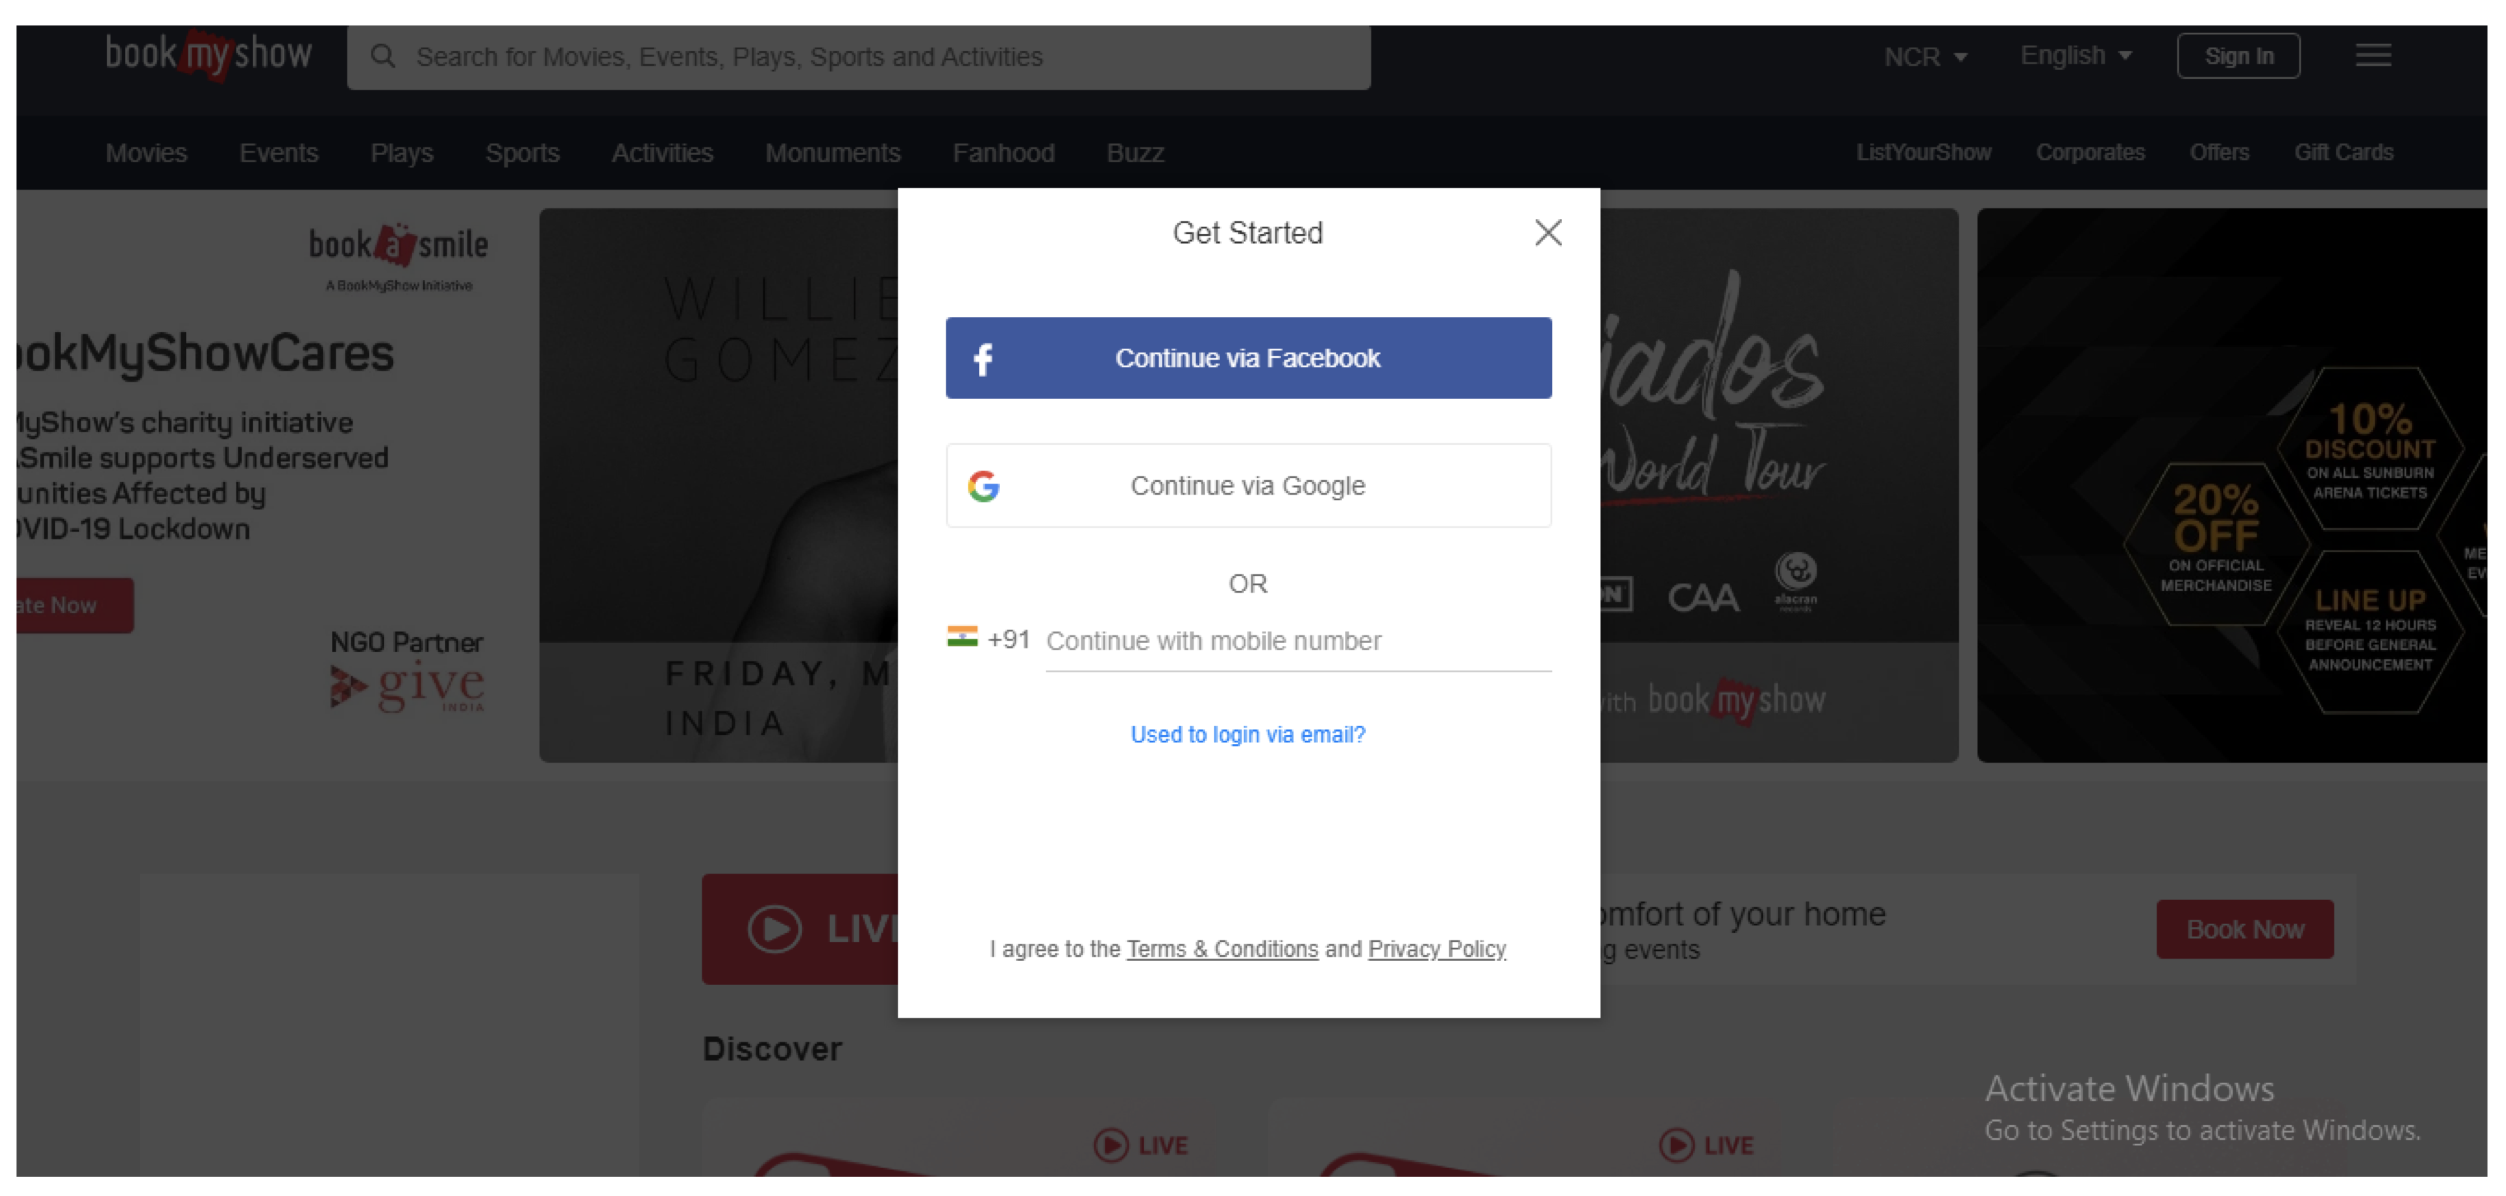
Here we are seeing an option like Connect via Google or Connect via Facebook. Suppose if we click on Connect via Google, will be redirected to –

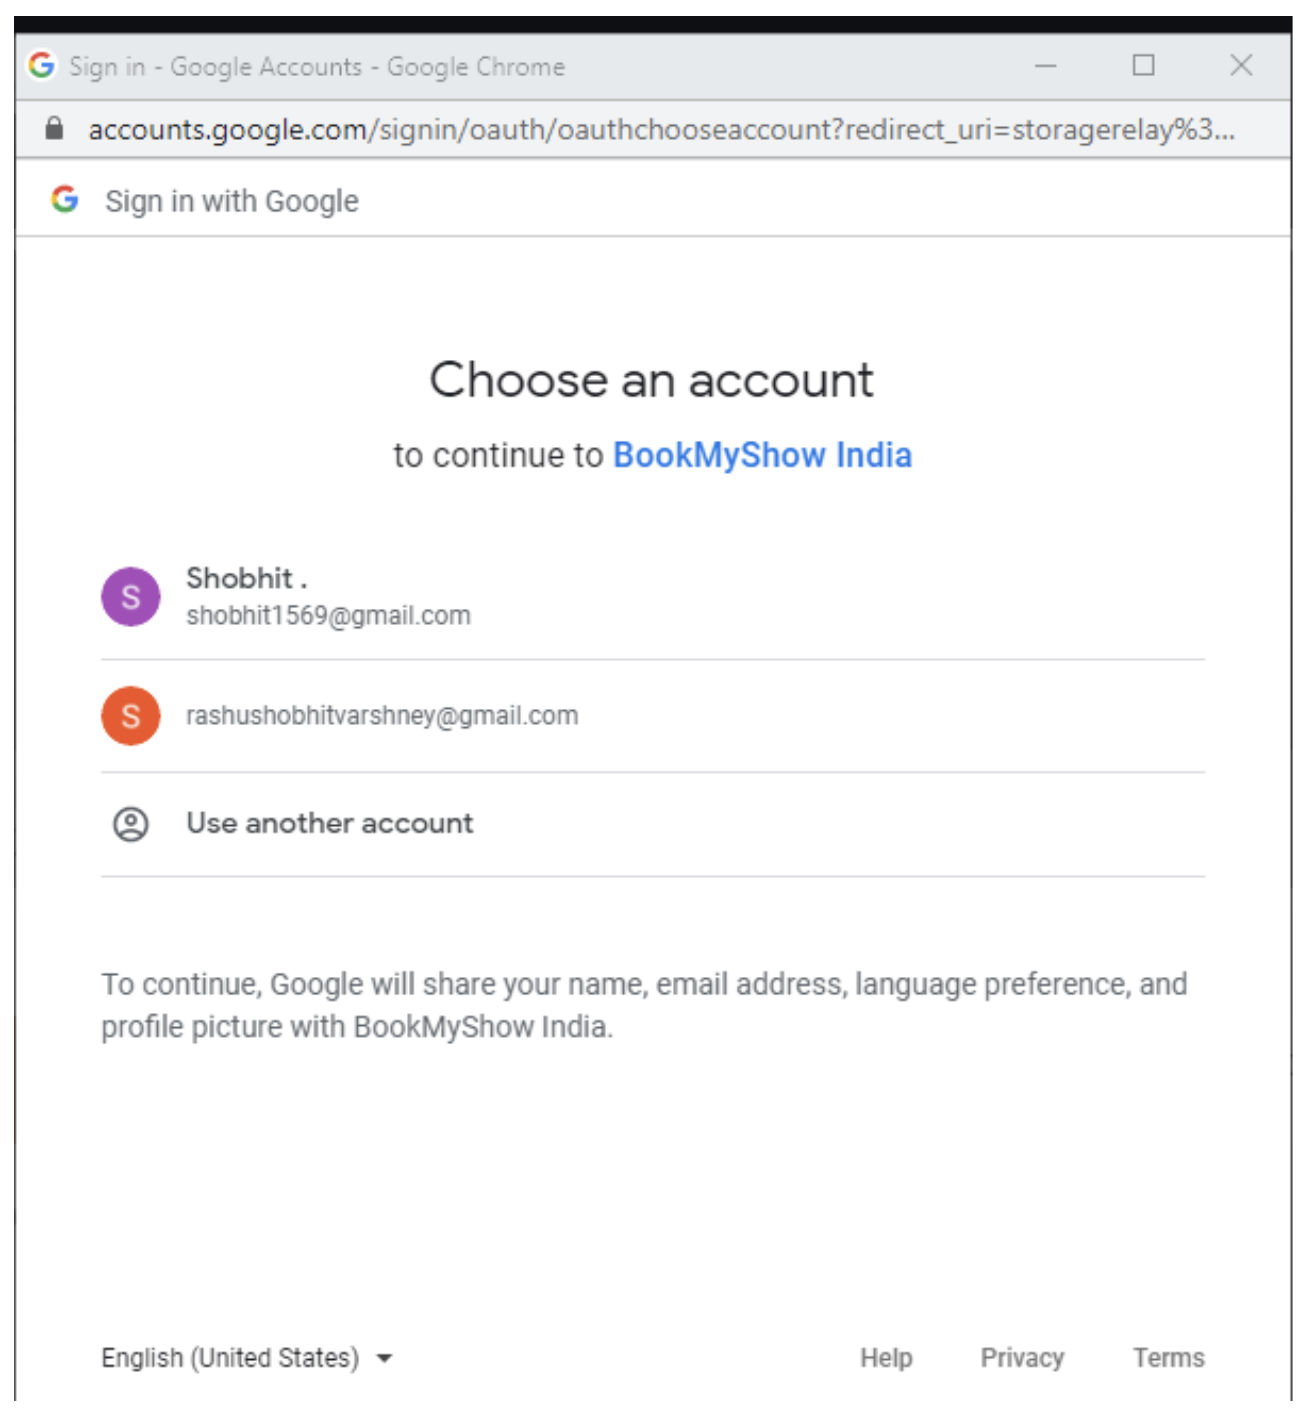
This is all based on OAuth2.0 mechanism, if we sign in to our google account we are giving access to bookmyshow to use our information. Similarly there are other websites which works on the same principle like makemytrip, cleartrip etc.


What are Bearer Tokens?
Bearer token are simple String which are used for authentication for API’s request and is sent in Header of a request. These tokens doesn’t require cryptographically signing of each request (this is the case in OAuth1.0) and are more easier way of making api request. 

As bearer token consists of simple plain text and can be vulnerable to security that’s why it is always recommended that API requests consisting of bearer token should be made over an HTTPS protocol.

Difference between OAuth1.0 and OAuth2.0?

We will see differences between these Authorization framework on basis of below
parameters:

  1. Authentication & Signatures:
    OAuth1.0 is based on cryptographically signing each request and is more complex to implement. OAuth2.0 is based on bearer token and is easier to implement.
  2. User Experience and alternative token issuance options:
    Initially OAuth1.0 has three flows i.e for web apps, desktop clients and mobile devices. But it was turned out that it only worked out fine with web apps. OAuth2.0 address this problem by introducing multiple flows called the grant types.
  3. ** Flows – The methods of obtaining an access token are called flows.
  4. Performance: OAuth2.0 performs better than OAuth1.0 when the api is scaled up.
  5. Bearer Tokens:
    OAuth1.0 have two parts in access token a public and a private string. Private string was used while signing the request, never sent across to other api.
    OAuth2.0 has only Bearer token which is a simple public string which is used in API requests.
  6. Life of Tokens:
    OAuth1.0 had long-lived tokens.
    OAuth2.0 have short-lived tokens and a long lived refresh token (this allows apps to obtain new access tokens without involving the user again).
 
Hope you got idea about OAuth2.0 Authorization.


Cheers!!
Naveen AutomationLabs

Blog Contributors:

This blog is written by Shobhit Varshney.

https://www.linkedin.com/in/shobhit-945298101

Reviewer: Naveen Khunteta

Actions Class in selenium WebDriver for User Actions

1.Overview

In this article, we are going to explore the most fundamental phenomenon that is Actions class in selenium WebDriver.

2. Actions Class

  • We have performed single actions like sendKeys, click event till now.
  • But there are events where we need to perform multiple actions like drag and drop, right-click or pressing a key from the keyboard etc.
  • So here comes the Actions class to deal with such composite actions.
  • By selenium documentation, they have defined the Actions class as:

Actions Class
  • In simple terms, Actions class handles various types of keyword and mouse events and is available under package 
import org.openqa.selenium.interactions.Actions;
  • Syntax:
Actions actions = new Actions(driver);
  • For creating an object of an action class, you need to pass the driver object to the constructor of action class like the following :

Methods in Actions Class

Now, you can perform any composite actions as shown above with the action object. We will see a couple of examples below where composite actions are being performed.

To Note: There are two major methods in actions class are build and perform.

build() compiles all the steps into a single step and then perform() executes the step, also for single-step perform() method can be used, then there is no need to execute the build() method.

3. Mouse Hover with Actions class

  • A mouse hovers cause an event to trigger actions such as where a user places a mouse over a particular element like hovering over a tab or link. 
  • moveToElement is the method used for hovering action:

Mouse Hovering Methods

Let’s understand moveToElement(WebElement target) by code:

package com.selenium.sessions;

import org.junit.jupiter.api.Test;
import org.openqa.selenium.By;
import org.openqa.selenium.WebDriver;
import org.openqa.selenium.WebElement;
import org.openqa.selenium.chrome.ChromeDriver;
import org.openqa.selenium.interactions.Actions;

/**
 * 
 * @author Mandeep kaur
 * @Date May 19,2020
 */
public class ActionClass {

	@Test
	public void performsActionClass() throws InterruptedException {

		String path = System.getProperty("user.dir");
		System.setProperty("webdriver.chrome.driver", path + "/src/main/resources/chromedriver");

		System.setProperty("webdriver.chrome.silentOutput", "true");
		WebDriver driver = new ChromeDriver();

		driver.get("https://www.makemytrip.com/visa/");

		// Locate more element on the web page
		WebElement moreObj = driver.findElement(By.xpath("//li[10]/a/span[2]/span[1]"));

		Thread.sleep(1000);

		// Locate International Hotels once hovered over more element
		WebElement moveToInternationalHotels = driver.findElement(By.xpath("//li[10]/div/a[3]"));

		Actions action = new Actions(driver);

		// hover to More element then hover to International hotel and build the steps
		// in singe unit and perform the step
		action.moveToElement(moreObj).moveToElement(moveToInternationalHotels).build().perform();

		Thread.sleep(1000);
		driver.close();

	}

}

Explanation :

First, we found out the elements where mouse hovering is required i.e more element and other is International hotels.

Then we are hovering over these elements with the moveToElement method, post that we build these steps it in a single unit using build() method and execute it with perform() method.

And we can see the above code output as:

Now, Let’s proceed with other method moveToElement(target, xOffset, yOffset);

This method is used to take the mouse on particular points on target elements.

The following is an example to deal with a slider:

Now the scenario is we need to move this slider, but how do we do that?

Let’s see the below code first to achieve this task:

package com.selenium.sessions;

import org.junit.jupiter.api.Test;
import org.openqa.selenium.By;
import org.openqa.selenium.WebDriver;
import org.openqa.selenium.WebElement;
import org.openqa.selenium.chrome.ChromeDriver;
import org.openqa.selenium.interactions.Actions;

/**
 * 
 * @author Mandeep kaur
 * @Date May 19,2020
 */
public class ActionClass {

	@Test
	public void moveToElementOffset_whenSuccess() throws InterruptedException {

		String path = System.getProperty("user.dir");
		System.setProperty("webdriver.chrome.driver", path + "/src/main/resources/chromedriver");

		System.setProperty("webdriver.chrome.silentOutput", "true");
		WebDriver driver = new ChromeDriver();

		driver.get("https://jqueryui.com/slider/");

		// Get the location of IFrame
		WebElement iFrame = driver.findElement(By.xpath("//iframe[@class='demo-frame']"));

		driver.switchTo().frame(iFrame);

		// get the slider element
		WebElement slider = driver.findElement(By.xpath("//div[@id='slider']"));

		// Get the location of X,Y coordinates
		System.out.println(slider.getLocation());

		Thread.sleep(1000);

		Actions action = new Actions(driver);

		// move the element on target by X , Y coordinates
		action.moveToElement(slider, 8, 8).click().build().perform();

		Thread.sleep(1000);

		driver.close();
	}

}

Let’s break the code into the statement to get the clarity of the concept:

  1. First, we need to locate the frame, as the slider is present in the frame.

Let’s discuss little about iFrames, what are these:

  • iFrames stands for an inline frame. It is like another web page within a web page. 
  • In this case, a different document is used to embed within the current HTML document.
  • when you execute any method say findByElement for an element present in an iFrame, it will throw an exception as an element not found. 
  • For this, we first need to switch the focus to the frame to get the Element.
  • Syntax: driver.switchTo().frame();

Switching to Frame

And most importantly how we will get to know that frame is present or not, for that you need to right-click on the element and you will get View Frame Source like below

And in DOM you will get to see an iFrame tag

where <iframe> tag states an inline frame.

We can switch to the frame by index , by frame name or id or by WebElement.

2. In the above code, we have to switch the frame with WebElement.

3. Find the target element and get the location of X and Y coordinates by using getLocation().

4. Once we got the coordinates then we can slide the cursor accordingly by passing the target, x and y coordinates:

action.moveToElement(slider, 8, 8).click().build().perform(); 

 As can be seen below our slider has moved with coordinates given:

4. Drag And Drop with Actions Class

Now, there are situations where we need to perform drag and drop operation. We can also perform this scenario with the action class.

  • There is a method called dragAndDrop which drags a source element and drops on a target element.
  • We need to solve the scenario given below

Drag and Drop Image

So, here we just have to put “Drag me to my target” box to “Dropped!” box

Let’s do it by code:

Code for Drag and Drop

package com.selenium.sessions;

import org.junit.jupiter.api.Test;
import org.openqa.selenium.By;
import org.openqa.selenium.WebDriver;
import org.openqa.selenium.WebElement;
import org.openqa.selenium.chrome.ChromeDriver;
import org.openqa.selenium.interactions.Actions;

/**
 * 
 * @author Mandeep kaur
 * @Date May 19,2020
 */
public class ActionClass {

	@Test
	public void dragAndDropExample_whenSuccess() throws InterruptedException {

		String path = System.getProperty("user.dir");
		System.setProperty("webdriver.chrome.driver", path + "/src/main/resources/chromedriver");

		System.setProperty("webdriver.chrome.silentOutput", "true");
		WebDriver driver = new ChromeDriver();

		driver.get("https://jqueryui.com/droppable/");

		// Get the location of IFrame
		WebElement iFrame = driver.findElement(By.xpath("//iframe[@class='demo-frame']"));

		driver.switchTo().frame(iFrame);

		// get the source element 
		WebElement source = driver.findElement(By.id("draggable"));

		// get the target element 
		WebElement target = driver.findElement(By.id("droppable"));

		Thread.sleep(1000);

		//create an object of Action class
		Actions action = new Actions(driver);
		
		// perform drag and Drop operation
		action.dragAndDrop(source, target).build().perform();

		Thread.sleep(1000);
		
		driver.close();

	}

}

So, it’s pretty clear from the above code that first it requires us to switch to the iframe as the elements are present in an iframe. Then we have to find our source and target element and just perform dragAndDrop Operation on it as has been done for you above.

And the output will be shown as follows:

 We can also have another example where certain actions need to be performed from Keyboard. User has to send some inputs from the Keyboard.

Let’s see this happening in the following example in the code:

As described in the above code, first we find the elements where keyboard actions have to be performed then with movetoElement function we move to userName element and KeyDown function to  press the shift key and sending the userName in upper case, post that KeyUp function  to  release the shift key and next we are highlighting the userName

In the end, we are clicking on signUp button with the help of Enter Key.

package com.selenium.sessions;

import org.junit.jupiter.api.Test;
import org.openqa.selenium.By;
import org.openqa.selenium.Keys;
import org.openqa.selenium.WebDriver;
import org.openqa.selenium.WebElement;
import org.openqa.selenium.chrome.ChromeDriver;
import org.openqa.selenium.interactions.Action;
import org.openqa.selenium.interactions.Actions;

/**
 *
 * @author Mandeep kaur
 * @Date May 19,2020
 */
public class ActionClass {

@Test
public void keyBoardEvents_whenSuccess() {

String path = System.getProperty(“user.dir”);
System.setProperty(“webdriver.chrome.driver”, path + “/src/main/resources/chromedriver”);

System.setProperty(“webdriver.chrome.silentOutput”, “true”);
WebDriver driver = new ChromeDriver();

driver.get(“https://www.facebook.com/“);

WebElement userName = driver.findElement(By.xpath(“//*[@name=’firstname’]”));

WebElement signUp = driver.findElement(By.xpath(“//*[@name=’websubmit’]”));

// In this step, we are moving the userName element and KeyDown function press
// the shift key and sends the userName and KeyUp function perform release the
// Key and next we are highlighting the userName


Actions builder = new Actions(driver);
builder.moveToElement(userName).click().keyDown(userName, Keys.SHIFT).sendKeys(userName, “testuser”)
.keyUp(userName, Keys.SHIFT).doubleClick(userName).build().perform();

// Enter the sign up keys after we passed the userName

signUp.sendKeys(Keys.ENTER);

driver.close();
}
}

5.Conclusion

In this article, we learnt about Actions class and how we can perform various composite actions using actions classes.

Thanks for reading it! 

Cheers!!

Naveen AutomationLabs

Blog Contributors:

Author:  Mandeep Kaur

Mandeep, having 5+ years of Testing experience in automation using Selenium (Java). Expertise in API and Performance testing using JMeter.

https://www.linkedin.com/in/mandeepkaur93

Reviewer: Naveen Khunteta

https://www.linkedin.com/in/naveenkhunteta